Skip to Content

Satsuma Designs

❤️ Living to create the BEST. DAY. EVER. Gift giving, parties + crafting daily moments for giving and gratitude, find your inspiration at Satsuma Kids Shop! http://www.satsumadesigns.com

DIY Kitty Cupcake Toppers

DIY Kitty Cupcake Toppers for Less
I had the privilege of hosting a dear friend’s daughter’s birthday at Satsuma Kids Shop recently. The theme was kitties and we went for it! With lots of delightful kitty theme birthday supplies found on Etsy and party supply shops like our local Party City, I wanted to round out the mix with a handmade token of fun.
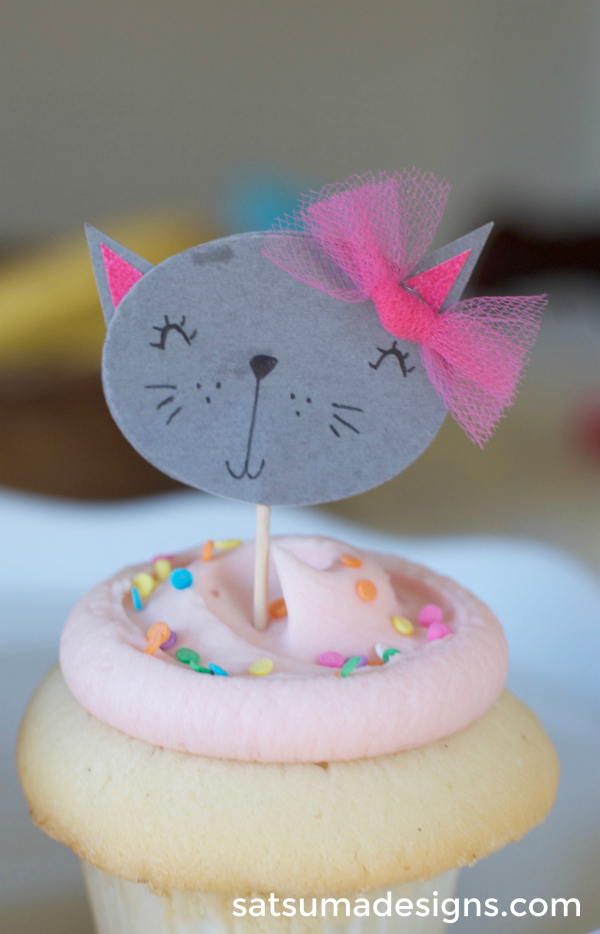
As the birthday theme featured sweet gray kitties, I wanted to find matching cupcake toppers to adorn our favorite cupcakes from our friends at Cafe Javasti in Seattle. I did some research and found that the only gray kitties ran $10 per dozen, which was more than I wanted to spend with the other decorations I had in store.

I turned to my craft supply bin and started pulling materials.

My small oval paper punch was the perfect kitty shape and would work well for puppies too! Next, I went to my scrap paper magazine holder. I use Ikea’s FLUNS paper magazine holders for all of my paper and 9″x12″ packaging supplies.
I found the back of an old notebook that was the perfect color gray. I also pulled a piece of pink and green card stock to use on the back of my gray kitty cupcake toppers. You can see that I found everything on hand without spending a dime. You can too! Find out how I made my DIY kitty cupcake toppers for less.
Here’s what you need to make your own kitty cupcake toppers

Gray card stock | My favorite paper store Impress Cards and Crafts in Seattle has the best selection of card stock for just $.49/sheet. If I didn’t have supplies on hand, I would be set for $1.
Coordinating pink, white or other color card stock for backing (optional)
Oval paper punch in whatever size you like. I used a 1 5/8″ punch bunch paper punch.
Scissors
Black ink pen – I use Sarasa pens in a .7 tip
Colored pencils
Toothpicks
Glue stick or hot glue gun
Narrow ribbon (optional)
Tulle (optional)

Here’s how to make your own kitty cupcake toppers
Start by punching out your kitty faces and back. Make as many as you need and then make some more! They are adorable and cute to send new ones home as party favors.
Now cut little ears from your gray card stock.
Draw your sweet kitty faces on the gray ovals. Use my examples as a guide, but be true to your kitty self and make them your own.
Now slather glue on the back of the kitty face and apply the ears carefully.
Place your toothpick or lollipop stick in the center of the kitty face and place the back onto the face.
Press the front and back pieces together to ensure that the glue is holding.
Add ribbon bows or tulle bows as desired.
That’s it! Enjoy your kitty cupcake toppers. I know your little kitty will!
Share your fun with tag #satsumasmiles and follow me on Pinterest, Instagram and Facebook. See you there! 

Grow a Living Easter Basket

Grow a Living Easter Basket
Springtime brings so many moments to savor in nature: blue skies, chirping birds, gentle (haha) Seattle rain and bursting blossoms in every neighbor’s garden bed. For extra springtime enjoyment, I’m sharing how to grow a living Easter basket that you can use for Easter fun and through the season.
This easy to create living Easter basket makes a perfect kids craft and is a lot of fun to watch grow over a short week of sunlight near a picture window. Your little bunnies will love planting their wheat grass seeds, watering their basket and waiting just a few days to watch the seeds germinate.
If you’d like to use these for kiddos’ Easter baskets, simply do this project on the DL and hide your work. Find a quiet window in your home and set the baskets there to germinate and grow.
You are welcome to trim your grass if it grows beyond your needs and have fun with the process!
Here’s what you need to grow your own living Easter basket

Planting container – try any fun waterproof container including a plastic bucket, galvanized bucket, a glass vase – there are endless possibilities here! Use a container with a wide opening so you can place your Easter goodies in there and the grass has enough surface area to grab sunlight and grow, grow, grow!
Wheat grass seeds
All purpose potting medium – this is a fancy term for a special soil mixture that helps the wheat grass grow quickly.
Water

Here’s how you make your own living Easter basket
For our living Easter baskets that we sell at Satsuma Kids Shop in Seattle, we use a 10″ diameter plastic basket filled 3/4 full with potting medium.
If you would like to add a small potted plant into your large sized basket, push a LARGE mason jar into the potting medium to create a ‘cavity’ that you can use for your small potted plant (4″ pot). Once your seeds start to germinate, you can pull the mason jar from the soil and replace with your small potted plant.
You’ll sprinkle your wheat grass seeds on top of your potting medium.
Then add 6 cups of water.
Set your basket next to a window for indirect lighting and wait.
Approximately 4 days later your grass will start to germinate and a week after that you’ll have a full basket of grass.
Your baskets don’t need to be watered as the potting medium retains water very well. If you decide to add a little potted plant, please do water this.
How to use your Living Easter Basket this season

Easter brunch centerpiece
Easter baskets for the kids
May Day baskets for your favorite neighbors
Teacher appreciation baskets
Create a trio of living Easter baskets for Easter brunch buffet
Make large Living Easter baskets for your church or place of worship to celebrate spring
Baby shower decor

Find more fun at Satsuma Designs! 
Share your fun with tag #satsumasmiles and follow me on Pinterest, Instagram and Facebook. See you there! 

DIY Bunny Easter Bags

DIY Bunny Easter Bags
It is so fun to celebrate springtime with crafting and DIY. This easy DIY Bunny Easter Bag is both adorable and easy. With a few dollar store supplies, I whipped this up in the amount of time it took to heat up my glue gun!
Fill these DIY Bunny Easter Bags with any number of dollar store or handmade treats. And these bunny Easter basket accessories – ears and tail – can be repurposed when the holiday ends. Add the ears to hair clips and the fluffy tail to a hair tie and you have a great new hair accessory set.
This little bunny set makes great dress up costumes for pretend playtime.
Here’s what you need to make your DIY Bunny Easter Bags

Dollar store gift bags in pink, white, gray
Scrap felt in pink, white and gray
Gray yarn to make a pom pom
Jumbo cotton balls
Fine tip Sharpie
Hot glue

Here’s how you make your DIY Bunny Easter Bags
Start by cutting out your ears. Layer an inner ear with an outer ear for the cutest result. Try short ears like you see on the pink bag and long floppy bunny ears like you’ll see on the white bag.
Now make your yarn pom pom tails if needed. Try this pom pom visual tutorial.
Next, draw your sweet bunny faces on the Easter bags.
Glue your fluffy tails and floppy ears to your bag and you’re done!

DIY Paper Gift Bag

DIY Paper Gift Bag

Presenting a gift in a gift bag is one of my favorite gift wrapping options. I love the flexibility of a gift bag as there are no awkward corners to try to fold wrapping paper around. I was inspired by this adorable springtime paper I found at my Daiso Dollar Store. If you haven’t visited a Daiso yet, make a plan! Here’s a Daiso store locator map where I noticed retail store concentration in larger metropolitan areas.
Daiso is a Japan-based value retailer that sells everything for around $1.50. A bit more than our traditional dollar store, but well worth the couple of extra quarters you’ll shell out. I cannot tell you how fun and festive a visit to Daiso feels. Go and enjoy!
Here’s what you need for your DIY Paper Gift Bag

Pretty paper – you can go small or big depending upon what you need to wrap. Just adjust your size based on the item. Make sure that the girth/width of your paper overlaps in the back so you have enough paper to tape/glue.
Scissors
Glue or clear tape
Hole punch
Ribbon

Here’s what you do to make your DIY Paper Gift Bag
There are many tutorials out there including this super easy to follow how to at Fall For DIY. I’ve included my how to video here for reference as well.

Kids Windowsill Garden Project

I’m so excited to be hosting the first in our series of early dismissal craft classes for kids (and moms!) in Seattle. In an effort to create fun for kids and a moment for mom, we’re hosting our spring painting and potting craft for kids class.
If you’re not in Seattle, then I wanted to share this fun idea that you can recreate at home. With just a few dollar store materials you can create the most fun little spring treat that will bring the outdoors in for the whole season.
This windowsill garden features flowers from seed, but you could add a trio of herbs and start cooking with the kids as late spring produce becomes more available in your area.
Either way, enjoy this little craft! I would love to see your creations. Tag #satsumasmiles on Instagram and we’ll share the love. And we’d love to see you on our Instagram, Pinterest and Facebook pages – thanks!
Here’s what you need for your own spring painting and potting craft

trio of mini terra cotta pots
acrylic paint
paint brush
potting soil
easy to grow seeds

Here is a handy list of easy to grow flower seeds to plant and enjoy with the kids.

Morning Glory
Sweet Peas
Nasturtium
Marigolds
Poppies
Sunflowers
Foxgloves
Wallflowers
Wildflowers

To create your own little spring windowsill garden simply paint your pots, fill with potting soil, plant the seeds according to direction, and tend them.

DIY Pom Pom Gift Bows

Make a dozen of these pom pom gift bows to use for the kids’ birthday party gifts, hostess gifts, even string together for an adorable birthday party garland. There are lots of ways to enhance these with your own marvelous ideas so have fun making your own pom pom gift bows!
Here’s what you’ll need to make Pom Pom Gift Bows

Cello sheet or poly bags – mine have a thin adhesive strip to secure, but you’ll see I used washi tape on some versions for added interest
pom poms – pick up a bag at the dollar store. It’s fun to use different sizes or all petites.
washi tape
ribbon (optional)
glue gun (optional if using ribbon in the center of your bows
scissors (optional if cutting ribbon)
scotch tape to secure to your gift

Here’s how you’ll make Pom Pom Gift Bows
Start by creating in your bow bag. Either use washi tape to create a tube out of cellophane or use a poly bag with an adhesive seal closure.
Now fill your tube or bag with pom poms
Then pinch and/or twist the middle of your tube or bag and secure with washi tape or ribbon.
Et voila! You’re done and ready to place on your gift. Be ready to be embarrassed by all the praise you’ll receive for your wrap job. You’re welcome. It’s on the house! Visit us for more fun gifting ideas at http://www.satsumadesigns.com