I’m so excited to share this project of how to paint a chevron wall. In case you didn’t know, it’s official—baby #3 for us is another GIRL! And although she’s not due until the end of August, I’m getting a head start on her nursery now. Okay, technically, my official due date is September 5th, but since I will be having another C-section, this OCD mama will be scheduling the baby’s arrival at the end of August.
The furniture is ordered, the bedding is picked and the paint colors are set! I’ll be sharing the design process as it unfolds, but I wanted to first give you an inside peek at the chevron walls I painted this past weekend. I can’t stop staring at them!
If you are planning a zigzag accent wall or even looking to update another room in the house (I think chevron would be cool in the kitchen), here’s my step-by-step process of how to paint a chevron wall in one day!
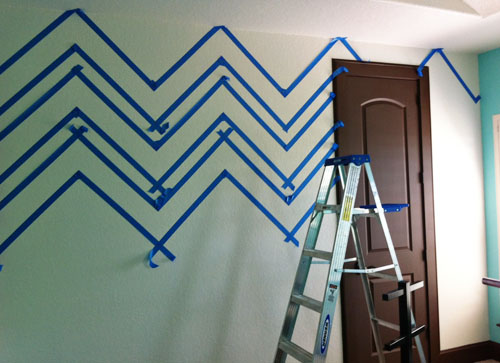
1. First, assemble your tools. I used a yardstick, pencil, blue painting tape (2 rolls), a level and a ladder. Our ceilings are 9′ in the nursery, but if you have lower ceilings, you might be able to get away with a step stool.
2. Decide how big you want your chevron to be. (And how much taping off you want to tackle!) I wanted it to be big and bold, and since I didn’t have to paint the wall behind the chevron, I wanted the stripes to be equal thickness. I recommend starting at the top; that way the points are all even along your ceiling, and if it gets crooked as you go, it’s almost like an optical illusion—no one will ever know! I started the tape in the top left corner, I eyeballed the angle I wanted the chevron, and the distance I wanted it to stretch. Holding the tape at either end, I placed it on the wall and used that as my guide for measuring.
2. Keep it straight and even! To keep all the angles the same, I measured from the corner of the wall to the top of the first point and then doubled that measurement to mark where the second tape (going down) would hit. I continued the same measuring points method the entire way across the wall, giving me equal distance from one to another. I came short at the very end (you can see where it starts a new zig or zag on the right side), but I actually like how it turned out not so perfect!
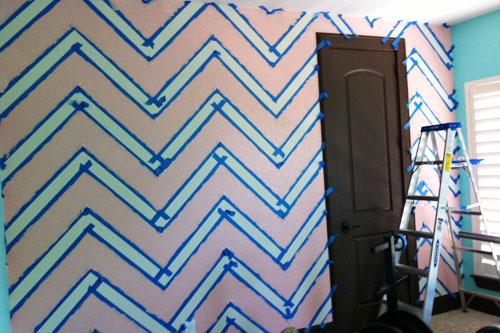
3. Connect the Dots. Once I had the top row complete, the rest were so much more simple! From each point, I measured 8″ down and marked the wall with pencil. You can use your level alongside your yardstick to make sure your lines are straight, and then it’s like connecting the dots with your tape!
4. Keep the corners sharp! Don’t forget to fold the corners of the tape at the points to give it a seamless look.
5. Roll on the paint. Once the entire wall was taped off, I took a small roller brush and painted on the color. When painting with tape, try not to put as much paint on the roller. You don’t want it sneaking under the tape, and it takes less time to apply two coats of light paint then to go back after you take the tape off and make straight lines on the entire wall (a lesson I learned painting stripes in my son’s room).
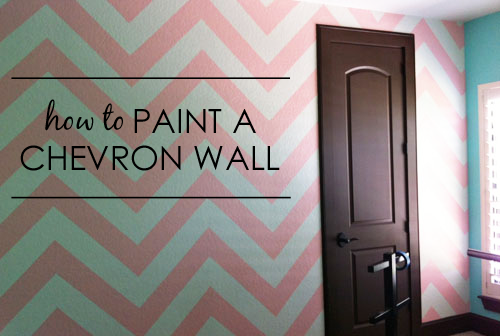
6. The reveal! Here comes the fun part—as soon as the paint dries, slowly pull the tape off. If there are any parts where the paint did sneak through, just take a small craft brush and smooth out the lines by hand.
So there it is! My daughter’s peachy-pink chevron walls. I think it turned out pretty fabulous, and for the three other walls, I used a light shade of teal. I can’t wait to see how this nursery evolves.
Now, if the next twenty weeks of pregnancy can go by as quickly and easily as this wall was to paint!






Comments
Melisa
You make this look way too easy! Beautiful job Katy. Can’t wait to see the finished room.
Kensey Marsland
This looks so amazing!! I agree you do make this look so easy; I’ve tried tackling the chevron pattern before and mine never came out this good!!
Tristan
This looks awesome! Just what I’ve been looking for! I expecting my third girl at the end of August, can’t wait to try this out for her nursery! Thank you!!
lisa keys
Great job Caden looks very professional all that taping is hard work…Love it:))
Stephanie
Such a great idea! Thanks for posting all your hard work!
DD
Well I read it all but I’m pretty sure I still wouldn’t be able to do it… Will you just come do it for me? :)
Frauline Melfi
This is gorgeous. Yeah, chevron pattern is so IN this year!
Jenn
I really wish that I had half the tallent that you have. I have a baby due soon and the nursery is pink and brown with bears and stars and a few moons thrown in. I was wondering how to do a wall monagram MBC (babys initals)Please HELP!!
Diane Mathias
Congrats on baby # 3! She’s lucky she has a mom who can do awesome things to her wall!
Sherri Blum
Perfect! (I’d expect nothing less from you, Katy!) Gee…I wonder where you’ll get her bedding? ;) Can’t wait to see it all come together! Thanks for sharing!
jgdyer23
Love this!! What color paint did you choose? And whats the color of the wall with the chevron?
MapleSyrup
I would have to say that this looks easier than done! I tried to do this before and ended up painting the whole wall. But thanks for the tips!!!! I think I’d do a better job this time around!
rebecca
Could you tell me your measurements? Like how thick are your ‘zig/zags’ and how long are they? It looks amazing and would love to do this in my master..
Barbara
I would love to know. I thinking of doing the same but with random thickness and different colors. I’m having a boy June 21.
Kaylei Holthe
What brand and color paint is on the blue wall?
Beth_PN
Hi Kaylei, The blue is “Tantalizing Teal” by Sherwin-Williams. The peachy pink chevron is “Gaiety,” also by SW.
Meghan
What are the measurements of the chevron pattern?