Michelle was one of our Project of the Month finalists a couple months back, and we loved all her DIY projects but especially her innovative use of contact paper for her the awesome polka dot nursery wall in her son’s baby room. Thank you, Michelle, for sharing with our readers!
I desperately wanted over-sized, whimsical, silver polka dots for the walls of my gender-neutral nursery. The $220 price tag for special ordering polka dot wall decals was ridiculous. I knew I could do it myself for less. And I did! Actually, I came up with a fantastic solution for less than $40! I’m excited to share how I made my polka dots with the Project Nursery community and hope other baby mama’s find this tutorial helpful.
Believe it or not, my polka dots are made with silver contact paper from a home improvement store. It’s sold in 18-inch by 6-foot rolls in the appliance section. Apparently, people use it to make it look like they have stainless steel appliances—who knew? Any color or pattern of contact paper will work.
Project list: Contact paper, circle cutter, credit card, self-healing mat and something heavy to weigh down the contact paper (I used oversized candlesticks)
1. Spread the contact paper out on top of the self-healing mat and hold it in place with your heavy objects.
2. Gently smooth out any wrinkles with the credit card.
3. Set the circle cutter to your desired size and cut, cut, cut!
My dots are five inches in circumference (roughly the size of a CD), and I got 39 dots per roll (give or take a few misfires). Your pile of cut dots will look like this. Don’t worry about flattening them out.
Once you have enough dots, the next challenge is getting them up on the wall. If you have Type-A tendencies like me, this is a daunting task. If you don’t need the dots perfectly ordered, just slap those puppies up! It will go a lot faster. However, if you want your dots in straight lines, some prep work is in order.
I used Christmas ribbon as my moveable guide; I started four inches below the ceiling and away from the adjoining wall. From there, I set the dots nine inches apart. For the next row, I measured nine inches from the bottom of the dot above, moved the ribbon for guidance and set the dots directly between the dots above. I repeated this careful pattern for each row and ended up with seven perfectly aligned rows. Good thing or I literally would have lost sleep over it!
What I didn’t lose sleep over was the budget! In my case (because I already had a self-healing mat), I only needed two items:
– Silver contact paper, $9.99 for each roll (I used three but ended up with twice the dots I actually needed) $29.97
– Circle cutter (I scored one with a half-off coupon at a craft store) $9.99
TOTAL = $39.96 (that’s a $180.04 savings from the pro’s quote!) Connect the dots…I’m a happy mama!
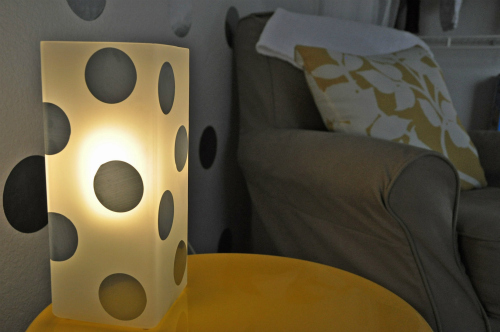
With some of my extra dots, I reset my circle cutter to a smaller size and cut smaller versions of the polka dots to decorate a lamp I had lying around. It was fun to add the polka dots to another piece in the room for absolutely no additional cost!
Anyone inspired? If you replicate this project, please post a link below, and let me know how it turns out. Be sure to check out my blog for more DIY nursery and home ideas.
Have a DIY project of your own that you’d like to share with us?
Email editor@projectnursery.com with details and pictures.






Comments
Shelia Butler
Great looking room! Looks like hard work, but well worth it.
Dandelion
This is the first time I heard of contact paper. What did you use to stick the dots on the wall? They just stick by themselves?
Jess (The Cozy Reader)
Very cool idea! Love the budget friendliness!
Amanda
This is fabulous. May try to replicate.
Melisa
I love this Michelle…such a smart idea! Thank you so much for sharing with our PN community. Awesome nursery!
Michelle
Dandelion,
Yep! The back is sticky. You just peel it off and stick it on the wall. So easy!
April Heather davulcu
What an adorable nursery!! Love the shiny polka dots–and such a clever, stylish solution. Truly timeless & elegant!! Well done!
Mischa
What a great idea! While I don’t have those type A tendencies to make sure the measurements are perfect… my husband does. We’ve been talking about needing to do something for an accent wall and just painting it another color didn’t seem like it was going to be enough. Dots- here we come! Thanks Michelle!
marianney (darling blogs)
what a beautiful room and such a simple solution! thanks so much for sharing how you did it. do you know if contact paper comes in different colors or just silver? and i assume they stick permanently, yes?
alicia v.
trying to figure out how to incorporate this into my new nursery!!
Carly
Any idea if the contact paper becomes a permanent fixture or damages the paint? I rent, so probably not an option for me. It looks fabulous though!!
Cjko
What a great idea. I read you can use sign making vinyl as well. I may order some from this site and give it a try once I figure out a pattern to use. Your room is beautiful.
http://www.signwarehouse.com/shop/merchant.mvc?Screen=CTGY&Category_Code=VOR6311510
Christie M
Great idea…we did polka dots (large ones) in my daughter’s nursery…though I painted them on the wall. The circle cutter is a great idea for contact paper! Beautifully done nursery.
Mehreen
Where are your drapery and decor from?! Love it ALL!!!
Michelle
Thanks everyone for the nursery love! My son is now 6.5 months old and we still adore the polka-dots. :)
A couple of you asked about the permanency of the contact paper… It actually peels right off quite easily. It doesn’t leave behind residue or take paint with it. In fact, my primary concern is if my son, when he gets older, will figure out that the dots peel off so easily. Then, we may have to remove them.
As for the valance and curtains – there’s a story behind those! I made the valance myself (hand painted the stripes) and bought the curtains at Bed, Bath & Beyond. I blogged about it here: http://ourdreamforeclosure.wordpress.com/2011/04/03/dream-it-yourself-diy-stripes/
Keep the questions coming and don’t forget to let me know if you replicate the dots! I’d LOVE to see them!
Sue
I just found this post on Pinterest. This is a brilliant idea. It works for apartment people that need something that can be taken down, as well as for anyone who likes polka dots. I bet you could even make a chevron pattern on the wall using contact paper. Now you’ve got my wheels spinning. Thanks for the post. The baby’s room is absolutely adorable and I’m pinning it on one of my boards.
ash
any problems with it not sticking well? Im wanting to do my girls room. trying to decide whats best. Thank you :)
Amy
How did you make them sick to the wall?
Bible Study
Love it!
Bible Study
contact paper is self sticking, its like a sticker, I’ve used it around my home
Perla J
That’s a pretty neat way to get the foil look polka dots. For the person that isn’t as hands on check out http://polkadotwallstickers.com for the same concept in other colors.
Lina
Just wondering if anyone has done this and then tried to remove it? How well does it come off afterwards? I don’t want to have a huge mess on my hands once we outgrow it!