Nicolle, from Libby Lane Press, is sharing a tutorial on how to recreate her creative ripped fabric backdrop with us today. Maybe you can use the idea for your next party. Thanks, Nicolle!
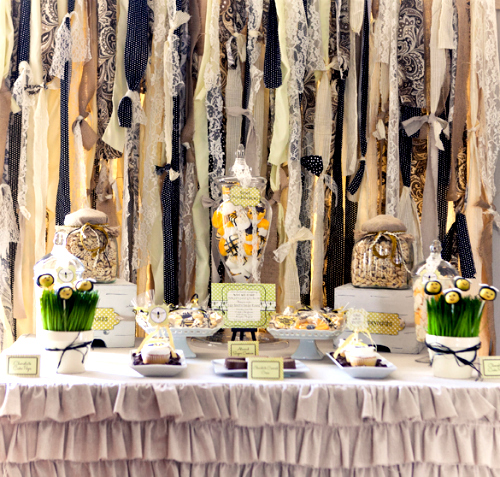
While gathering ideas for my first styled event, I stumbled upon a ripped fabric curtain on Pinterest and knew that it would be the perfect backdrop to set the stage for my Honeybee-themed dessert table.
I wanted to incorporate not only natural colors but also pattern and texture in this fabric curtain display. This inspired me to include burlap, muslin and lace.
Supplies:
6 ft wooden dowel rod/1.25 in diameter
2 yards – polka dot fabric
2 yards – seersucker yellow fabric
2 yards – paisley fabric
1 yard – lace
1 yard – burlap
small pieces of muslin left over from ruffled table linen
First, I placed all of my fabric next to each other to determine a good width for each strip since various patterns were involved. I started ripping approximately 2.5 inch strips and then varied the width anywhere from 2 inches to 3.5 inches, depending on the fabric.
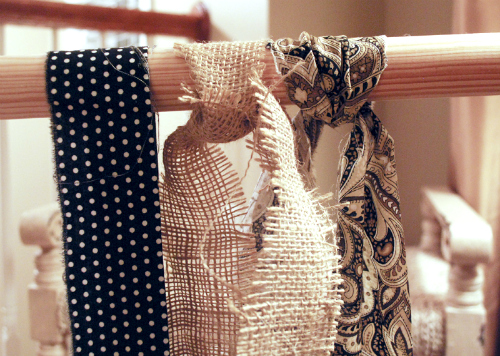
It was news to me that once an initial cut is made, fabric rips in a straight line—talk about a time saver! I wanted frayed edges so ripping the fabric was the exact look and feel I wanted for this project. I decided to rip all of the fabric prior to hanging it on the rod. (Note: Burlap and lace do not rip, so I had to manually cut each strip.) Once the fabric was torn into strips, I tied it to the dowel rod leaving an uneven strand hanging.
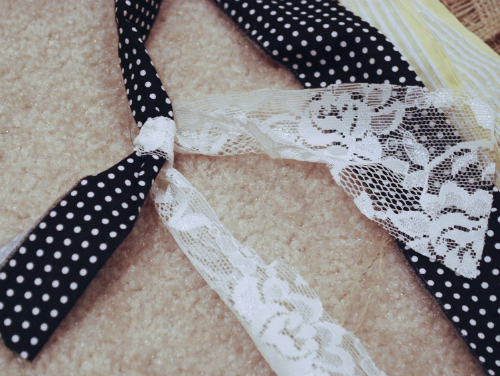
I then realized that the strips of fabric were looking rather flat, so I took the pieces of muslin and used them as “connectors” while attaching either burlap or lace to the strip of fabric. This created a rugged, textured look. Once I achieved the look I was after, I decided to stagger the lengths of each strip hung on the dowel rod. I also mixed and matched patterns and textures to create an uneven feel.
Finally, I suspended the dowel rod behind my dessert table and added random pieces of lace and burlap throughout as a final touch.
Lesson Learned: If I were to create this backdrop again, I would purchase less fabric since the fabrics were connected and displayed in varying lengths.
Here is the fully styled Honeybee Gender Reveal Party. I hope you enjoyed this tutorial and can use this idea at your next party!






Comments
Rebecca
Thanks for the idea! It’s simple to do and allows you to recycle old fabrics.
Jennifer Needham
So cute and original!
Lindsay {Easy Made Invitations}
LOVE it!! What a great idea for a backdrop! Thanks Nicolle, you’re so creative!
Kristina McCook
LOVE it! So creative!
Leonie @ Ashlee Rae
Looks great, I love using ripped fabric and my daughter LOVES to help with the ripping!
Debbie
As a fabric lover, this is a really cute idea Nicole! Well done:)
Debbie -{PARTY PATISSERIE]
Lisa @ HR Creative Design Studio
Great job! Looks lovely.
Renee
I think I’m actually going to use this idea for my baby boy’s vintage nursery as a valance project. This is the neatest project I’ve seen in a while. I love this website, it is so inspiring to this first time mother! THANKS FOR SHARING!
Nicolle-Libby Lane Press
Renee- I love your idea to incorporate this project into your baby’s nursery. I think the ripped fabric would be perfect to help create the vintage feel. If you have any questions along the way, feel free to email me directly at nicolle@libbylanepress.com
I’m happy to help!
Nicolle-Libby Lane Press
So sweet- Lindsey! Thanks
Dawnielle
How did you suspend the rod? I would love to use this fabulous idea but can’t figure out how you hung it.
Fabric Heart
lovely idea. i am sure the fabric exchange has so many choices of fabric for this kind of project.