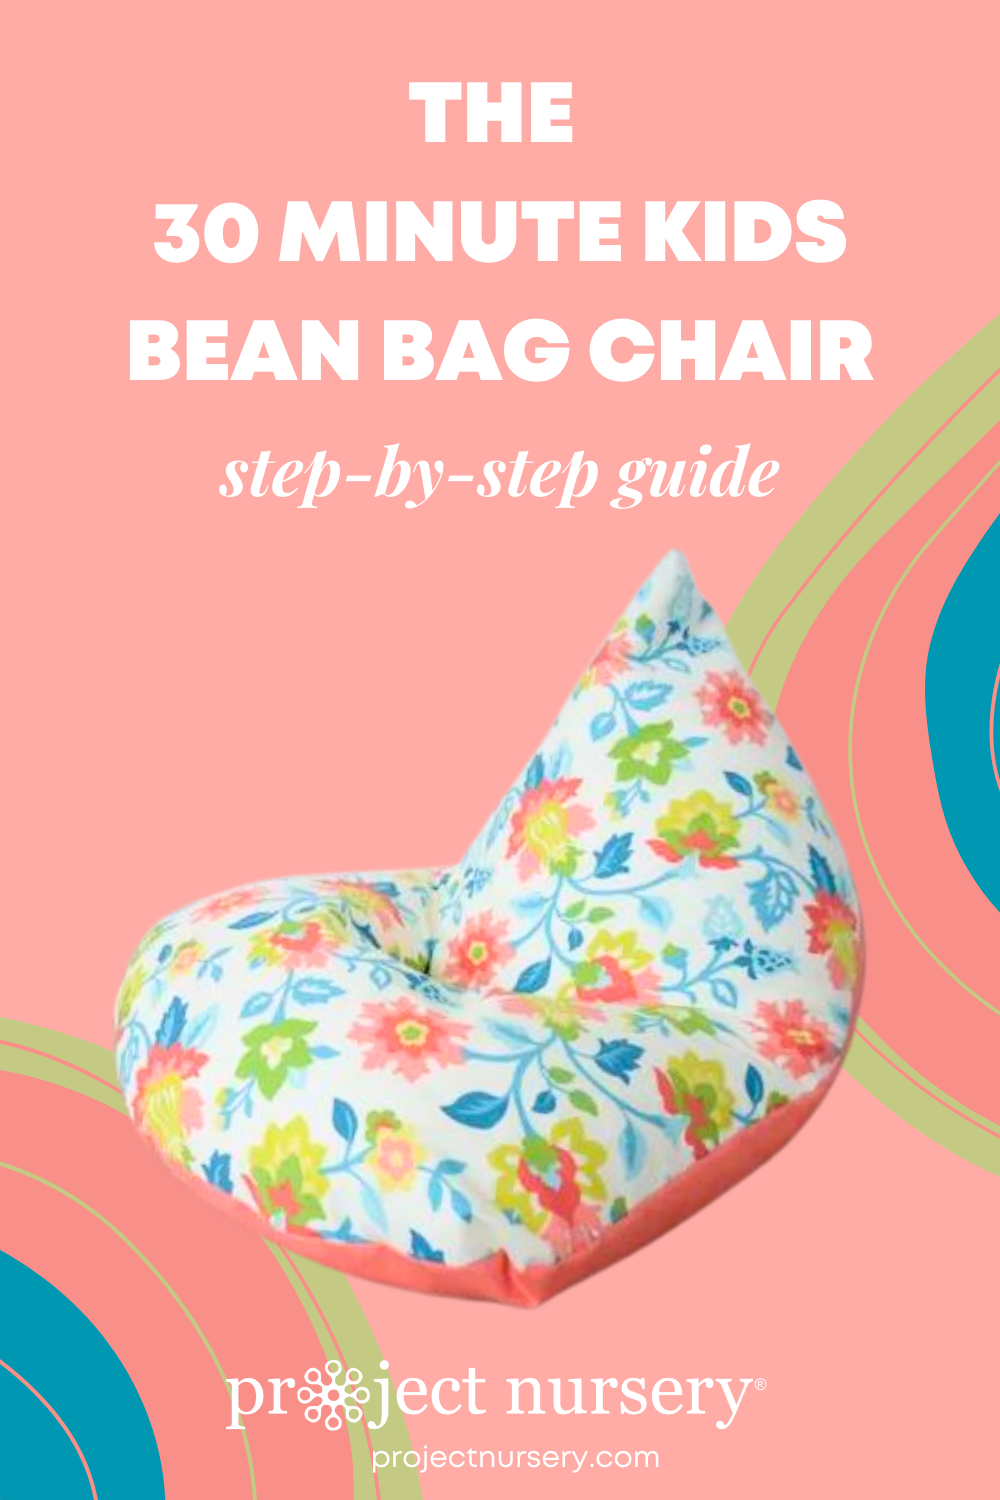
All kids deserve a snuggly spot to call their own. Whether it’s for lounging, movie nights or just curling up with a good book, a pint-sized bean bag chair fits the bill. And while there are many of these available in stores, wouldn’t you rather make one as unique as your child?
Complicated bean bag tutorials can be intimidating with all their sections and circle-ness. But what if I told you that with two pieces of fabric, one zipper and a straight stitch you could have an adorable kids bean bag chair in 30 minutes—would you believe me?

Materials: two pieces of fabric (upholstery weight fabric is preferable), one 22″ zipper, 3.5 cubic feet of bean bag filling
In the following directions, all seam allowances are 5/8″.
1. Cut two fabric pieces to 45″ x 32″. The fabrics can be identical or you can choose coordinating patterns for a two-toned look.

2. Turn right sides together. On the long raw edges, use a zigzag stitch to prevent fraying. Then straight stitch the same edges. Due to the amount of abuse these seams will endure, I highly recommend using a small stitch length for durability.

3. Fold the fabric in half like a hot dog bun, matching up the sewn edges.

4. Starting from the folded side, round one end, removing approximately 6″ of material from the corner.

5. Open the fabric back up, and you should have a nice symmetrical curve on one side. Zigzag the raw edge, and again use your straight stitch to close.

6. Open the remaining unsewn edge. Keeping right sides together, fold in half the opposite way as shown below.


7. Sew your 22″ zipper into the center of this opening. I used an invisible zipper so it would be less noticeable when completed.

8. Finish your zipper installation by closing the zipper edge with a straight stitch on either side.

9. Turn the bean bag chair right side out and fill with beans! This kid-size chair takes exactly one bag of bean bag filling (3.5 cubic feet or 100 liters) to create the perfect plump.


There’s really no easy way to get those static cling-crazy little pellets inside without spilling a few. My best advice is to have two people holding the zipper open and a third person to pour—oh, and have your vacuum on standby!

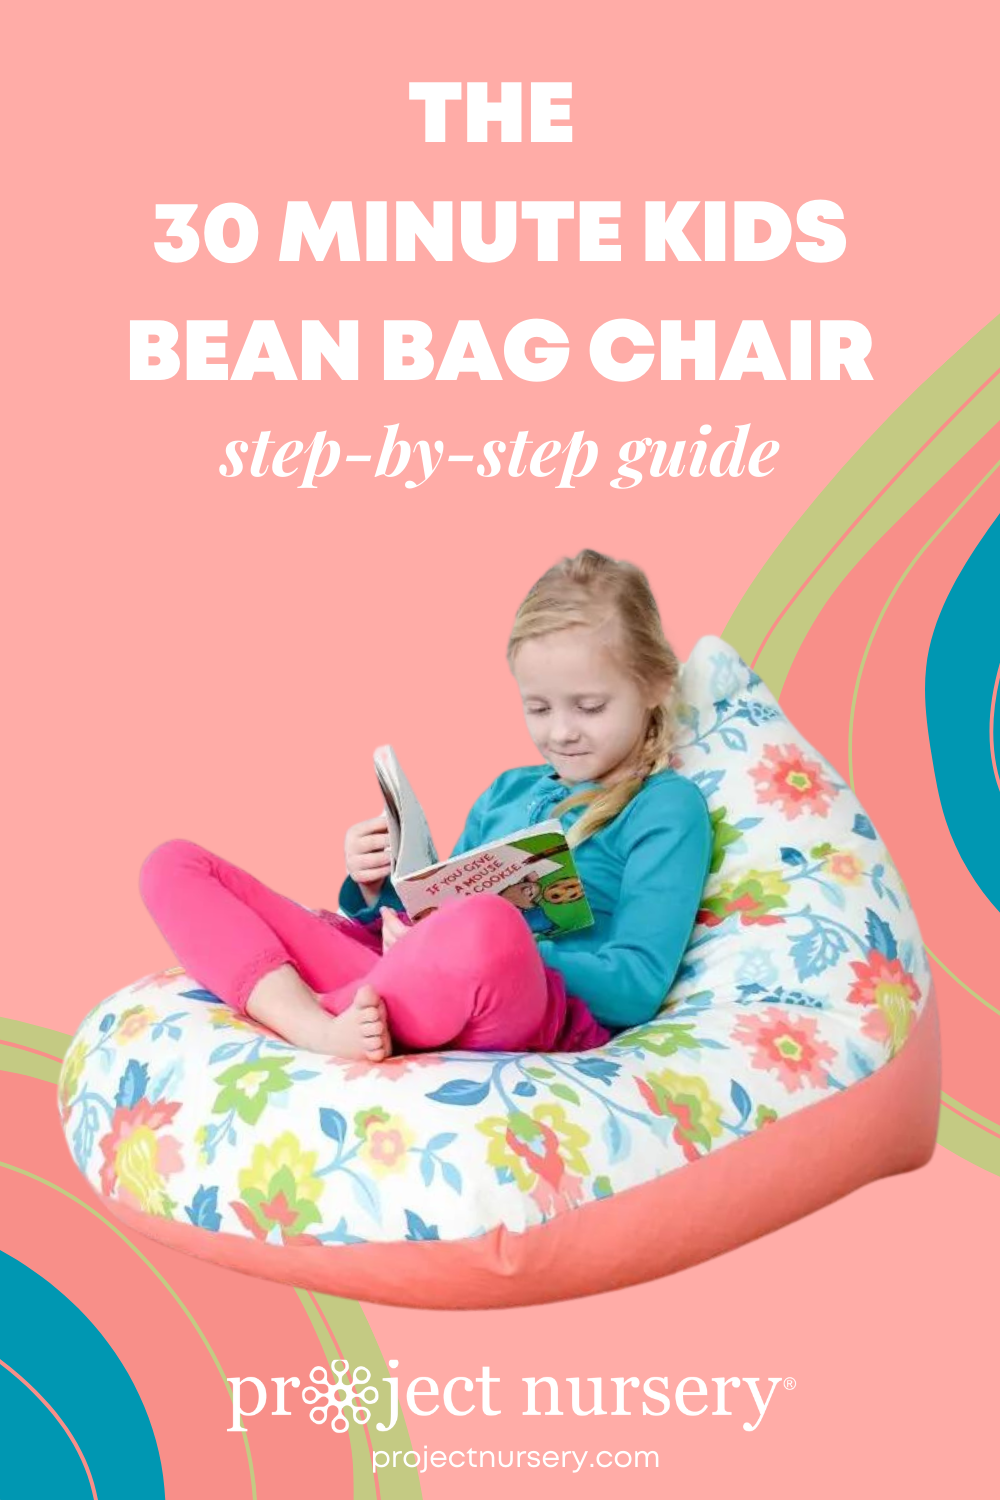
If this chair doesn’t beckon “come, relax,” I don’t know what does!

Choosing to use two different fabrics means the bean bag chair is reversible too. Just flip it, and you’re rockin’ a whole new vibe—it’s two chairs in one!

Whether you make one for your own child or give it as a gift, I guarantee this kids bean bag chair will become the new favorite snuggle spot.

Keep in mind that bean bag filling pellets are a choking hazard! Because the zipper is accessible, please make these only for kids who are old enough to know better than to eat them.
Editor’s Note: If you have any concerns about your child opening the zipper or you’re making for a young child, consider sewing the bag shut (knowing you will have to rip open the seam if you ever want to refill the “beans” and sew shut again). It is never safe for a child to open the zipper or attempt to climb inside.


Comments
NoAdditives
You could easily make an inner, completely closed bag to hold the beans, while keeping the cute fabric as a cover. Then there’s no worry of little ones choking, and it’s washable!
Hayley
Great suggestion!
Anne Weaver
Oh wow! I love this!!! I’ve got a Craft Gossip post scheduled for later today that links to your tutorial:
http://sewing.craftgossip.com/tutorial-30-minute-kids-bean-bag-chair/2014/06/19/
–Anne
sakshisinha
Really nice information about kids bean bags. I’m very happy to look at your blog, It’s just amazing one.
Jane Green
Love this great idea. Will definitely make it for my granddaughter. For me I think it would be much easier to insert the zip before closing the curved end and definitely would make an inner.
Hayley
Thanks for sharing @anne_weaver:disqus!
Constance
Can I double the measurements and make a big one?!
Britney Wilkes
What kind of fabric did you use? Was it the upholstery weight or did you just use a print fabric?
Grey House Harbor
I haven’t tried that, but I don’t see why not!
Grey House Harbor
It was upholstery weight fabric I found at Joann’s.
Hayley
I don’t see why not! Try it out and let us know.
Hayley
This is upholstery weight fabric I found at Joanns.
Jessie
Love it! I’m wondering how much fabric I should get if I am making an adult version? I want to make one for my husband and he is 5″8′. Thanks
BL
Hi! This is great! I’d like to make a bean bag chair for a 2 1/2 year old. The fabric I’d like to use, though, is only 44″ wide. Would you recommend just buying more fabric or cutting down the dimensions of the panels so I don’t have to buy as much fabric (30 X 43, for example). I appreciate any thoughts you have about this!
Grey House Harbor
I think that cutting down the dimensions a couple inches will give you the best bang for your buck. Since it’s for a 2.5 yr old, the small size difference won’t matter much. Good luck!
Grey House Harbor
Jessie, to make an adult size I’d recommend beginning rectangle dimensions of 43″ x 60″. Keep the seam allowance at 5/8″. The largest size that can be made with standard material (54″ width) is 54″ x 75″.
Hayley
Jessie, to make an adult size I’d recommend beginning rectangle
dimensions of 43″ x 60″. Keep the seam allowance at 5/8″. The largest
size that can be made with standard material (54″ width) is 54″ x 75″. You’ll also need more filler, of course. ;)
Hayley
I think that cutting down the dimensions a couple inches will give you
the best bang for your buck. 43 x 30 sounds great! Since it’s for a 2.5 yr old, the small size difference won’t matter much. Good luck!
Laura
Looks great! I’d like to make this but fill it with fiberfill for extra cuddliness. How many pounds do you think I will need?
BBF
I’m anxious to see if anyone dried the adult version of this and how it turned out?
BBF
tried
Claire
What dimensions would you use for making an inner bag? This would be my first real sewing project as I attempt to make this for my little boy. Thanks
Carmen Kells
thanks so much for this tutorial, I’ve just completed my 3rd bean bag! I decided to sew cheap cotton inner bags for the beans (that I sewed shut) so that the outer bags are easily washable. I ‘m sure my kids will be very excited when they see them in the morning!
Emma
Hi Carmen,
Can you share the pictures of the 3 bean bags. I would like to get some inspiration of colour cordination. Many thanks!
Carmen Kells
Hello Emma,
I chose to use the same fabric for top and bottom. Making 6 fabric choices seemed too hard at the time! Its not the best photo, and the kids arn’t exactly using them the right way (this was more of a bean bag pile)…. but they LOVE them!
April
Carmen – A couple questions for you, did you make the inserts the same size measurements as the outer shell? How were you able to stuff the inner bag in through the 22 inch zipper? I’m having trouble getting my inner bag into the outer shell. Did you use a larger zipper? TIA!!
Carmen Kells
Hi April, I did make the inserts the same size. It was a bit tricky getting the inner bag through the outer bag, and I did actually use a 24″ zip (accidental, not on purpose!) , there was a lot of shuffling and shaking and poking to get it in, I think I kinda did it a bit like an hour glass – put the empty inner bag bit in first, then let the beans fill that bottom section and shuffle etc. Hope that helps?!!
Cassidy
Carmen, these look awesome! Where did you get your fabric?
Lucie
Hello Hayley! Thank you for this great idea! I was just wondering what age is the girl on the picture? I would like to make one for my niece who is 5 years old, so I wonder if I should make one a little bit bigger if I want it to last a few years??
Carmen Kells
I live in Australia and bought them at Spotlight when they had a sale! The charcoal and Mint green ones are manufactured by Cloud Nine and designed by Rashida Coleman Hale. Hawthorne threads used to stock this fabric line (they have lots and lots of amazing canvas/upholstery weight fabric! http://www.hawthornethreads.com/fabric/designer/rashida_coleman_hale/koi_canvas/pennants_waving_canvas_in_wave
I have no idea about the pink one!
Jennifer
where can I find bean bag filler?? I have checked walmart and hobby lobby neither had it. and the price I find online is $16 for the bag shown in your picture :/ HELP!
michelle chastain
I get my bean bag filler at Fred Meyer,,,but that’s in Seattle :)
Stacey
I would like to make this and was wondering what kind of sewing machine you have? I’ve never sewn upholstery fabric and just want to make sure my machine would be able to handle it. Would I need a different needle?
Hayley
Hey Laura,
I’m not super familiar with fiberfill! If you do use it, be sure and let us know how much it takes!
Hayley
My daughter was 5 when I did this tutorial and she could comfortably use it for another couple years. But, you certainly wouldn’t go wrong enlarging the dimensions if you wanted. Just multiply your longest side length by 1.4 to find the shorter side length.
Hayley
I purchased my filler from Walmart for about $16, which was the cheapest I could find. I bought some other things from them online at the same time and was able to get free shipping since my order total was over $50. Amazon also has the same brand for $16 and free shipping if you have Prime.
Hayley
I just have a fairly basic model made by Brother. My recommendation of upholstery fabric was based more on wanting people to avoid the really thin quilting cottons, than having to seek out anything ultra-heavy. My Joann’s store has a “upholstery” section that offers slightly sturdier cottons in widths around 54″. My regular needle handled it just fine. Hope that helps!
Hayley
You’re welcome Carmen! Thanks for the photo of your kiddos enjoying them. Great fabric choices, too! I also appreciate your tips on making the inner bag version, as I had not done that.
Teresa Hardy
I just bought my fabric to make this. I got the softest ever fake fur for one side and a very soft, pliable vinyl for the back side. So the side that sits on the (sometimes dirty) hardwood floor will be the vinyl side and be easy to wipe clean and the cozy side (with the more expensive fabric (the fake fur) will stay clean as it’s on the top. I am making a lining out of muslin so the outer bag can come off and be washed. Thanks for this tutorial. Fingers crossed my sewing machine will play nice while sewing through fake fur and vinyl!
Teresa Hardy
I am making two matching bags so I bought two bags for $32 at Walmart then added random stuff that I already buy like beef bouillon, face wash, dish soap and got free shipping from Walmart (plus saved a trip to the store). It was the cheapest I’d found it online anywhere also.
Becky
Thanks for the awesome tutorial! I made a bigger size and let my boys store extra bedding, pillows and stuffed animals in there. Then they get a useable chair and I get less clutter.
Jamie
I can’t wait to make one of these. Plan on filling it with my daughters large collection of stuffed animals.
Kelly
I’ve had 2 bags of beans from Bed Bath & Beyond sitting around taking up space until I have time to make these…hopefully soon! (I went two different times with my 20% off coupon.)
julie
Thanks so o o much for this tutorial. This will be super easy and quick (I’ve been asked to make three). Just got to hope for fab fabric at local shop..
julie
How much filler do you reckon for the adult size??
Jo
Stayed up last night and made these for my twin daughters 7th birthday today. I made them slightly bigger but kept the proportions – so they’re 125 by 90cm (50 inches long dimension) and they took a bag and a half of beans each. Size-wise they’re great, and will last them for ages. I made them from ikea fabric and my girls love them – thanks for the tutorial!
Chandra
A couple of suggestions (I am an avid sewer)…you could use outdoor fabric for the bean bag…it has a dense weave, and is very easy to keep clean. JoAnns has a lot of beautiful fabrics in 45″ widths. Also, if you’re worried about the zipper coming open, you can do one of two things, you can use a tool to cut off the flap on the zipper pull and then when you need to refill the bag, you put a paper clip through the hole (that’s how our current purchased bean bag works), or you could just sew the zipper pull shut, and only have to remove that stitching to get in the bag. Eventually, the beans break down, after use, and you WILL need to refill the bag. I love this, and may make a larger version for my tween kids soon!
Sally
Made two of these yesterday for my niece and nephew. Such a great pattern. They were a much loved gift today!! Thanks so much.
Emma
Hi,
I wonder if any kind souls who made this bean bag could offer me some advise. I bought some fabric from the charity shop 43″ X 55″ , zip 17″. Do you think I can make an adult bean bag out from these?
Many many thanks in advance for your advise. :)
Amy
I made this about four months ago. My little guy loved it, until the stuffing seemingly started to disintegrate. I used the filler pictured in your tutorial. I also noticed a note at the bottom stating that you may want to open it to refill it. Have you noticed your bean bag getting limp and flat?
Grey House Harbor
Hey Amy. Yes, the filler does lose it’s volume after awhile, especially if kids are rough with them (as they tend to be!). The zipper was included to make it easy to refill them as needed. Keep in mind that, although I “poofed” mine up for the tutorial photos, you don’t want the chair to be super full otherwise it’s tough to actually sit comfortably in it.
Grey House Harbor
You’re welcome Sally! Glad the gifts were a hit.
Grey House Harbor
I hadn’t thought of those fixes for keeping the zipper closed — excellent suggestions!
Grey House Harbor
Awesome Jo. Nothing like a last minute late night craft sesh!
Grey House Harbor
I would guess 2-3 bags for one chair. You want it to be fullish, but not overly stuffed. It may look a little saggy when unoccupied, but too full and it’ll be uncomfortable to sit in.
Amanda
If making the bean bag 43×60, is it still 6″ that you cut off for the curve? I want to make it a bit bigger so me and my son can snuggle in it before bed for stories and bedtime prayers!
Kirk@adequateliving.com
Really cool tutorial. I would definitely consider trying this out. My only concern would be the bag being sewed tight enough to keep the filling in and the eventual wear and tear from children constantly sitting and playing on the bean bag. However I would love to try make one just to see for myself.
Connie
Thank you so much! I just made two of these for my 3yrds room:)
Grey House Harbor
Amanda – the curve is purely aesthetic. You could sew it straight if you wanted, but I would think that for a bigger size, your curve would be a bit larger also. No real equation for how much bigger… probably just have to eyeball it! :)
Grey House Harbor
My pleasure, Connie! Thanks for giving it a go!
Nicole
Just wondering if anyone had used normal zipper? I haven’t used invisible one before. Thanks
Grey House Harbor
@Nicole – No reason you couldn’t use a regular zipper! It will be just a tad more noticeable along the back… and, as such, potentially more enticing to little fingers. That’s the main reason I went with the invisible kind.
Saralynn
I just made a adult pouf for hubie at 36/50 ish size looks like it will work as a game chair just fine
A good way to fill is get a wide tube (Pringles tube size) and duck tape it to the bag with it zipper snug to it then using another set of hands clip off the corner of beans a little larger then the tube wile pinching it off then give a twist to hold it all down then have your extra set of hand hold it like it is and duck tape it onto your tube and untwist and push it all in
I did this way and didn’t have any little balls to pick up same type you used as well :)
Tho his will take more then the 1 bag of fill it only has one in atm i have another bag I will partly add when his birthday is closer since it’s his present :)
Melody
Thank you for the awesome tutorial! I made it for my 1 year old last night! I don’t know how to post pics but it turned out awesome! I just love it! And cheap too! I filled it with two old pillow stuffings I had. Just because I couldn’t find local beans for a bean bag but eventually I might switch it, the stuffing works for now.
Lisa Stubbs
I Luuuurve these beanbags and would love to try making them for my 2 sons. Been a complete beginner when it comes to sewing, when you state doing a zigzag stitch then straight stitch, do you mean next to each other (if so, which goes on the inside/outside please) or a straight stitch on top of the zig zag?
Many thanks x
Grey House Harbor
Melody – that’s great! So glad you enjoyed the tutorial.
Grey House Harbor
Lisa – The zigzag stitch is a way to prevent the raw edges from fraying. Run the zigzag flush along the fabric edge or even overlapping the edge a little. Then the straight stitch will be in from the zigzag, 5/8″ from the edge. That make sense? Good luck and have fun!
Ruth
This is the first Pinterest pin that I have found for bean bag chairs that not only had the instructions, but was also super easy. I am making 2, or maybe more, for my daughter. We are moving into a smaller place and she has a ton of stuffed toys. I don’t want to use toy hammocks because they attract dust and spiders. This way we have storage and seating. Thank you, this is a life, and money, saver.
Grey House Harbor
Ruth – Yay! I’m so pleased that you found the tutorial and will make it super functional for your new space, too. Your daughter will love them!
Lisa
Me again! Please can I just ask what fabric people have used to make a liner? Does it need to be flame retardant does anyone know? Thank you! :-)
Chloe Witty
I really love this easy DIY! I have been looking for an easy way to make a bean bag chair for ages and i am loving this one! I live in Germany and i am not finding a German eqivalent to bean bag filler and i was wondering if you had any other alternatives or suggestions of what else i could fill the chair with? Also, is there a suggestion of how much bigger i should make the chair for an adult? Thank You!
Marianna
It’s just amazing. I did one for my 1 1/2 year kid with an inner, for I suppose it will have to be washed now and then. Used a simple fabric and quilted some figures (sun, clouds) on it. He loves it (and me too). I live in Hungary, so we can say that your project has become quite international so far. Many thanks for sharing the idea and for the comprehensable instructions and photos. If you don’t mind, I will spread your site to some interested friends.
Chloe make a try with polistyrol füller Kügelchen!
Thanks one more time!
Emil
Thanks for this awesome guide!
I look forward to use it tomorrow.
But first I need to buy the stuff I need.
Thank you one more time :)
Grey House Harbor
Chloe – some people have mentioned filling the chair with stuffed animals or maybe you can find ripped foam bits? Not sure of the resources overseas! :) If you make one adult-sized, I would recommend cutting the rectangle to 38 x 51 in (97 x 130 cm).
Grey House Harbor
Hi Marianna. Thanks for all the kudos! So glad you found the tutorial all the way in Hungary and that your child is enjoying it. Feel free to share away… we love the exchange of good ideas. :)
Belinda August
Thank you. This tutorial was sooooo easy. I ended up not inserting a zip so the kids dont fiddle … but they LOVE THEM
Thank you
Erika
I have a silly question. Is it 45L x 32W? I always get confused when it just gives dimensions.
Thanks!!
Love this tutorial!!
Erika
Hi!
Is it 45Wx32L? Also, if I wanted to make this for a tween what size could I do? Is it big enough for an 8 year old? Hard to tell size by picture :)
Can’t wait to make it!!
Thanks,
Erika
Marianna
Hi Erika, if I understand well, width or length does not matter, since you can turn the fabrics. However, if your fabric is horizontally patterned 45 is the longer, it will be the length and you put the zipper into the smaller side (32). Sorry if I misunderstood your question. I have made another for an older child – just cut a duvet cover into half. Based on my own experience it is also convenient for a teen or even for a not sooo tall adult (I’m 177 and just had a wink of sleep in it :)). But in this case 1 1/2 or even 2 times more filling material was needed.
Grey House Harbor
Hi Erika. It does depend on the way your fabric pattern is laid out, but generally speaking, yes, it’s 45W x 32L. Unless the fabric pattern makes sense to turn sideways, in which case, you would need to purchase a piece of fabric 45″ long. I would say this size is adequate for a normal sized 8 year old, but for a tween I’d suggest going up to larger 38×51 size.
Jennywren
Hi, do you think faux leather would work well on this? My lo has a bad dust allergy and I figured that would be more allergy friendly, plus wipe clean! My machine is a workhorse (1940s electric singer) so would be well able for the job. I could do an inner like most have done and the zip isn’t a problem because I’ve a few feet of upholsterers zip somewhere that can be cut to length. For people asking about filler, it’s the same polystyrene beads they use for house insulation so if you can’t find it in your local haberdashery try your local builders merchants
Danielle
I just finished making two of these for my boys’ birthdays! One is turning 5 and the other 3. Thank you for the wonderful tutorial. Because I do not trust my boys to keep the zipper closed, I made a liner for the bean bag filling that I sewed shut after filling. That way, the outer part acts like a pillowcase. It was twice as much work, but I like that I will be able to wash the outside if needed, and I don’t have to worry about the boys getting to the filling.
Marion
I made this today. Super easy and super cute. I used a fleecy fabric with “My Little Pony”. My kid loves it.
Val
This chair looks fantastic! I would love to make one for my niece for Christmas. What size does the chair turn out to be? I’d like to adapt your instructions slightly in size to make a mini beanbag chair that would be toddler size.
Thanks!
Meg
Hi. Thank you for tutorial. Just finish for my 3 year old. Made with separate inner section so cover can be washed. I used old pillows and all leftovers from my sewing projects to staff it. I keep all cut offs for such projects:)
Latoni
How did you make that indentation part in the middle?
Mary
I have just made two of these beanbags for my grandchildren. I would definitely recommend making an liner to contain the beans. Also I don’t think the amount recommended is enough. The bags look very too floppy!
Grey House Harbor
Jennywren – Faux leather would be super sweet for this! Let me know how it turns out. And cool tip about housing insulation for our friends in the UK!
Grey House Harbor
Danielle – You’re welcome! Wash-ability is a huge bonus with boys that age. Hope they loved them!
Grey House Harbor
Marion – “My kid loves it.” Music to my eyes… :)
Grey House Harbor
Mary – I definitely “poofed” up my bag for the photoshoot, but you actually don’t want it to be super duper full. A little floppy means there will be room to snuggle into it. If the bean bag chair is full enough to look really nice while not in use, it’s probably too full for comfortable sitting.
Grey House Harbor
Latoni – that was just finicky “poofing” on my part (pushing around the beads inside until it looked cute). But normally it looks kinda flat until someone sits on it.
Grey House Harbor
Meg – You’re welcome! Awesome that you “upcycled” your scraps for filler. So thrifty of you!
Marleen
Thanks for a great post. While I am an accomplished “sewer”, with a one-year-old running around, I don’t really have the time to make a proper 6-sided beanbag. I love your pattern and can’t wait to make one for my daughter in fabric that matches the cushion covers I made for the sofa.
For those questioning the inner bag size, cut the same size as the outer omitting the seam allowance, this should give you enough play. Place the inner in the outer bag before filling for ease. Hoe that helps anyone.
Lois
I can’t wait to try this! What are the finished dimensions (approximate!) could a mother and child sit on it together?
Grey House Harbor
Lois – The completed dimensions of the instructions (as given) are about 43L x 26W x 23H. There is not enough room for an adult and child to snuggle on this size. But if you make a version that’s larger start with fabric about 43″ x 60″ or larger.
Betsy
If I did not make an inner bag, wpuld we still be able to toss the whole bean bag into the washer?
Grey House Harbor
Betsy – The purpose of making an inner bag is so that you can have an outter zippered shell that would be removed for washing. Do NOT wash the bean bag chair with the styrofoam filler inside!
clara
just made one of these with a case for my daughter for her birthday and im seriously thinking about making one for me haha! it was so easy to make, its really comfy and supports your back very well. would make a great gaming chair (hence why i want one :). the hardest part was getting the beans into the bag. i strongly recommend having a helper (man them things are crazy) i also recommend using a longer zipper for on the case if you decide to go that route, it was kind of difficult to get the bag inside without putting a lot of pressure on the zipper. i also sewed the inside bag shut completely to eliminate the risk of a bean tsunami as my daughter is only turning one and i didn’t want her to ever be able to open it. thank you! this was a great project for an impatient sewer lol
Grey House Harbor
Clara – Thanks for sharing your project experience! I’m so glad you found it fun and easy. Except for the beans… told you those things are cray. The longer zipper is a great tip for people making inserts too. Impatient sewers unite! Let us know if you make an adult size and how it turns out. ;)
Lois
If I increase the size of the fabric to 43″ X 60″, would I still cut the curve at 6 inches?
Grey House Harbor
Lois – Honestly, I kinda winged that measurement based on what curvature looked good for the original size. If you increase the bean bag width, you may also want to broaden the curve some too. Maybe go to 8 or 10″?
Janice
I made this and love it ! Wish I’d seen it earlier for all my kids when they were little. I made it firstly in white cotton fabric and filled it with the beads, then I made another case in pinks with a zip, that way it can be washed.
Grey House Harbor
So glad you loved it Janice!
Ryan
Can this chair sit on its own and have the back (head part) stay sturdy, or does it have to lay up against a wall?
Thanks
Grey House Harbor
Ryan – It totally sits on it’s own! The weight of the child sitting in the chair pushes the filler beans up into the head part and it’s totally self-supportive. When not in use, it can look a little floppy (unless you over-stuff it, which I don’t recommend), but when in use, no wall necessary.
Linda
Just sew a few rounds over the zipper right behind the zipper pull and they can’t open it. You can just break the threads when you want to refill it that way.
Erika
Hello,
Any tips on cutting the curve? How precise does it have to be?
Kerry
Hi,
I’ve used a bean bag liner in mine as I do not trust my 4 year old not to open it , in using this I dont get the same shape chair when it’s not in use any tips on how best to use the liner to create the top peak.
jean
Hi Hayley. I just found you and this adorable bean bag chair. Is this a pattern I can purchase to teach a class? If not, do you allow teachers to teach using your tutorial? Thanks for taking the time to answer!
Anne Tam
Hi! This is so great. I’ll make one, my kids would love it. Thanks for sharing. Terima kasih.
becky
This is so cute! The kids are getting a fresh paint and redo in their rooms….this might be on the list to make for them.
Grey House Harbor
Hi Jean! Sorry for the late response… There isn’t really a pattern per say – just the measurements and directions. I’d be honored to have to use the idea for your class – please just add in a reference to this post. Thanks for asking!
Grey House Harbor
Erika – There’s no real trick to cutting the curve. In fact, you don’t have to do it if you don’t want to — I just like that it softens the look of front of the bean bag. It doesn’t have to be super precise.
Texas Susannie
Love this!! Perfect Christmas gift for the grand babies!
Barbara
Really pleased with this, my granddaughter will love it! I put the zip in before sewing the curved edge, much easier! I used dress fabric 100% cotton and double stitched the seams.
Dawn
Brilliant ..I’m going to get my girls to make themselves one of these each.. thankyou for sharing.
Grey House Harbor
You’re welcome, Dawn! Glad you will get your girls in on the sewing action. They’ll be so proud of themselves when they finish!
Parrish
Thanks so much for this easy pattern! We put all her stuffed animals and some unused pillows inside. Great storage, and she loves it!
Jean Kritenbrink
I made the chair and it turned out so cute. I made a liner as I have cats and know it will at least have to be tossed in the dryer occasionally. I made the liner just like the chair and when I filled it, I put the liner inside the chair and lined up the curved front seams on both and clipped them together on the outside with large office clips so that the liner would stay in place while we filled it. After the filling, I took them off. I posted about it tonight on my blog if you want to take a peek! quiltinjeanie.blogspot.com
Grey House Harbor
You’re welcome, Parrish! So glad it’s as much a hit at your house as it has been at ours.
Grey House Harbor
Love your tropical fabric, Jean! So cute! The tip about the office clips is a great idea.
Leanne
I just made one of these with waterproof material – our local diy shop had sale on waterproof/stain resistant table cloths!
It’s out by the pool and it’s perfect for sun bathing on here in Spain.
Thanks for the tutorial ?
Sarah
I have made two adult/teen size of these bean bag chairs for the family and we love them! Thank you so much for sharing!
Grey House Harbor
Excellent, Sarah! So glad you’re enjoying them.
Grey House Harbor
Leanne, that is a BRILLIANT idea! We have a pool as well… I might be hunting for waterproof table cloths this week! ;)
Leanne
?
Shirley D
Hi! Love the tutorial. What do you think about using old jeans? I have a ton of them and was thinking of sewing them together in a crazy pattern or just in strips for the outside fabric and then use old bed sheets for the liner. Any thoughts or tips? Thanks!
Grey House Harbor
Hi Shirley. Jeans sound like a rad idea! Since the dimensions for the bean bag are rectangular, you should be able to easily patch together some old blue jeans to create a unique look. And bedsheets for the inner-liner is brilliant. I love your “green” take on this.
Mary
Thanks for your tutorial, made it quite easy to follow. I made a pair of these for my classroom library. They turned out great!
Shirley D
I finally finished it! It’s an adult sized bag made from old jeans and the liner is made from old bed sheets. I wish I could post a pic. Can’t figure out how to do that. I had a bean bag chair that I bought last year but all the seams broke open (hardly sat on!) so I reused the beans plus bought an extra bag of filler from Wayfair. I think the next time I make one, I’ll insert the liner before filling. I tacked down each of the liner corners to the bag so the liner doesn’t shift inside. I was too lazy to put in a zipper so I just sewed the openings closed. My girl is older so I don’t anticipate washing it as often as I would with little ones. At least I hope so, lol. Thank you to the person who suggested to use a Pringles container to fill the bag. Less mess and stress! This tutorial was so easy to follow! Thank you so much. I love it!
Grey House Harbor
Shirley – I love that you totally “up-cycled” this whole thing! Thanks for stopping in and letting me know you enjoyed the tutorial. :)
Artsy Fartsy in Florida
WONDERFUL FUN AND EASY! 58×40 good adult size (might go to 60×40 on next one)
I made a liner from a sheet (first sheet was too old and puppy nails popped 4 holes that pooped beans everywhere…. ) so made a new liner from new sheet, sewed all 4 sides as above BUT left a 15 opening (no zipper on the liner) when it came time to fill……
1. took a paper trash bag and cut a 4 inch hole in the bottom corner
2. stuffed the paper bag into the liner gap 1/3 way at an angle and used packing tape to connect it to the fabric and the bag from the outside
3. put my leaky bag on the table (used packing tape to cover the holes) and cut off one corner about 2 inches to make a round pastry tube like funnel.
4. had hubby hold the bag and the liner while I tipped the “pastry bag” into the trash bag….. fill away…. about 1/2
5. had hubby shake the beans into liner then we repeated (I am not that tall so he had me stand on a step stool so he could raise the bag higher as the liner filled up.) Worked like a charm…. just sewed the liner with a basting stitch to try out the amount of fill…. WE have a new Christmas present idea for the whole family! Even teaching the 8 year old to sew and make 2 for the brothers!
Thank you for inspiring me to get this project DONE! (HUBBY and Son thank you too as the “poofing beans” are all contained!) Thought about using my round OATMEAL Paper can but it is in reserve for another project.
Grey House Harbor
Wow! Thanks for all the extra tips. So glad the kids are getting in on the sewing action!
Holly
Hi I’m making this for my daughter who is 5 when cutting the fabric which is the width and which is the length measurements?
Is the width the shorter or the longer one
Thankyou
ShoelessShop
I’m going to try this with a waterproof lining for easy cleaning! I’ll post pictures of the process if I’m successful….?
ShoelessShop
Also trying a mix of beans and foam…we’ll see!
Grey House Harbor
I like your waterproof idea, ShoelessShop. This whole tutorial actually started with my crazy idea to make waterproof poolside bean bag chairs out of used spinnaker sails! That never came to fruition, but the kids versions are fun all the same.
Grey House Harbor
Hi Holly. Yes, 32″ is the width and 45″ is the length. 32″ also becomes the approximate height because the one side gets turned sideways. Hope that helps!
Shannon
My friend and I are making 5 of these. The first one is finished, but we put I page 1000 liters or 3.5 cubic feet in it. It’s flat! Nothing like the picture. Followed instructions exactly..
Grey House Harbor
Hi Shannon. Sorry to hear of your filler troubles! I will say that I intentionally “poofed” the bean bag for the photos (not with extra filler, but just with my hands). You don’t want the chair to be super full otherwise you won’t sink into it when it’s sat upon. So yes, in general it won’t have an abundantly full look unless you “poof” it or someone is sitting in it. But feel free to add more beans if you wish for it to retain that shape all the time.
Shannon
Grey House Harbor-
Thanks for the Reply. It was just a surprise when 1 bag looked flat.. our cost on filler here isn’t cheap and making 5 with 2 bags each filler… we might would have reconsidered this…lol We still love them.. And appreciate the post. But for other readers you might want 2 bags! Lol
anoymous
What is the best brand to use of bean bag filling pellets?
That is not real expensive?
Saw that Jo-ann’s has some on sale right now? What do you think?
anoymous
thank you so much for this pattern though planning on making this for a Christmas present!!!!!
Desirae
Curious what age these will work for? I want to make one for my 9 year old, but don’t want it to be too tiny for him!
Grey House Harbor
Desirae – This size might be a tad small for him. I’d suggest making one that’s more adult-sized. Start with a rectangle that’s 43×60 and a longer zipper. Directions will be the same.
Lyndsey
I’ve just made one of these for my little girls 3rd birthday, I’ll post pics up online soon and comment again once I’ve bought the filler. I just wanted to give everyone a little tip regarding the liner for the beanbag. You can actually buy specific beanbag liner from ebay – it’s like a really super stretchy lightweight kinda sock that the beans go in, which you then put into your bag. Makes washing easier and the sock ‘moulds’ to any size/shape bag ;)
Beth
Great tip! Thanks, Lyndsey!
Jan Caglar
Made this for when my grandson comes ..he will love it… Thankyou for the pattern ..very easy
Éva
Kedves Hayley! Nagyon örülök, hogy rátaláltam erre a bemutatóra. Köszönöm! Szeretném én is elkészíteni a közelgő karácsonyra! Éva
Claire
Wow this is great! Just whipped up one for my son and about to start on one for my daughter. We stuffed ours with recycled plastic bags, have done this with cushions also and it works really well.
Skipped on the zipper and used a couple of inches of stick on velcro that I had in my sewing bag.
This is so easy and also basic enough to customise. Thanks heaps, from excited kids and mum ??
Sarah
This might be a “stupid” question, but:
Does that mean I add the 5/8 seam allowance to the dimensions, or do I take from it once it is cut?
Grey House Harbor
Sarah – Not stupid at all! Cut the fabric to the stated dimensions, and THEN sew in 5/8″ from that edge. No need for extra math. ;)
Grey House Harbor
Claire – Thanks for stopping in to let me know how it went! So happy you’re enjoying the finished chairs.
Grey House Harbor
Éva – Sok szerencsét varrás néhány karácsonyra!
Tina Peterson
Lol – Gigi would be the kiddo who opened this bag. If there is a zipper or button insight she’s messin’ with it! Another thing you could do is sew the beanbag with an outdoor type fabric. Sew it shut. Then make a slipcover that can be zipped and removed to wash.
I actually came from another website who sewed one of these up for her toddler and I thought it was more of a square pillow leaned against the wall. I was thinking it would be great for nap time. I may have to try this.
Crystal
I made one of these for my (small) 11-year-old daughter and she LOVES it. It turned out so great — I wish I could post a pic here!
Beth
So glad your daughter loves it! Thanks for letting us know!
Amanda
I made these for my kiddos. I made another bag out of water proof fabric to hold the beans so if my kids spill anything on it, I can easily wash the cover! Thank you for the tutorial!
Grey House Harbor
You’re welcome, Amanda! Thanks for sharing your tip!
Deborah
Other sources of large, sturdy, easily washable fabric would be “cloth” shower curtains, table cloths, sheets from bedding sets that are too rough to sleep in. I also have rip-stop nylon but that is pretty static-y. Thanks for the tutorial!
Jenny
I made this wonderful bean bag too. Possibly because the fabrics I had left over from making roman blinds from my daughter’s bedroom were similar to the ones you used. I slightly overfilled it but it’s getting better and is really comfy, even for adults!
Mark
Hi, thanks for sharing! I just made a grown-up sized bean bag chair, and took some inspiration for construction from your helpful description. Now that I have a better idea what I’m doing maybe I’ll try to adapt this shape for an adult; the back looks like a nice touch.
Melissa
Just finished one for my 18 month old granddaughter. She absolutely loved it. I am now almost done with a second chair for my two year old granddaughter. Thank you for sharing this pattern.
Dee
I made this! Really fun. I did a plain muslin one and filled it and then made several covers. One thing I did that made it a bit easier was put the zipper in before sewing the curved seam. At least it was easier for me but I basically try to find the laziest way to do anything! Thanks for such a great pattern. I haven’t done this yet but our local furniture maker will also grind up their left over foam and give it to you for a nominal fee. I may try this next. Thanks again for such a great pattern.
Narelle
Use a cobble stitch over the zipper to seal it from little fingers. That’s he best way to retain adult access to the inside of the bag, while keeping chldren out. Sure beats having no zipper, hence ripping the seams, when replenishing beams. It is a simple as cutting the cobble stitch and unzipping.
Beth
Thanks for the tip, Narelle!
Sue Craighead
We have seven small dogs, Pekingese and Chihuahuas. I think by making these a bit smaller, our girls would be very comfy and happy. They would be more attractive than homemade bunk beds. LOL
Susan
Hi – I haven’t made this yet but regarding the zipper – you could sew an extra piece of fabric over the zipper end to cover pull tag like they do on children’s wonder suits. Just takes the visual away from the child. You could also remove the pull piece which is often done on other larger bean bags
Trina | Mom Smart Not Hard
Thanks for the awesome tutorial. I made two of these for our playroom and they turned out great! I wrote up a short post showing them off and made sure to send people your way :)
Linda
Have you heard if anyone has made this out of fleece? I’m looking to make one for a friend’s new baby out of their university’s fleece rather than the thin cotton alternate available in the school’s fabric.
Such a great idea!! I can’t wait to complete one and send it off!
Cara
Such a cute bean bag! I’ve seen some new bean bags that instead of filling them with the “filler” you can use it as storage for stuffed animals. Have you tried that? Just wondering how it works because I’m interested in making these for my kiddos for Christmas. Thanks so much!
Tasha
Do you have any more info between steps 6 and seven…was going well untill i got to this point.
Trina | Mom Smart Not Hard
Hi Tasha,
This was actually the exact spot I messed up on.
Take your zipper. Unzip it.
Make sure the fabric is inside out and fold it so each side is half and half of the different fabrics (very important).
Now place your zipper in the middle of the opening and face the “front or outside” of the zipper into the bag. The zipper part of the strips should also be facing into the bag. Pin each strip to the fabric.
To sew, I would watch a few youtube videos on how to sew a zipper. My best advice is to sew one side half way (starting from the open end of the zipper). Then keeping your needle in fabric lift up the foot and zip the zipper closed so now the zipper is at the other end and out of the way. Continue sewing down the rest of the strip.
Then open the zipper and repeat on the other side.
Now you will only need to sew the fabric gaps at each end of the zipper closed. You can do this the normal way you sewed the other seams but make sure you sew a little past the zipper on each side so there are no extra opening. When you do this, make sure the zipper is open so you can flip inside out.
I hope this helps!
Rebecca Smith
Do you hem the fabric before adding the zip? Would it not frey otherwise?
Judy Dengler
I made this and found that 1 – 3.5 cubic feet or 1000 liter bag of fill was not enough. I ordered another bag and then realized that luckily since I’d made a lined insert, I could remove the outer bag and shorten it by 4″ on the curved seam and stuff the liner with filling back in and voila! it resolved the problem and saved having to buy/store another bag of filling.
The pattern is adorable, but this problem wasn’t fun to fix. I followed the measurements and directions exactly. Just wish I’d known the correct measurements before I began.
Thank you for the tutorial though. Now that it’s the correct size it’s truly adorable!
One more note, I used a serger to finish the raw edge next to the zipper. to give it more strength.
:-)
Beata
Great tutorial! I’m just about doing same thing, any recommendations for a strong fabric?
Judy Dengler
Hello Beata,
The upholstery fabric is usually quite strong. Although, depending on who will be using it a cotton could be strong enough. I just used some nice Waverly fabric I was able to buy at Walmart. It’s quite nice quality but for a great price.
Mine will be used primarily by a 1 year old though.
Good luck!
Alysa
this was so much fun to make and I am so excited to give it to my 3 year old. we’re using it as a home for stuffed animals :)
Beth
Linda, Did the fleece work out okay? I want to make one with some fleece but didn’t know if it would be too stretchy.
Linda
Beth,
The fleece seems to be working out well. It’s a substantial fleece rather than a thinner fabric. I also made the inner lining with the beads out of muslin so it can be washed. I am still finishing up the zippers on the bottom (I hope the third time is a charm as I’ve done them a few times now — one won’t work if you want to be able to remove the entire bag of beads in the muslin liner and then I was a little directionally challenged).
If I could post a pic, I would…but I’d definitely say — go for it!
Gypsy
Thanks for sharing this. I just made one to store all my kid’s soft toys. I didn’t have heavy weight fabric so I used double layers of normal cotton fabric (I had them in my stash) and it worked out beautifully. Also, I didn’t curve the base as I saw many pyramid shaped bean bags and didn’t mind the straight edge all that much.
Janice
I love this idea for my girls reading nook. I am always looking for ways to be more healthful and love the idea of making my own so that I can fill with natural shredded latex rather than the the polystyrene that they “claim” to be non-toxic :( I would like to know what is the finished size once it is filled? Does anyone have that info? Thank you in advance.
Pam
Tried this today, with a furry side and a heavier cotton side. Easy to sew up, the instructions were great. I thought I’d try filling it with shredded foam thinking it would last longer than foam pellets but I hadn’t worked with the shredded foam before. It was REALLY full of static and stuck to everything. Not fun trying to fill it but it did plump up nice. Thanks for the tutorial! Next one I’ll just stick to the pellets!
Linda Burrell
Pam, the styrofoam pellets we’re no better. I ended up chasing them so over my house and they were a nightmare to get stuffed in to my cotton liner bag for my fleece chair!!
Don’t plan on these filters being any easier to work with!!
Jessica
I’ve had this one saved for a long time and I finally did it! It’s a great pattern and my boys love it! I ended up making an inner cover that is sewn all around and I’m going to make a removeable outer cover. Thanks for the tutorial!
Beth
So glad you liked it, Jessica!
Kimberly Mayo
OMG!!!!! This was SO easy to make and your instructions were AWESOME!!! I made mine a little bigger, well, I made it as large as I could with the material I had and it turned out so big it took 5.0 cubic feet of beans! I’m sure my granddaughter will love it though! Thanks so much for the great tutorial!!!
Aisi
What a great little beanbag! So easy to make.
I used your measurements, but a bigger seam allowance so it came out a little smaller. It took a full 4 cubic feet (113litres) bag full of beads to make it the perfect plump. Fits my smallest son perfectly. And if you don’t mind your beanbag not being enormous, it’s quite adequate for a grown-up to sit on too. I’m 5’8″ and I found it comfy. The shape is great, plenty back support.
Alison McAndie
Love this easy post!
When sewing the zip make sure it is open or you will find you cannot turn the bag right side out! I have some ripstop fabric to use on one side so my grandchildren can sit on the grass!
Sarah
Spent ages in hobby craft earlier with youngest feeling all the fabrics, he is very sensitive to touch.
Found some fluffy stuff he likes, let’s hope it works
Georgia Featherstone
Thank you. Great design and easy steps. Very happy with my bean bag. Yes I made an inner bag so the outer can be removed easily and washed without the extra work of refilling the beans.
Eluxury Home
Wow Great! This Article is so helpful for us.
Sarah
Made yesterday, took about half a day, but then I’ve not used a sewing machine in over 10years, never put a zip in, so really quite impressed with myself.
Not looking the best as just used the filling someone gave me, more on order.
Logan
Hello! How should I do the last edge if I’m not using a zipper? Thanks! I’m a novice sewer :)
Anna
I can’t wait to try this! The shape reminds me of a leaf, at least from the front, I think I might try quilting the top with some veining for texture and plushiness. Wish me luck?
For the zipper I think I’ll just stitch the tab down, that way they can’t open it but if we need to add more “beans” I’ll only have to cut a few stitches to unzip it and re-stitch when I’m done!
ExcitedTailer
Wow! This is so cute! Were moving to a new house in a month and I don’t see why I can’t make a few of these for my room! So when my friends come over we can laze on comfy bean bags!! I’m ,like ,still 16 by the way. :)
Katherine Buchanan
This was amazing, I’m making a couple of these for an activity I got outdoors and i’m having so much fun sewing them with my mom. :) Thank you for the detailed explanation. :)
Mariaan Joubert
This is so great! Thanx Hayley! What would happen if I were to make a seperate bag inside that also has a zipper for the bean bag filling… so if I want to wash the outside cover (which also has a zipper) I can just take out the inner bag… and also make it less accessable for the kiddies to get to get filling by inserting the inner bag zipper facing down or at the bottom of the outer bag… so for my actual question…. how big must the inner bag be? Same size? Smaller? If so, how much smaller do you think?
Carina
Had anyone really followed these directions and made these bags? I have! Number #1 3.5 cubic whatever is not nearly enough! I have used 6 cubics and still need more for my daughters…I also found that u NEED polyfil to make the point stay up. Oh, and this is a really expensive project too! $30 at least for plain cotton fabric (not the reccomended expensive upholstery fabric), $15 in polyfill to make the peek stay up, and $60+ in bean bag fill! So before u spend $100+ to make one…just buy one! WHAT YOU NEED TO KNOW FIRST!
Shirley
Carina, it is expensive if you don’t look for or wait for the deals at the fabric store for the thicker, sturdier materials. I made mine out of old jeans and the liner from 2 old bed sheets. Free! The most expensive was the polytfill/beads. I did pay about 60$ for it but some people stuffed them with old stuffed animals. Probably not as comfy but it can work and also serve as storage for all those stuffies that they can’t part with!
Shirley
As well, I made mine after buying one from Walmart for 75$ and it fell apart after 2 weeks. A handmade one is much sturdier and made with love!
Yogan
Great tutorial! I’m just about doing same thing, any recommendations for a strong fabric?
Kimberly McGowan
We are having a small birthday party next week, so guess where the kids will be sitting! Thank you! This is great!
Laura
Any tips for getting the zip neat ? I got it right on second attempt after unpicking first go but still bit of a fluke rather than knowing exactly what I was doing as never fitted a zip before
Thanks
Amanda Wright
Hi, I just made this for my Grandsons using an unwanted quilt cover. Only had to sew 2 sides and it had poppers already attached. Stuffed it with stuffing from old pillows, so no cost involved. Thanks for the pattern.
Kelly
Still totally love this bean bag! I featured it on our article 6 DIY Kids Bean Bags And Kids Poufs
a while back :)
Kelly
Still totally love this bean bag! I featured it on our article 6 DIY Kids Bean Bags And Kids Poufs
a while back :) https://www.diythought.com/6-diy-kids-bean-bags-and-kids-poufs/
Jessica
Anyone try this by hand ? I’m attempting it. Slowly lol
Sarah
Loved this! I made two of them. So easy and the kids loved them! I used outdoor upholstery fabric so they are water and stain resistant.
Sarah
Loved making this! I made two of them and my kids loved them. Used outdoor upholstery fabric. Water and stain resistant.
deborah
If you sew the sides together then cut the fabric wouldnt the zig zag stitching come undone?
Tina
I am not making a 2 toned bag. All one piece of fabric. Does that mean that I don’t need to cut the fabric in half, and not make the extra stitching?
Kacey Warren
I am sewing up 4 of these for use with our at-home learning pod due to COVID. I found the filling for 50% off and the yardage was also on sale, so they ended up being about $30 per bag – way cheaper than you could get in a store. Thanks for the tutorial!!
Caroline Scott
Thinking about making two of these but for very small children so I will need to make a liner that can be sealed and then the outer can be washed easily. Please can you advise me on the best sort of fabric to use for the liner? I was going to use blackout curtain lining fabric with is slightly rubbery on the inside but I have seen more of a netting that is sold for this purpose. My worry with that is not being able to copy the exact shape with a stockinette. Will I be ok to use the curtain lining?
Deb Van Sickle
I Made it…Pretty easy!! The zipper was a challenge for me only because I lack the experience. I added my Grandson’s name in applique on the side with left over scraps from the top (BATMAN) fabric that I used on the top.
Thank you for the tutorial, I think he will love it.
Raewyn
Just made one for my 9 year old daughter. Used a single sized quilt cover, doubled over (so two thicknesses of material). Double stitched all seams, but didn’t cut anything so no need to zig zag stitch the edges to stop fraying. I found a free old beanbag online, took out the zip and used it in my beanbag, so mine has the proper safety zip in it. So pleased with the overall result! Using a quilt cover makes a great size for tween/teen. I can sit in it comfortably (small adult). As others said, better to put the zip in before doing the curved side, BUT make sure the zip is open before stitching the curved side! I didn’t, and had a great deal of trouble getting the zip open from within the material!!! Took waaaayyy more than 30 min, but I am quite inexperienced (first time I have sewed a zip). Overall about 4-5 hours over 3 evenings. 🤷🏻♀️ Thanks for the fabulous pattern!
Bernadette Kennedy
I’m using this pattern for a bean bag liner. Just the idea that I needed here.
Tara
Would I be able to use quilting cotton for this or would it rip too easily? If I were to use quilting cotton would I need to make an inside liner?
Alex
Quite often when you buy the beans – I have made this a couple of times and bought beans off Amazon – you get a stretchy stockinette sack included for free. I have sewn these shut in roughly the right shape and they can then be popped inside the outer layer and no chance of beans spilling out if the zip is opened. I also sew in a little handle in the same fabric at the top point for easy picking up and moving around. Great pattern though, thanks so much. I have made a bigger one for a grumpy 16 year old in black and white and a brightly coloured floral one for a two year old and they both love them! :)
Elina
Hi, I am just beginning to sew, so still learning many things. May I ask if linen canvas fabric is going to be too heavy??? It is pricey too. What other options of heavyweight/medium weight fabric could be a good fit (i.e
what are they called basically)? thanks a lot in advance.
Leslie
These are awesome! I made two little ones (for toddlers) and one large one (for a teen) several years ago. I’m making two more for toddlers this month, and planning to employ the “liner” method. I plan to sew the liners closed and use heavy velcro on the decorative covers, and I sew a “handle” on so the kids can drag them around if they want to (or hang them on a hook to get them off the floor). Thank you for the great ideas!
Andreah Cole
Great instructions and photos. I have just made 2bena bags from this pattern for my girls for Christmas. They are quite big and really comfy!
Don
I think this is perfect for decorating a kids room. The kids really enjoy having bean bags!
Gift Idea Geek
Super cute idea for a gift as well! We love it! However, I think you’re being very optimistic about our sewing skills. I may just need to invest in that sewing room after all!
Thanks for sharing!
Andrew
ro
Thank you for this tutorial! I made it but I did it to stuff Kid’s extra blankets in there. It wasn’t enough filling so I also put some old pillows in too. I used velcro instead of a zipper because that’s what I had at home. She loves it! I made it just to keep the blankets off the floor.
Beth
Such a clever storage idea! Glad you liked the tutorial. :)
Arthur
Thank you! As a new sewist (this was my first project!) – the zipper is the most challenging part for me. I would have benefited from more detailed instructions on how to do that, as it’s all brand new to me. However, I’m sewing my fourth beanbag chair and my zipper stitching continues to improve. I appreciate this post so much, as it’s given my children a cozy place to hang out that’s really special to them. Cheers!
Beth
Hi Arthur! So glad you enjoyed it!
Woodworkers Shoppe
A kids’ bag chair is a fun and practical piece of furniture designed specifically for children. Combining the comfort of a chair with the portability of a bag, these chairs are typically lightweight and easy to carry, making them ideal for both indoor and outdoor use.