Whether your decorating style is transitional, comptemporary or straight up modern, you can’t help but have a soft spot for the sweet, charming feel of vintage. Little Miss Heirlooms’ founder Priscila shares with us a darling craft you can complete with the help of your kids along with adding some versitility to any room in your home.

From: Priscila Barros
Location: San Diego, California
Share a little about yourself:
I am a wife, mother, daughter, designer and boutique owner. I reside in San Diego, California where I spend my days watching and playing with my 2 adorable curly headed boys. I enjoy going to flea markets and thrift stores to find forgotten treasures and also enjoy blogging (www.littlemissheirlooms.blogspot.com) about all things baby. I love baby, children and playroom decor and you can find all of this at my online Boutique Little Miss Heirlooms. We provide vintage decor for children spaces, toys, party items and even different holiday decor! I love how vintage items adds a whimsical touch to a modern nursery and how each piece has it’s unique history. It’s just so charming and so cute!
What inspired you to create this project?
I love to add personal touches to my son’s rooms and I personally believe that there is never enough pictures in a house! It was an easy project also that my sons could help me create and something they really felt proud of making. It’s simple enough for a child to make (adults will need to help cutting) and personal enough for a unique gift.
Please share with us step by step, detailed instructions:
You will need:
Scissors
Wood Picture Frame
Mod Podge
Scrapbook Paper
Embellishments
Vintage Illustrations
Paint (optional)
Step 1:
Prepare your work space! Lay out the newspaper and get your brushes and supplies ready to use.
Step 2:
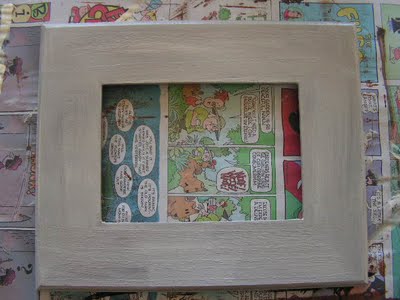
1. Remove the glass from the frame (you don’t want to get paint on this) and place your frame on top of the newspaper. If you decide you want to paint than lightly paint your first coat.***** I painted my frame 3 colors (brown, black and then an antique white) so that when I sanded the corners it gave it that “shabby chic” look of worn wood. I wanted the different colors to come through depending on how much I sanded. Also the painting process doesn’t need to be perfect especially if you are just going to distress it after. That’s why this is a perfect craft for kids because it doesn’t have to be perfect! It’s the imperfections that really gives this project charm.
Step 3: Cut and Paste
1. While my frame was still wet I laid it on top of the scrapbook paper. This gave the paper an outline of where to cut my hole for the picture
2. Cut the hole
3. I then applied the Mod Podge glue and glued down my scrapbook paper on my frame
4. Take a credit card or something hard to get the bubbles out of the paper
5. Trim the paper on the edges so they fit the frame

Step 4: “Distressing” your frame
1. I mixed a small amount of the antique white paint and a dot of the brown and applied the mixture on the edge of the scrapbook paper. This gave my frame a real “vintage” feel. This again doesn’t need to be perfect, let your kids have fun.
Step 5: Adding Your Personal Touches
1. This is the real fun part! You can now add anything you want to the frame! Lace, flowers, vintage cards, illustrations and words are just some of the things you can add! I added some vintage illustrations from a book that dates back to the 1930’s!
2. Cut your embellishments out and Mod Podge them on your frame. Mod Podge over the illustrations also so they have a finished look to them and remember to get the bubbles out!***** Something fun to use is vintage game pieces! I love to use old Scrabble tiles to spell out names or fun messages!

This is a fun, fast and rewarding project ! Frame your children’s art, give these as gifts or display them in a special place in your home!
If you have a great DIY project for the nursery or kid’s space, we want to learn about it! Submit your projects here.





Comments
Bibzees
So creative! Thanks for the step by step….will forward to my artistic friends who will love this.
Rachel
CUTE! Thanks so much for this, I’ll be linking.