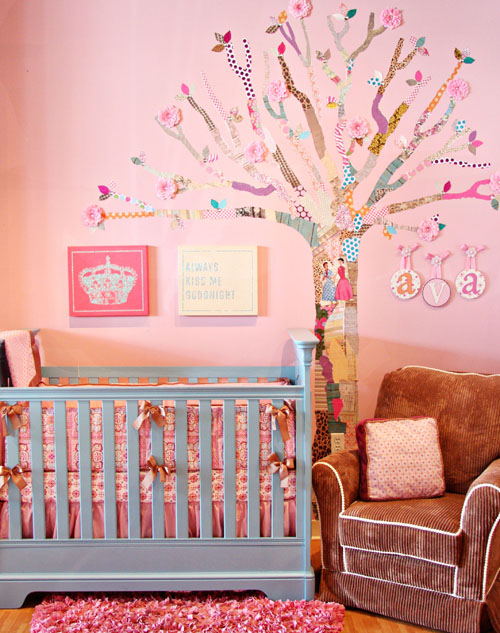
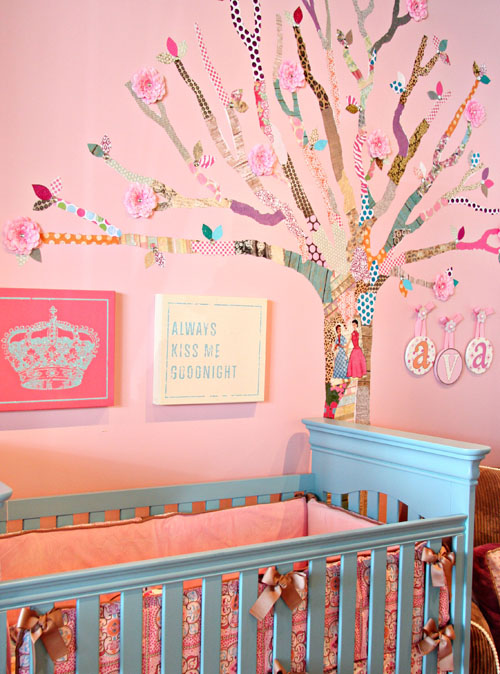
There’s no question that trees have become a popular decor item in the nursery. Just scroll the pages of the Project Nursery gallery, and you’ll see all kinds of trees in different sizes and shapes! The vinyl decals are easy, but I wanted to mix it up a bit. With a quick trip to my favorite local craft store, I grabbed some of my favorite scrapbook papers, some simple tools, and in a few hours this very cool tree grew right out of my imagination!
Not very creative? Don’t stress! If you can tear paper, you can accomplish this tree—and just to prove it, here are a few simple steps on recreating the same look in your own home!
Here’s what you’ll need to get started (some of this you’ll probably already have at home):
Shopping List:
Scrapbook paper (any size) about 20 sheets for a 6′ tree
Modge Podge Glue (you can find this with the other glues; I went with the matte finish because I didn’t want it to be too shiny)
Scissors
Cheap paintbrush (you’ll throw it away after, but get a wide one—I think mine was 2″)
Paper bowl or plate
Ladder or step stool
STEP 1: Go to your local craft store or scrapbooking store, and pull some of your favorite papers. I brought fabric swatches of the bedding I was coordinating the tree with and grabbed a mixture of printed, solid and glittered papers (everything needs a little sparkle)—anything that was in the same color family that I thought might look cool together. It’s better to have a variety of colors and styles than to stock up on one print, so go for it, get creative and just grab one of each paper you like. I think I had about twenty different sheets total to start with. I only used about half, but it’s better to have too much than not enough. It’ll save you a trip back to the store mid-tree.

STEP 2: Start the tree. I didn’t use a tree template, but if you’re nervous about limb placement, I’d suggest printing a picture of a tree you like and using it as a reference for limbs and the trunk. Don’t worry, there’s no “right” way to make a tree—just take a peek into your backyard! I started at the trunk where the limbs start to branch off. That way you know the approximate height of your tree, and you can make sure you give yourself a good base to work from. If you start from the floor, there’s a good chance your tree might grow crooked, but if you’re more comfortable with that, then go for it!
You can use the scissors to cut the limbs, but I actually tore all of my paper. I like the imperfect edges, and it adds a vintage feel to the tree. So put those hands to work, and just tear down the sheets, making each branch the thickness and length that works for you. Once you have the torn piece ready to go, just slather on the Modge Podge to the back with the paint brush, and press it against the wall. The glue is super sticky, so it will attach right away, but it will still be moveable if you don’t like your first placement. Hint: if the glue goes beyond the tree onto the wall, don’t worry, it dries clear!
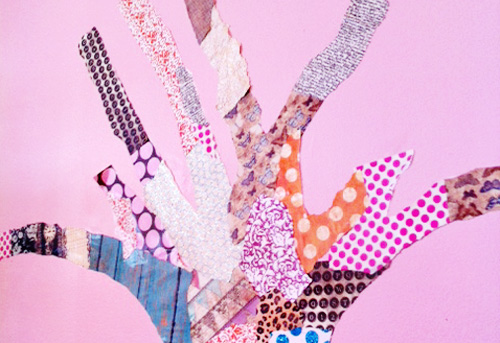
STEP 3: Let it grow, baby! As the limbs reach out and up, tear the paper thinner, just like on a real tree. I tried to do the main branches first, and then filled in with the smaller branches as needed. I love how the one lower left branch reaches out across the crib. Wouldn’t it be cute to hang the baby’s name off of it? Or pictures of family members like a family tree?
STEP 4: Once the tree was complete, I added the flowers and bling and cut out the leaves. Now, for the leaves, I did use my scissors (it’s easier than tearing). I stacked up some of my leftover scrapbook paper and cut out simple leaf patterns. I grouped the leaves on the tree and added a rhinestone to give it some BLING!

So that’s it! No two trees will be the same, and I can only imagine the possibilities! You could add rows of rhinestones to the branches, use fabric for the leaves, add birds, butterflies…whatever your imagination can dream up!
Happy tearing everyone!


Comments
Liv Llanillo-Elms
Hi… with this tree making, can i use old magazines that are colorful? when i took it off in the future, will it be messy and do i need to repaint the wall? thank you.
Danielle
Anyone ever tried this for a boy? I wonder if concept is too ‘girly’ for my all-mess boy room ;) i love it tho… its super cute!
Ashley and Paula
Hands down Amazing!!!! I’ve done different projects before with decoupage but nothing like this! I can’t wait to try this in my baby boys room :) Thanks for sharing this fabulous idea.
jtejada08
I LOVE THIS!
Katy
I think it would be AWESOME in a boy’s nursery! Or kitchen… or guestroom! ;-) Just change up the papers! And Liv, love the magazine idea… how could would it be with old book pages too – the light pages & black words would totally POP off a darker painted wall!
Post pics when it’s done!
And here’s a link to the bedding in the pic too! http://cadenlane.com/collections/modern-vintage-collection/modern-vintage-dylan-bedding.html
hawahawa
This is just amazing. But I do share Liv’s concerns about leaving the wall messed up that you’d need to paint it!
KelleJoya
I have tons of fabrics in the attic which was left over from our reupholstery business, and I wonder if I could use these for the tree itself, not just the leaves? This certainly looks lovely!
Recreate
Whee! This sure looks like a fun project to do. Can’t wait to try it for myself thanks for sharing!
Brittany
This is seriously GORGEOUS! I can’t wait to try it out!
Cala Nanda
How easy would it be to remove later? I would love to do it if I understood how to strip the paper down the road!
Kaity
How easy is the removal of the tree? I would love to do this, but we are military and live in base housing and when we move out the walls have to be returned to their original state. I would hate to do this and then never be able to remove it.
Anne Brown
Kaity,
I would think that if you use wallpaper paste instead of the modge podge, it should be easy enough to remove. Not sure what’s in the modge podge, but at any rate, your walls should be painted (prepped) so you don’t tear the drywall!
Alison Fennell
Just adorable and so natural-looking.
For me its the contrast of the pretty fabric patterns and colours and being against the pink wall it really is so inviting and whimsical! Well done.
Heidi M
I too I’m wondering on the wall. Anyone out there no if mod podge ruins the walls? Can’t afford the vinyl trees I’ve seen, but I have a box of scrapbooking papers that would be oh so fun for this!
Mandy
OOOhhhh, cute.
it would also be really cute to hang a wooden swing from the ceiling, maybe sit a little stuffed animal friend on the swing.
Beth in AZ
I love this idea! I have no small children, but this may equate to a soccer logo in a teens room or something quilty in my sewing room! I wonder if watered down liquid starch would work for removal purposes? I remember a LONG time ago (please dont’ make me try to remember the YEAR!!), I remember seeing a whole wall done with fabric and they used liquid starch. After you pull it off, the walls can be washed.
t
I’ve gone back to this store multiple times to look at this tree…it’s so cute!! Soo I finally decided to make a boy version. I’ve finished the trunk and it looks pretty awesome…just hoping I don’t make the tree limbs crooked or awkward looking.:)
berceaux bebe
I do agree with all of the ideas you have presented on your post. They are really convincing and will certainly work. Still, the posts are too brief for beginners. May just you please prolong them a little from subsequent time? Thank you for the post.
Joyce
Is this easy to remove from the wall?
Maran
I did a tree with variety of fabrics and used liquid starch.. dip, ring and slap on wall.. turned out great and comes right off without hurting the painted wall underneath. Just have to wipe down the wall for the most part.. I thought I would share that for everyone asking the questions about how to get modpodge off the wall.. my assumption is it will not be easy only because it is glue… prob would have to treat as if it was wallpaper. LOVE this tree .. thank you for the great idea of doing it with different fabric. :)
kizi.com
Greetings! Very helpful advice in this particlar article!
It’s the little changes that will make the most significant changes.
Thanks for sharing!
Centros de mesa
So clever! I love the way it looks!!