Skip to Content

Dusty Blush Big Girl Room

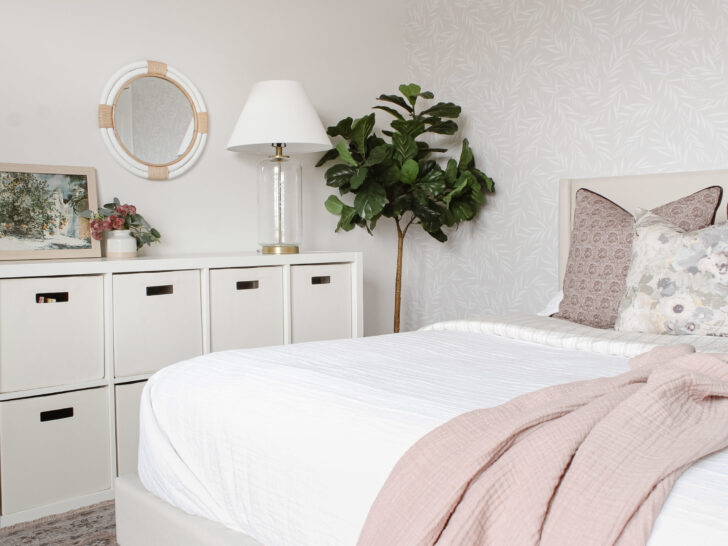
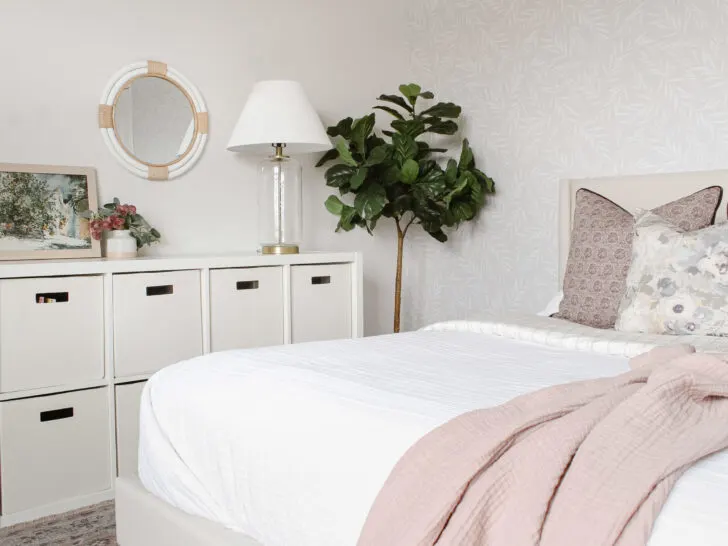
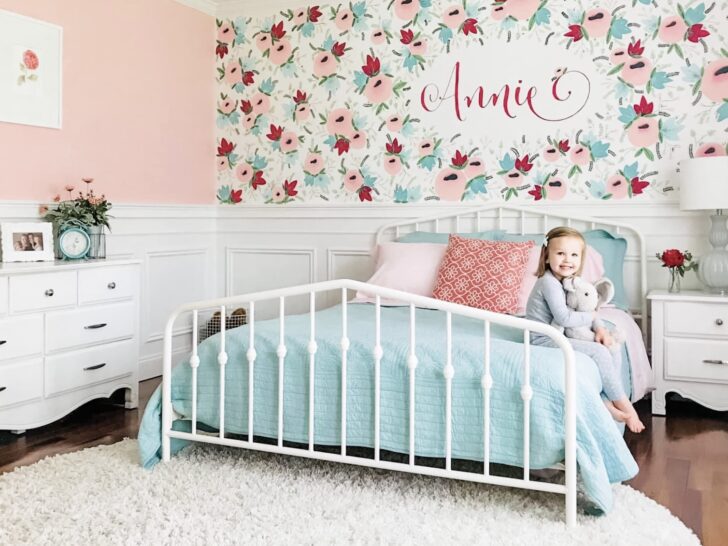
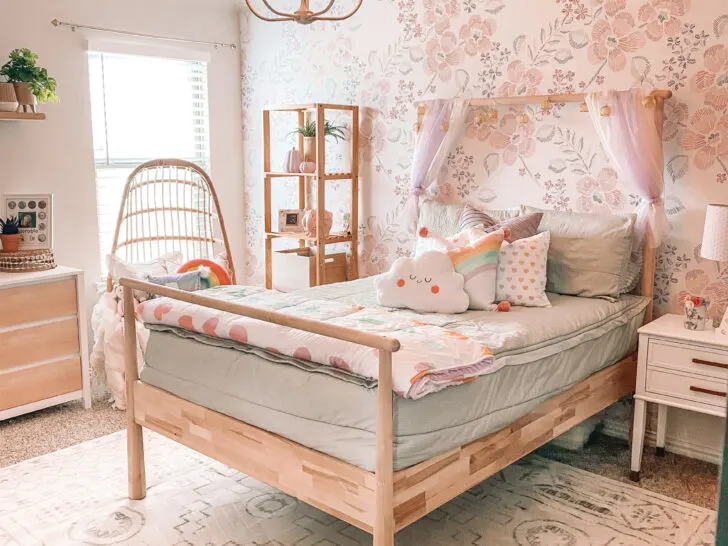
My daughter’s room was a labor of love. It all started with the rug, which was in her nursery. I loved the soft tones and the subtle pop of green, which I wouldn’t normally opt-for, but it works really well with all the muted tones and keeps it from looking too babyish. The rug’s color palette is what ultimately inspired the floral wallpaper; the colors are bold, but they play off the colors in the rug beautifully. Other than the crib, the gold bookcase was pretty much the only other item I had for her nursery. I then added the wood beaded chandelier when we moved into this house and that’s how her room stayed for a while.
When I started to look at “big girl beds,” I fell in love with this dusty blush bed. I had debated between a “safer” choice with a white bed, but I’m so happy I ultimately went with this one. It’s a mature shade of pink that can carry her well into her teenage years.
After I decided on the bed, I came across this gorgeous canopy  in champagne and knew I wanted it for her corner to create a dreamy reading nook. It is such a beautiful, high-quality piece, and my daughter’s mouth dropped when she saw it go up; definitely a little girl’s dream.
I then purchased this simple white nightstand and swapped out the knobs with a set from Hobby Lobby and the room was complete. I’m so happy with how this labor of love turned out, and seeing her reaction to it all was truly priceless. Just remember that oftentimes, these projects do take some time, and you should embrace that because in the end you’ll have a room that you truly love.

Project Revive!

I chose this project because this was the most adorable little boy who recently transferred into a big boy bed and didn’t have the proper space!  He also didn’t have a reading nook, despite loving books. I chose green as the main color because it is a soothing bedroom color and promotes calmness and serenity. The rest of the decor is light colored to complement the soothing aspect.
tips: don’t mix too many colors in a bedroom. Less is more. Also, make sure not to over clutter a room with too many items.

A Vintage Little Girl’s Room with Touches of Modern

The inspiration behind the design of this room is a vintage feminine look with touches of modern!

 
Many of the pieces in Ella’s room are vintage, but we love mixing in modern and versatile pieces such as this adorable queen bedframe that she will be using for many years to come. These gorgeous blush pink pillows  added lots of texture and were the perfect feminine addition to the room.
 
The vintage dresser in her room is another favourite piece that was refurbished and given a new life! These whimsical handmade garlands gave this corner of the room the perfect magical touch. They were also used as a decoration piece for Ella’s birthday party.
 
Ella was also asking for a fun change so we went from polka dot walls to these really cute rainbow wall decals. They’re really the sweetest looking wall decals. With lots of bright fun colours and eucalyptus leaves in the rainbows giving a subtle touch.

Vintage Floral Big Girl Room

When planning to transition our daughter to a big girl bed, I decided to give her room a refresh. I wanted to create a soft, mostly neutral space with a floral and vintage-inspired elements that she could enjoy for years to come. I began by painting the walls a warm white, and then installed peel and stick botanical wallpaper (custom colors: white and mist) for an accent wall behind the bed. For the bedding, I started with a cozy white duvet and layered feminine pillows and a blush throw. I love affordable toy storage options, so I used a white cube organizer with fabric bins, and dressed it up with a round rattan mirror, brass lamp, and greenery. A blush rug pulls it all together. One of my favorite things about this space is the clean and minimal look! My advice is to keep things simple, focus on elements that you love, and include storage that is both functional and pretty. Find more details on my blog HERE!

Bowen and Beckett’s Adventure Room

My boys are 2 years apart and as soon as my youngest was out of the crib I wanted my boys to share a room! After having toddler beds for a few years, it was time to upgrade to twin beds. I immediately knew I wanted a black metal bed for my boys and a pop of color! That was my starting point. I also wanted to use as much from both of their nurseries as possible because I still loved the woodland/mountain/outdoor theme but wanted to add a NEW color to change it up a bit! I found a vintage washed green quilt from the target pillowfort collection and knew that was the color I wanted to use. My advice would be find the items you really love that make the room unique but don’t feel like you have to buy everything brand new to create an entirely different look! I try to buy decor items that can grow with my kids and can be used for a long time. For an example, when I got their toddler bed comforters I already had in mind that I would use them across the end of a twin bed one day! Take a look at Beckett’s Adventure Nursery and Bowen’s Woodland Nursery to see all of the items I incorporated from their nurseries into their big boy room!

Arts & Crafts Colorful Playroom

About a year ago we moved my hubby’s home office to the basement and dedicated his old office to house Lily’s growing collection of toys. I wanted to design it right away but life, work, and all the things got in the way. One year later it is finally done! Check out Lily’s brand new arts and crafts themed playroom!
Check out the makeover video on the Craft Box Girls blog post.

Hoopstar Playroom

I chose this project because a ton of our kiddos are schooling virtually and so much of how they perform depends on environment.  I love that this playroom is dual functioning with a desk area for today’s virtual learning and a bean-bag lounge area for breaks.  This project is inspired by my client’s love for basketball so it’s a locker room theme.  When designing a playroom my advice would be storage, storage, and more storage!!  The lockers were a Facebook marketplace fine with a DIY repaint.  They tie in the locker room theme, but also give great storage!

dream

The interior of a student’s room is radically different from the design of a bedroom for younger children. Now it is no longer a colorful and bright space strewn with toys, but a rational, orderly room, however, not devoid of a special childish charm.
Design features
At the age of 7-12, the child becomes more responsible, organized, but this happens gradually. In the student’s room there are toys and books, textbooks and notebooks, things for walking and a school uniform. The task of parents is to ensure balance, to make the transition period from preschooler to teenager interesting and comfortable.
The student’s room should be divided into functional areas: work, sleep and play. Sometimes the play area is supplemented with a small workplace – for example, if the child loves to draw or is engaged in modeling, and the desk is installed separately so that work and rest are still separated.
And don’t forget the lighting. In a schoolchild’s room, the top chandelier alone is not enough – there must be a sconce by the bed and a high-quality table lamp.
Furniture selection
Furniture for a student’s room should be practical, and this is the main rule. You will need to provide for the following furnishing elements:
work desk and comfortable chair;
book shelves;
wardrobe or chest of drawers for things;
boxes for storing toys.
It’s good if there is a place in the nursery for the child’s handicrafts, for his letters and photos. Also, a sports corner will not hurt, so that the child can relieve the accumulated stress with benefit, not by senseless running around the apartment, but with the help of sports.

Summer & Claire’s Bedroom Refresh!

I’m so excited to be sharing Summer & Claire’s bedroom refresh! Confession – I always wanted a sister and dreamed of sharing a room with a cool older sibling. (Note: I have an older brother but he was never down for it! LOL)
When we got the news that baby #2 (Claire) was on the way, we of course set up a beautiful gender neutral nursery and made sure the girls both had their own beautiful spaces. Deep down I was dying to create a fun space for them to share. We kept the girls in their own rooms for quite some time, after all an 8 year age gap did mean that their sleep schedules were different and it just didn’t feel like the right time.
When it came time to transition Claire out of her crib naturally she spent a lot of time sneaking into Summer’s bed. The girls came to us and asked to have a shared room and I was OVER THE MOON!!! And of course I said yes!!!
My vision for their room was simple and timeless with touches of blush. My goal was to pick pieces that would grow with them and suit them with their 8 year age gap. Here are the details on my favourite items! First off… THE FOCUS WALL!
Finding a wallpaper brand wasn’t hard. The hardest part was narrowing down my choices. Again, I wanted something timeless, simple and a print that could grow with the girls. The print featured in the girls’ room is called “Grey Meadow Wildflower”. The grey details on a simple white background made it perfect to pull in the white beds, blush accents and the black name cut outs popped perfectly! The Dreaded but EASY Install!

Jay & I were total wallpaper virgins before this! And I’m not gonna lie we were definitely scared to try the traditional wallpaper on such an important project! Livette’s included easy clear instructions. We unrolled the panels and laid them flat as we prepped our space by moving furniture and making sure the wall was clean. We popped over to the hardware store and grabbed a couple supplies (adhesive & a flattening tool – of course I don’t know what its call LOL). Then it was back home to start the first panel!
The first panel is easy peeezy! The second piece made us sweat a little! We were so worried about how much adhesive to use and making sure the pattern was lined up just right. We quickly realized that that you can be liberal with the glue, the excess will be pressed out when you use your smoothing tools. We also were nose to the wall inspecting the pattern to make sure it matched… take a couple steps back, and look at the big picture. I promise this helps! Each piece went quicker and quicker and the whole project took us under an hour! And the final result was just beautiful!!!

Overall, the things I love about our Livette’s wallpaper is the quality, style, easy install. The paper is the perfect thick texture and really adds such a wow factor to any space. All the Livette’s patterns are so modern and really add a wow factor to any room. I can’t wait to wallpaper another space in our home! This post is not sponsored however Livette’s did gift us the wallpaper for our project!


Easy Halloween decor

My sister is a kids illustrator and this year I asked her to help us prepare to Halloween party for our 3 kids. And here is a result. I like this easy way to decor our entrance. Looking forward for some windows decoration as well.
It’s super easy craft for kids (you will need just print, cut and fold it) and looks very cute.
You can find her printable Halloween party decor here:
https://www.etsy.com/ie/listing/876606989/printable-halloween-party-decor-diy?ref=shop_home_active_1
Happy decorating)

Boho Chic Girl’s Room

My daughter is my hardest client yet. With a constantly evolving style, she loves so many different elements that it’s hard to complete a space without a lot of hesitation and second-guessing. However, this finished room left my girl happy, and for that, I’m ecstatic.
We combined a neutral palette using white and black along with jewel tones on her bedding and pillows to add some pop and give a little character/personality to this space.

Królestwo księżniczek

Chciałam Wam pokazać jak wielką zmianę w pomieszczeniu potrafi zrobić tapeta . Nigdy nie mieliśmy w domu tapet ze względu na czasochłonność ich kładzenia na ścianie . Tapetę Coloray zobaczyłam u jednej z mama i szybko postanowiłam zagłębić się w jej temacie , kiedy przeczytałam że jest samoprzylepna od razu pomyślałam , że to coś dla nas . Zdecydowałam się na zmianę ponieważ pokój moich córek jest duży przez co ciężko sprawić aby był przytulny  , po położeniu tapety wiedziałam , że to jest właśnie to czego szukałam :) pokój optycznie się zmniejszył i stał się mega przytulny  , wygląda pięknie a właścicielki są mega zadowolone . Jeśli tak jak ja stawiacie sobie wygodę , designe i krótki czas pracy to zdecydowanie tapeta Coloray MagicStick jest dla Was <3

Bright & Colourful Playroom with Mastermind Toys

It’s finally time to reveal the corporate playroom i’ve been working on for several months. Mastermind Toys, Canada’s largest specialty toy and children’s book retailer, wanted to transform an unused room at their HQ office into an inspiring space. It needed to be fun, bright and full of wonder… and I was up for the challenge! I was asked to create an environment that could serve many purposes. One to host vendors and suppliers, to hold internal meetings and workshops, as well as to capture all of their social and marking content. I had two large set walls built in order to create some pretty iconic and special moments and even transformed a small office space into a full photography studio, perfect for capturing product unboxing videos and storing photography gear. We were so lucky to have such wonderful partners join in to help bring this space to life; floor knot cushions from Juju & Jake, storage bins, rugs and bedding from Pehr, wall decals from Urban Walls, a reversible floor mat from Play with Pieces, wall decor and a bean bag from Gautier Studio, a slide from Catchu Boutique and wallpaper from Chasing Paper. The pièce de résistance is definitely the 5-foot custom neon sign from Neonific that really lights up the room with a playful and bold aesthetic. I am so proud of this incredible playroom that brings a sense of imagination and a twinkle to everyone’s eyes…

Cactus Cowboy

Once my husband and I found out we were having another boy we knew we wanted the boys to share a room. I wanted to create a space that was beneficial for my 3 year old and my soon to be newborn. I kept most of the decor from my first sons nursery and just added some small details to make it feel new. I really love how their room turned out and my oldest son could not wait for the arrival of our new little buckaroo to share their room.

Girls Room Makeover

The “Before” was a very boring, plain, builder-grade look. The house was built in 2019 and while everything was nice and new, the room had no personality and did not reflect the little girl living in it at all! There was nothing “custom” about the room and it’s likely that everyone who bought a home from our builder had rooms that looked exactly like this one. The room also had very little functionality aside from sleeping! There was little to no storage, no shelving, and no real storage system for toys, books, etc.
We wanted more, and needed more out of this space. We wanted a space that WE could get creative in, but that would also encourage creativity for our little girl! She needed a place she could feel herself in, feel safe in, read in, study in, and just enjoy being home in!
The entire makeover could have been done in one weekend, but it took us about 3-4 weeks simply for delivery or products we had ordered to spruce things up (bedding, rugs, etc.). We chose a kid-friendly bedding that can be made up simply with pull of a zipper! We went with a beautiful and feminine floral peel and stick wallpaper that was not only SUPER easy to apply, but it has all my daughter’s favorite colors!! Then we added some neutral wood toned shelving for aesthetics and storage, a large comfortable egg chair for cozying up with a book, and some floating shelves above the dresser for books and/or pictures. The entire project cost about $750.
We love everything about this project! My daughter was over the moon thrilled when it was finally done and now she enjoys playing, reading, lounging in there all the time!! It’s so pretty and functional now that it’s even inspired her to keep it clean!! Now if that’s not a mom-win, I don’t know what is!!!
I honestly wouldn’t change a thing, well…except I would have done it sooner!!! But my only words of advice would be make sure that whatever wallpaper you choose works with your wall type. For example if you have textured walls, make sure you get a wallpaper that works well on it. This one did for me! The other thing I would add is make sure you choose design elements that are true to YOU!!! You are unique and the room’s personality should reflect yours!