Description
I had the honor of helping plan a baby shower for a very dear friend of mine, Diana. We've known Diana & Joel, and their son, Caleb, for a little over 2 years now, and they have grown to be like our second family. Diana and Joel had a very difficult time conceiving Caleb, and it turns out that it was even harder this time around. So, you can imagine my excitement when she told me the good news – and even more so when I had the opportunity to help plan her baby shower!
Design Inspiration
Diana is really good at keeping the gender of her babies a surprise (I, on the other hand, only lasted a week before I couldn't take it anymore), so her friend, Cindy, thought it was a good idea to pick a theme that incorporates her nursery colors - sage & brown. Her “Sweet Pea” theme was an easy choice for the baby shower because that’s one her terms of endearment..Joel’s “Sweet Pea.”
Decorating Style
I really don't have a particular style. I build my designs in my head as I find items on clearance that I could use to incorporate into parties. But I do love mixing things, like glass and wood, hard and soft, old and new.
Project Details
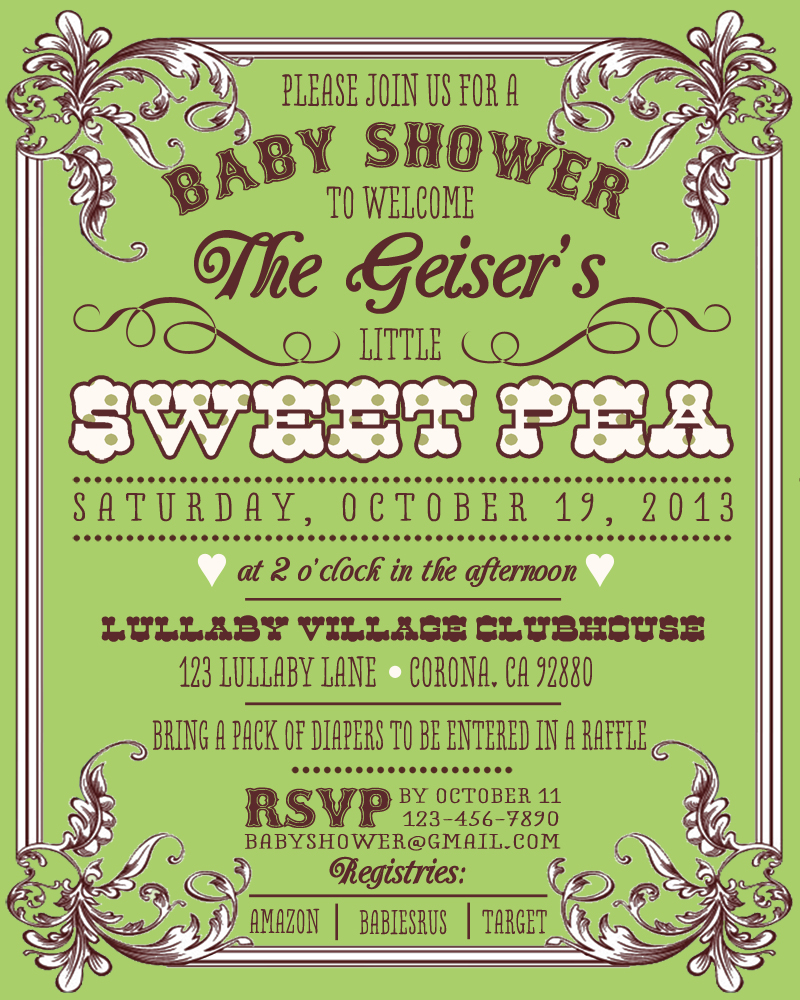
After we had a theme mind, I started looking up ideas on Pinterest. I wasn’t too happy with what I found because a lot of the Sweet Pea themes had a little baby sitting in a pea pod..that just wasn’t the look I was going for. I liked the colors, but I didn’t want to take the theme too literal. My first step when I’m planning a party is designing an invitation. This usually helps get my ideas flowing, and here’s what I came up with (see attached image). The border frame that I used has a hint of vine-y-ness that could be tied in with the pea in the pod aspect of the theme, and the rest of the invitation is styled the way I like..eclectic, with a mix of vintage looking fonts.
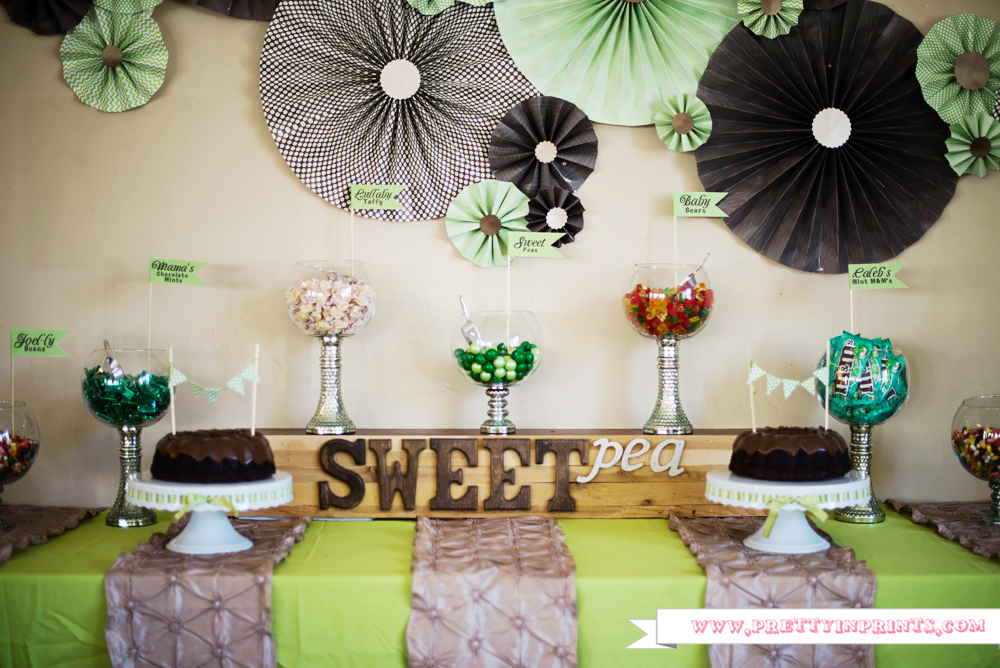
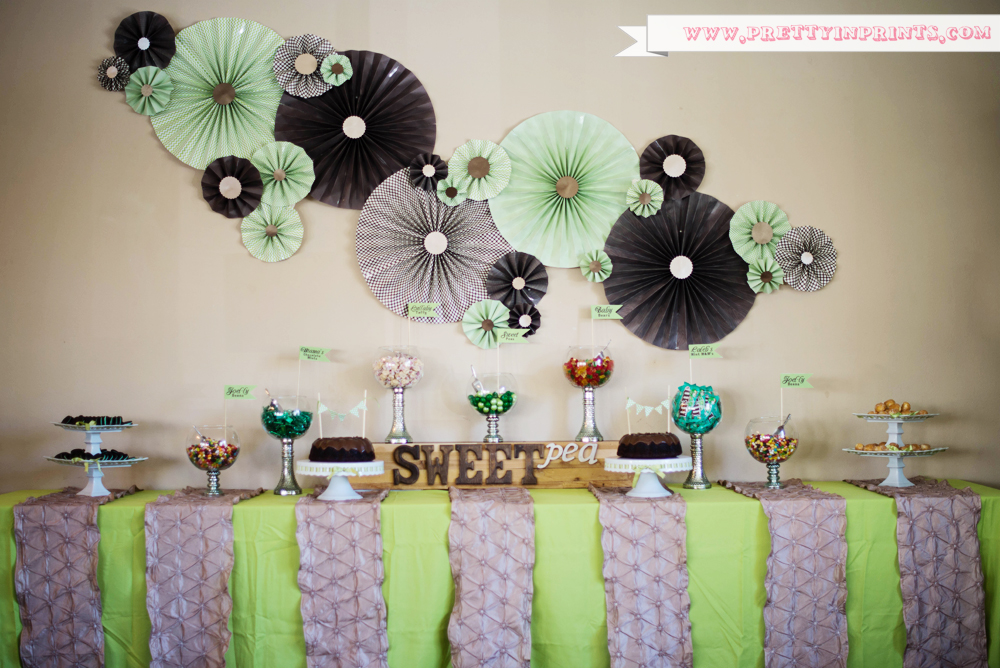
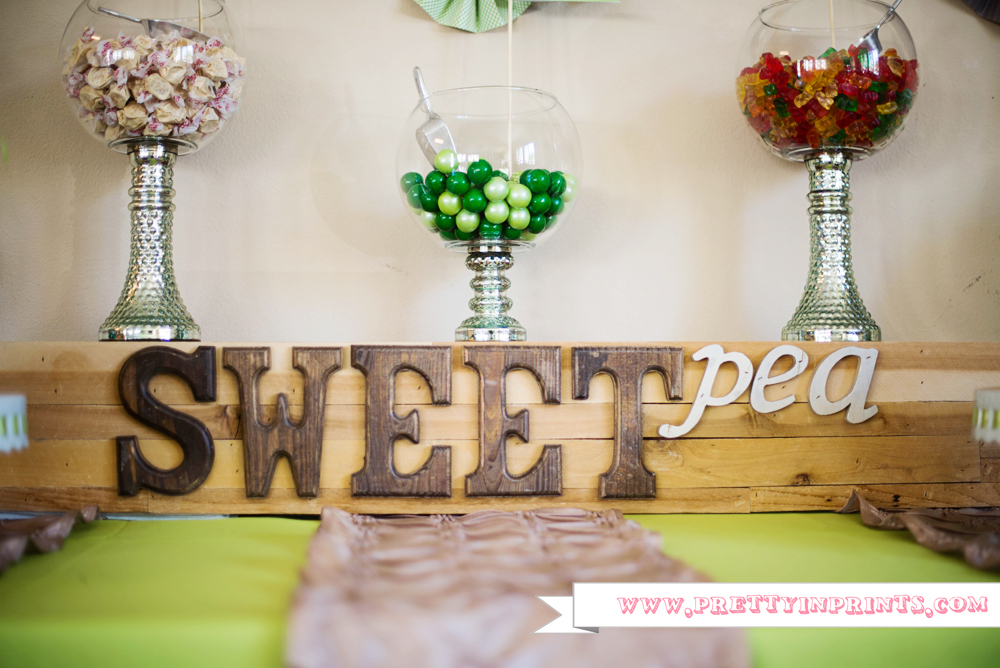
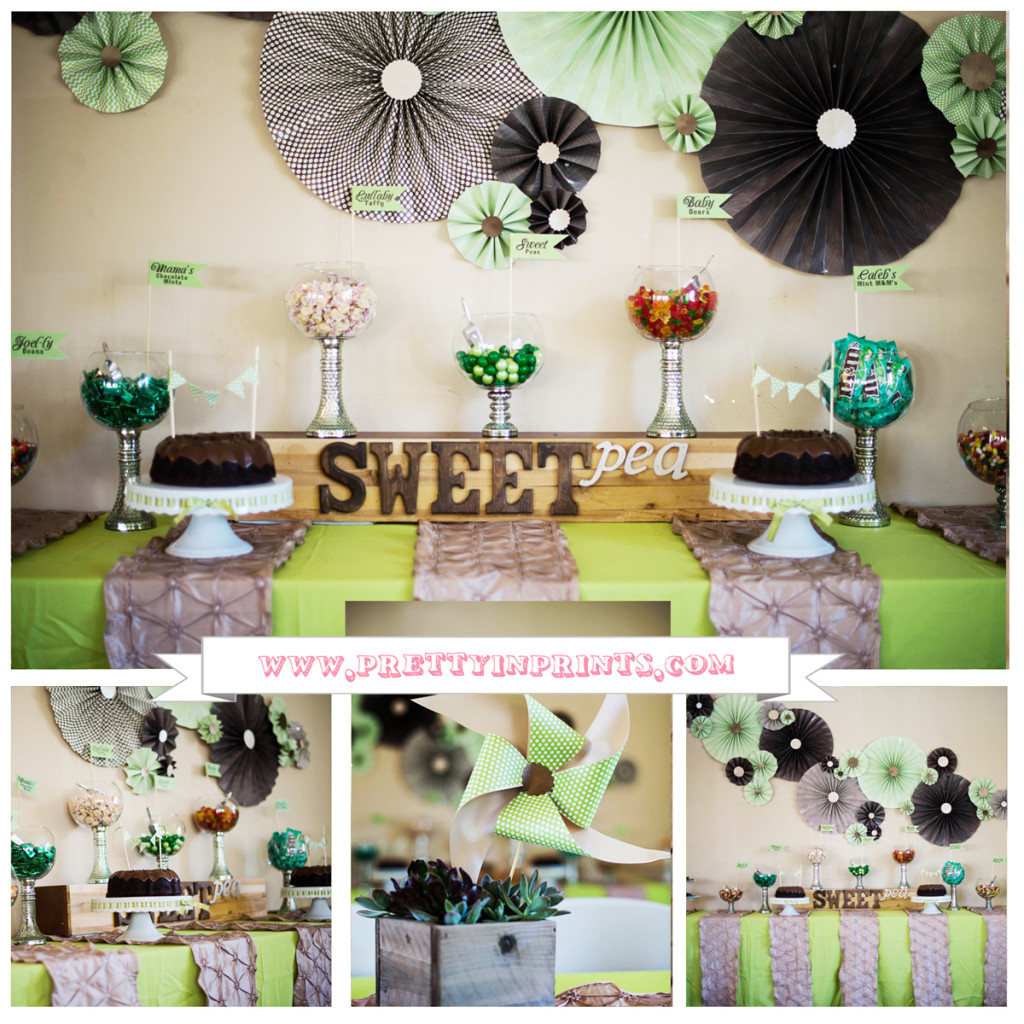
After the invitation was made, I needed to take charge of the sweets table & the centerpieces. The sweets table was really fun to do because it was something I haven’t quite seen before. Even though I have a ton of apothecary jars, I wanted to give this table a really clean look, so when I found some glass candle holders on clearance at Target for less than $2/each, I knew I wanted to make the containers myself. I used a special epoxy to adhere the glass candle holders to these glass fishbowl containers (purchased from Michael’s for $5.99/each, down to $3.60/each with a 40% off coupon…multiple trips are worth it if you have time to collect the jars with coupons. Don’t forget to bring a friend with you so you can buy two at a time). I had purchased 4 tall candle holders and 3 small ones. Here’s what they ended up looking like after I glued them together. If you’re doing this at home, please use the correct type of adhesive…you don’t want glass falling and breaking while kids are trying to get candy out of the containers!
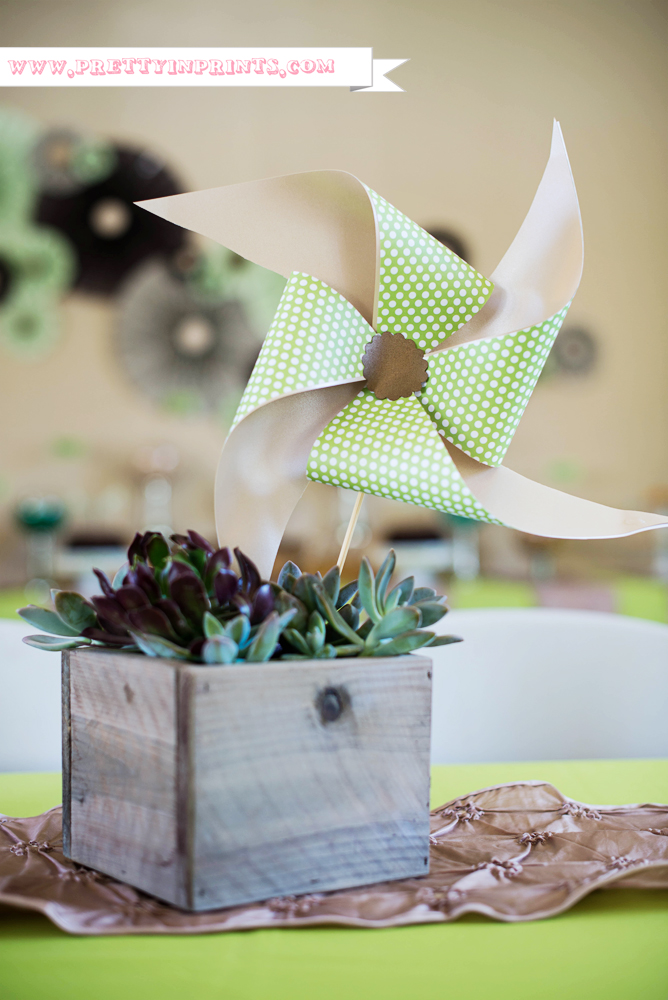
For the centerpieces, I decided to do succulents since they are easy to transport, and it worked out perfectly since we have a TON of varieties growing in our backyard (no thanks to me). My husband is a pro at wooden crate making (and he’s also a pro at growing succulents hehe),so I had him make 6 for me. We used the trick of soaking steel wool in some vinegar and painting it on the wood to give it that aged look. This technique is so easy to do (easier, faster, and less messy than staining!) Just make sure you paint the solution way in advance so the boxes have time to release that vinegar scent. It was a last minute decision for me to make pinwheels to stick in the boxes. I had leftover card stock from the paper fan backdrop and some wooden skewers, and I put them together 30 mins before the party started with a crying 3 month old in my Ergo carrier. They don’t spin, but at least they’re pretty!
Luckily, I had leftover tablecloths from my son’s Ninja Turtle Party, and some table runners from our wedding renewal. I used the runners to make a stripe pattern across the table because I thought the shade of green was a little too bright. I also made those paper fans/pinwheels as a backdrop for the candy buffet. There are a lot of great tutorials online, but there wasn’t really a good calculation to determine the size of the paper fans (trust me, I tried). The largest size that I made (about 2 feet wide) took 7 pieces for 12×12 card stock that I attached together with tape to make one very long piece. Then I just folded the long piece into an accordion, taped the ends together to make a circle, then I flattened out the circle and attached a dowel with hot glue to hold the fan flat. I didn’t take any pictures of the process, but I used this blog post as a guide.
I also made cute little flags as my candy labels. The candy we used were favorites of the family and I used names like “Joel-ly beans” and “Mama’s chocolate mints.” The candy riser that I used was an old bookshelf that I had my husband put a wooden “face” over to make it look more vintage (we always seem to have extra wood laying around). The wooden letters to make the word “sweet” was leftover from our wedding renewal candy table, and the “pea” wooden letters were on clearance at Michael’s.
Favorite Items
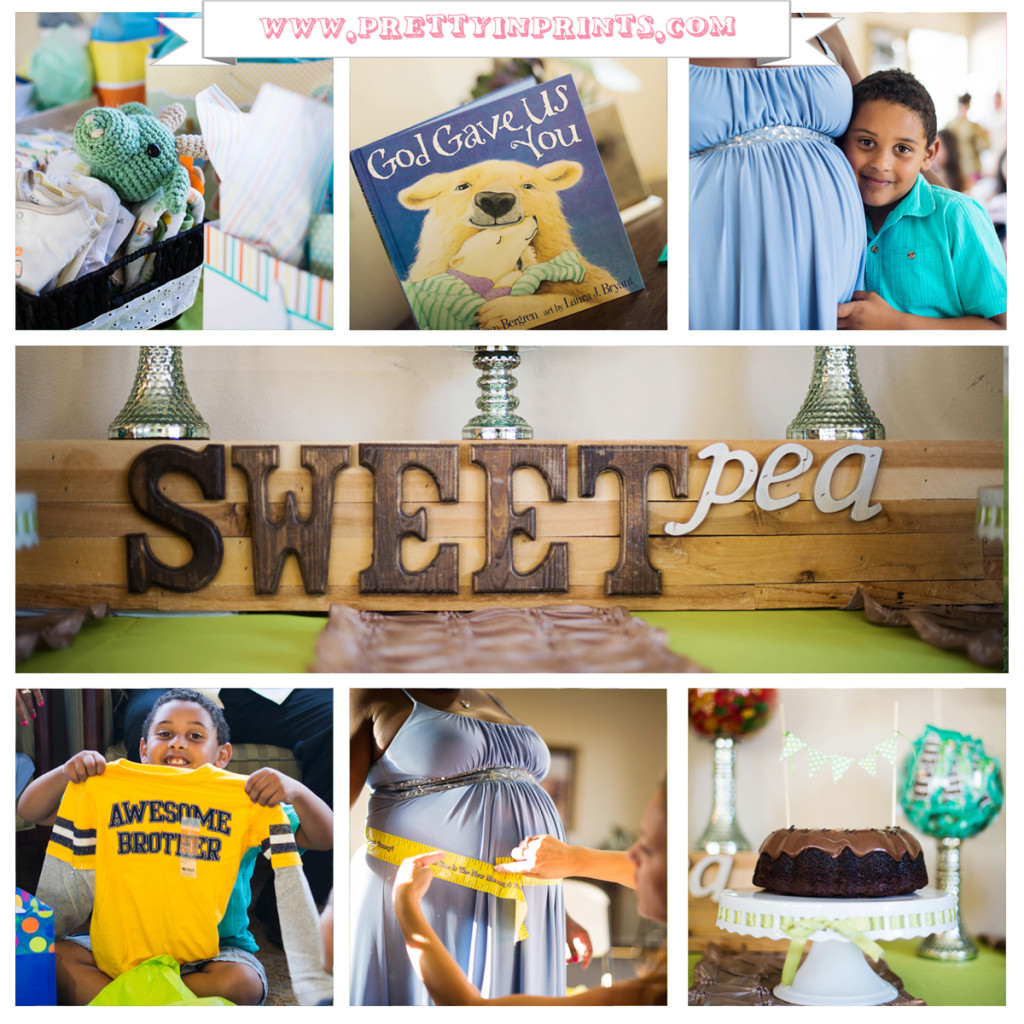
My favorite items were the candy jars that I made, and the "Sweet Pea" riser that my husband helped me make. I think those pieces really made the table unique. With a little time spent searching, and a little bit of scrap wood, I spent about $50 on those pieces.
I am going to help Diana decorate her nursery using the paper fans that I made for the candy backdrop (glad to know my hard work won't go to waste!) And I plan on reusing the candy containers as decor around my house (maybe to put some pinecones or candles in) until I need to use them again (:
Advice
I've said this before, and I'll say it again. Planning parties on a small level (like I do) takes time if you're trying to save money. You need time in advance to collect items if needed, time to make things, time to find the best deals. Also, save what you can so you can reuse items over and over again! Pick pieces and things that you like, and incorporate them in one design. Whether it's for a candy buffet table, a nursery or designing a living room - I promise you'll LOVE the finished product because it all came together by YOU!
For more creative inspiration and FREE printables, please visit www.prettyinprints.com
Freya Natasha Fernandez Dy
Sunday 17th of November 2013
So elegant and classy!
Holly
Sunday 3rd of November 2013
Nice decor! I especially like those paper flowers you made for your backdrop.
christine@prettyinprints
Friday 8th of November 2013
Thank you, Holly! They took some time to make, but saved me a ton of money and made a big impact on the space (: