Skip to Content

DIY: No-Sew Teepee

There is no better place to grow a child’s imagination than tucked away inside a secret hideout. While blanket forts are still a trusty go-to, why not up the ante with a DIY no-sew teepee that can stay out year-round?

Store-bought play tents can cost upwards of a couple hundred dollars, but this smart design can be made for right around $60. It requires intermediate crafting skills and is collapsible for easy storage. Be warned, however, that after you complete this fun project, you may find yourself competing with the kids for teepee time!
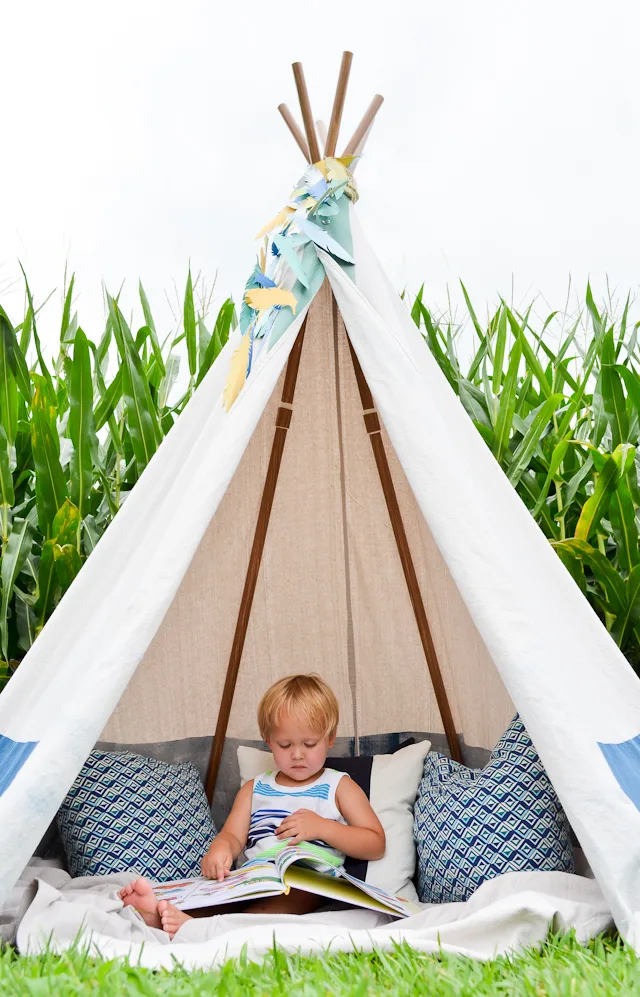
DIY No-Sew Teepee

Materials: (6) 3/4″ x 10′ thick-walled PVC pipes, (6) 3/4″ PVC couplings, (6) 3/4″ PVC caps, 9′ x 12′ canvas drop cloth, woodgrain Con-Tact Paper, Super Heat’n Bond iron-on adhesive, (1) package (8 count) 5/8″ heavy duty snaps/tools, 1/4″ sisal rope, Duck Tape, saw, iron, hot glue, marker, paint, fabric scissors, hammer

Before you start, wash and dry the canvas drop cloth in a regular warm cycle with detergent and fabric softener. This will make the fabric less stiff and much easier to work with.

Use a miter saw or hand saw to cut each 10′ piece of PVC pipe down into two sections, one 32″ long and one 48″ long. Below is a close up of the caps and couplings for your reference. If you do not wish to make the teepee collapsible, you can just cut each pipe to 80″, and you will not need the couplings.
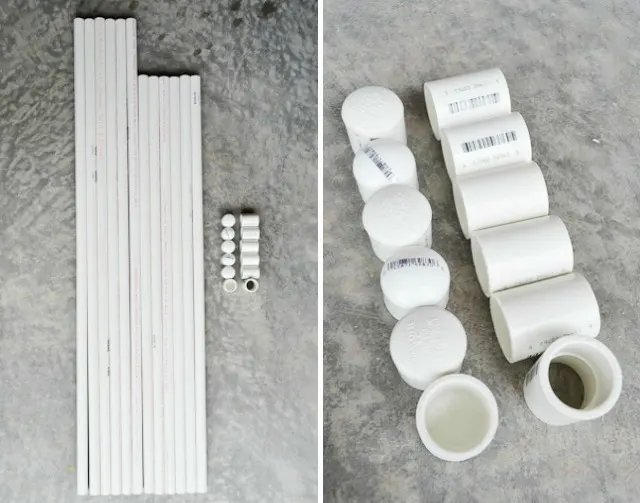
PVC Pipes, Caps and Couplings

To give the pipes and couplings the look of real wood, I covered them with some woodgrain Con-Tact Paper left over from my lampshade revamp. Be sure to leave about an inch of pipe uncovered on one end of each short pipe and both ends of the long pipes—this will allow them to fit snugly inside the couplings and caps.
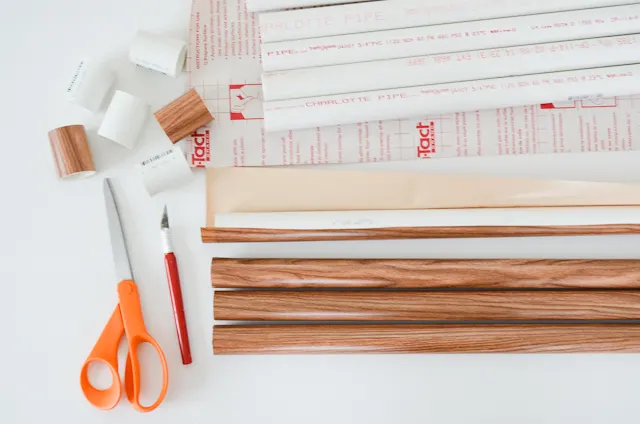
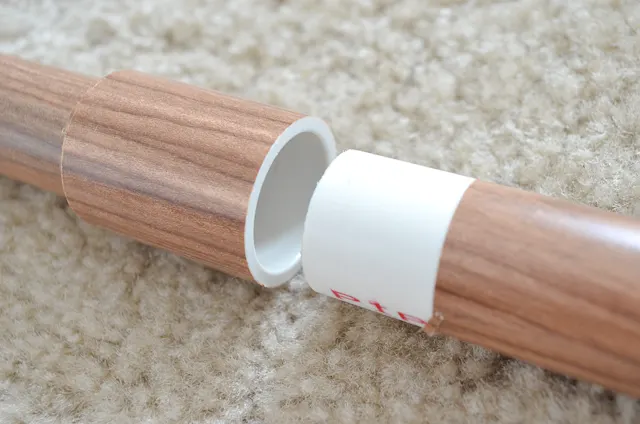
PVC Pipes for DIY Teepee

PVC Pipes for DIY Teepee

Spread out the drop cloth on a flat surface with the 12′ edge at the top. Center the end of a measuring tape at the top and mark a dot 69″ out with a marker. Continue to mark 69″ out from the center until you’ve drawn a half-circle (a helper to hold the end of the measuring tape centered will make this step easier). Cut out the half-circle with fabric scissors.
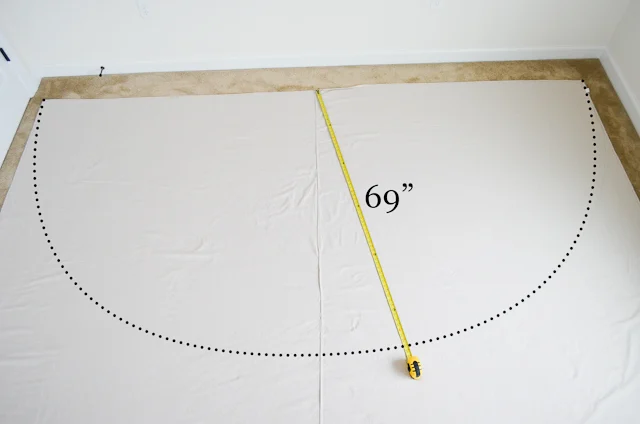
Drop Cloth for DIY Teepee

In the next step, you’ll be hemming the edge of the drop cloth and creating pockets. Use a marker to draw 2″ wide x 2″ tall sections evenly spaced around the curved edge. See the diagram below for the correct measurements.
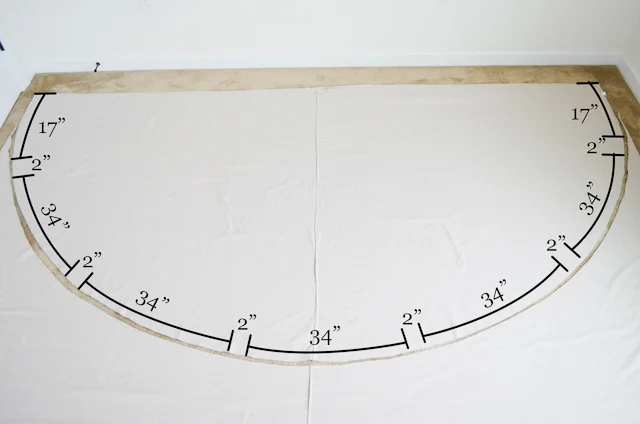
Drop Cloth for DIY Teepee

Preheat an iron to medium high. Use the Super Heat’n Bond iron-on adhesive to create a 1.5″ hem along the curved edge of the drop cloth. Do not place any iron-on adhesive where you’ve marked your 2″ pocket openings. Make sure to protect the floor you are working on from the hot iron.
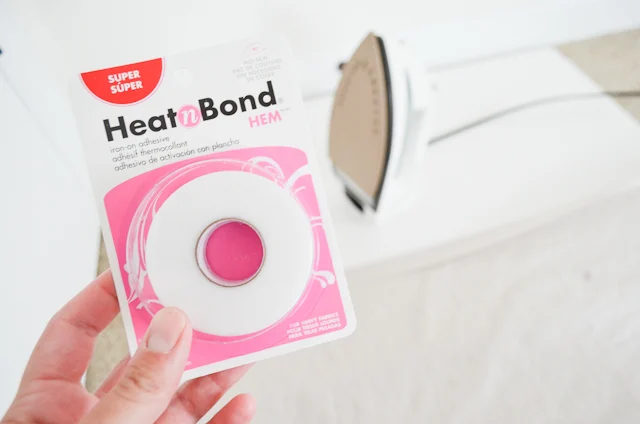
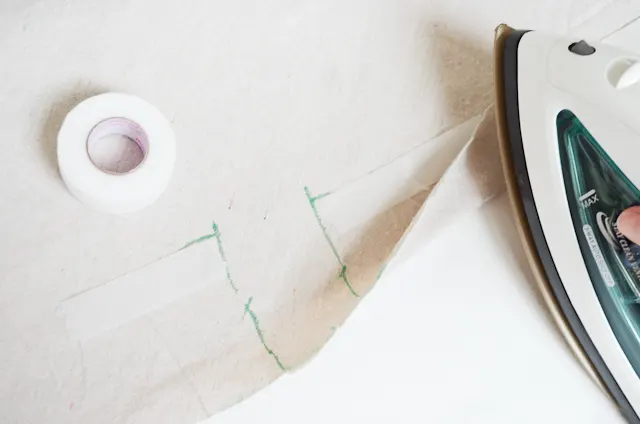
Hem Tape for DIY Teepee

Hemming DIY Teepee

You should have six pockets and a 1.5″ hem along the curved edge of your drop cloth when you’re finished.
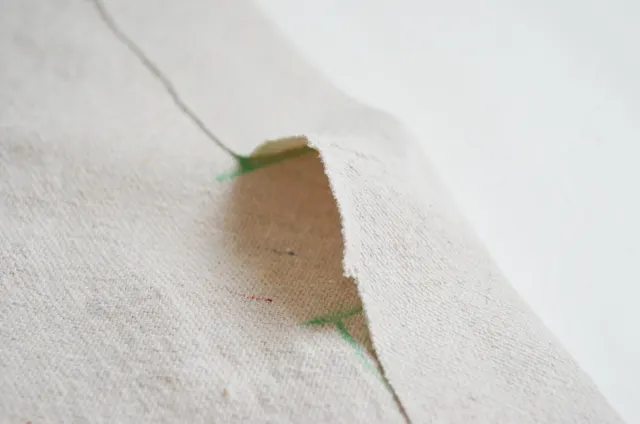
Pole Pockets for DIY Teepee

At the center of the top edge of the drop cloth, cut a half-circle with a 4″ diameter. Then cut 1″ flaps and use more iron-on adhesive to tack back the flaps for a smooth hem. The diameter of your finished half-circle should be 6″.
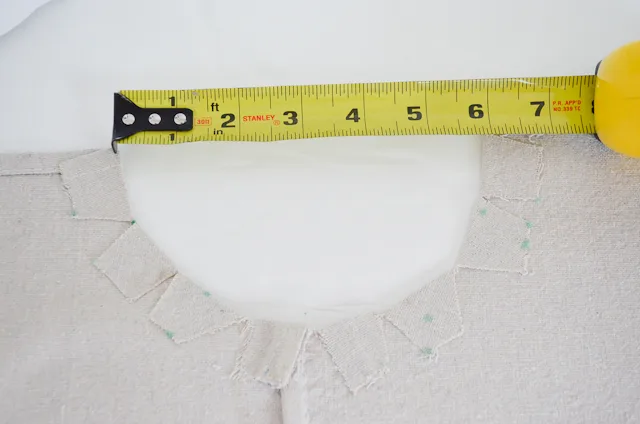
DIY No-Sew Teepee

If you wish to paint your teepee, do that now. Make sure to flip the canvas over so the pockets are on the inside! I used a foam roller, painter’s tape and latex house paint.
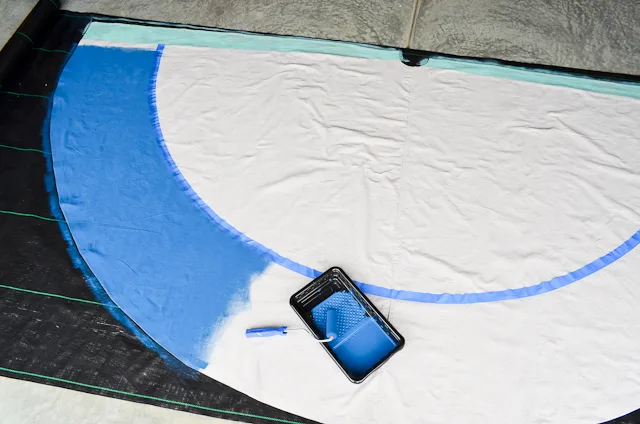
Painting DIY No-Sew Teepee

After your paint has dried, tuck one PVC cap smothered in hot glue into each of your six pockets. The trick to not burning yourself is to put two fingers into the cap whilst smothering.
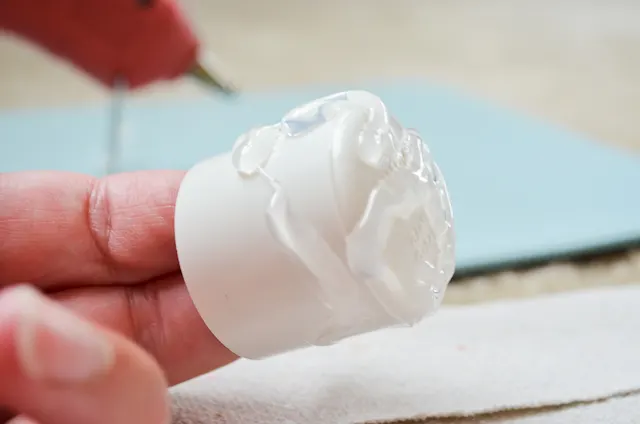
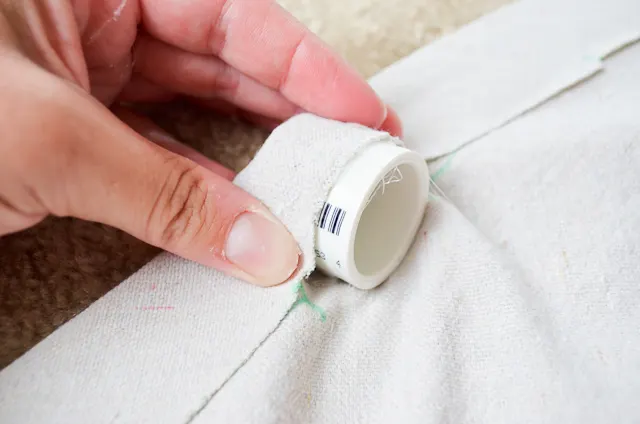
DIY No-Sew Teepee Assembly

DIY No-Sew Teepee Assembly

You’re almost there! Starting at the small half-circle, attach seven heavy duty snaps along the straight edge spaced 1.5″ apart. You will be overlapping the two sides, so place the snap tops on the right edge and the snap bottoms on the left edge.
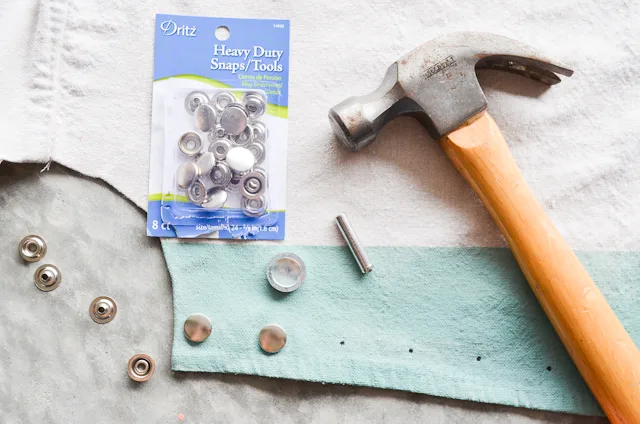
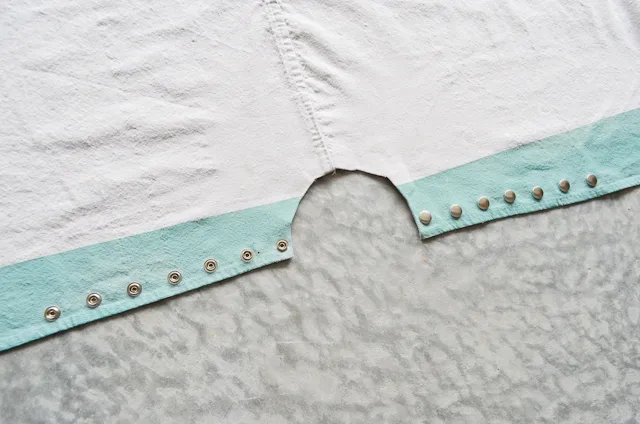
DIY No-Sew Teepee Snaps

DIY No-Sew Teepee Snaps

Cut a piece of 1/4″ sisal rope to be 16.5′ long. Wrap the ends in Duck Tape to prevent them from fraying (or gold Duck Tape if you’re feelin’ fancy).
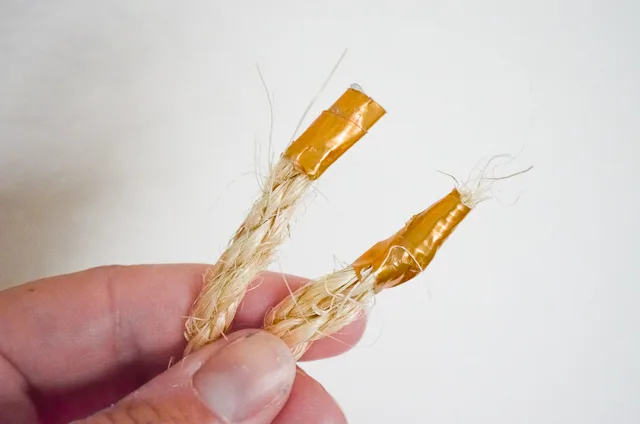
Rope for DIY No-Sew Teepee

Since your teepee is all in pieces at the moment, I’m going to first show you how to pack it up for easy storage or transport to your set-up locale. Simply tuck the disassembled pipe pieces and rope into the folded canvas covering. Then roll together and secure with extra sisal rope or, in my case, a strip of excess drop cloth.
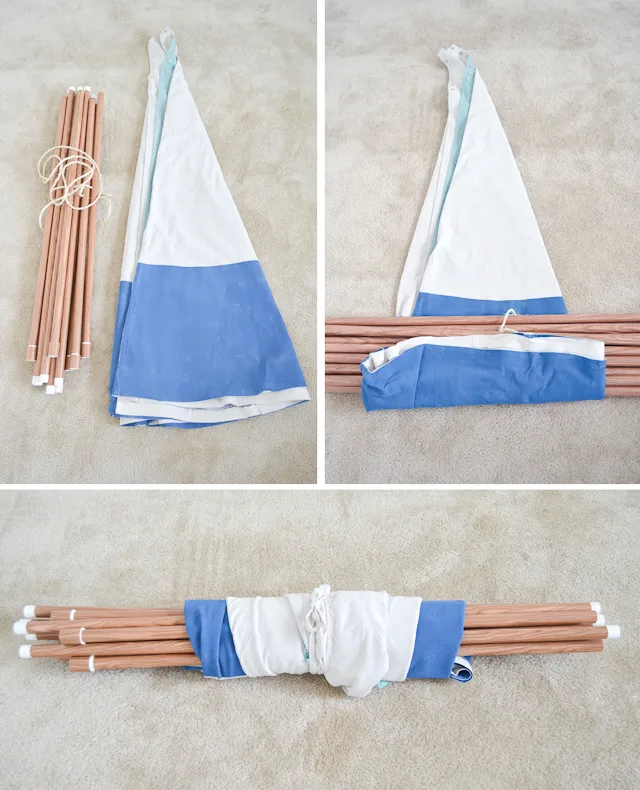
DIY No-Sew Teepee

To set up your teepee, first find a suitable cornfield with an adjacent freshly cut lawn—just kidding! Start by attaching one short pipe and one long pipe together with one coupling until you have six tall poles. Stand all the poles up together, and, holding the top, evenly space the legs out. About 10″ down from the top, lash them together with your pre-cut sisal rope. While this can be done alone, an extra set of hands is very useful for this part.
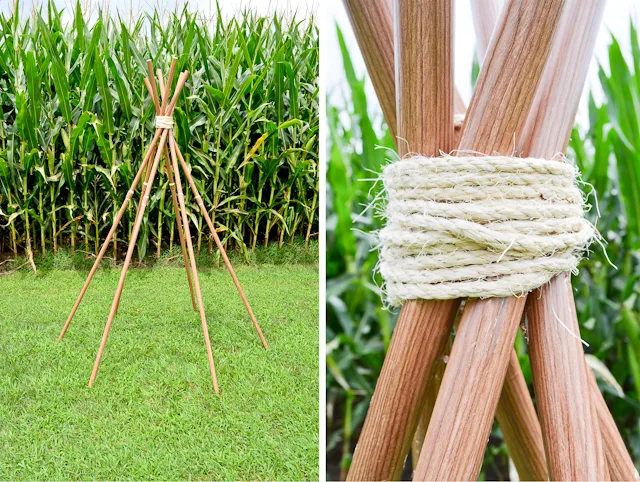
DIY No-Sew Teepee

Next, gently drape your canvas covering around the legs and secure the top with the snaps. Gently push each leg into its respective cap in the bottom hem of the canvas.
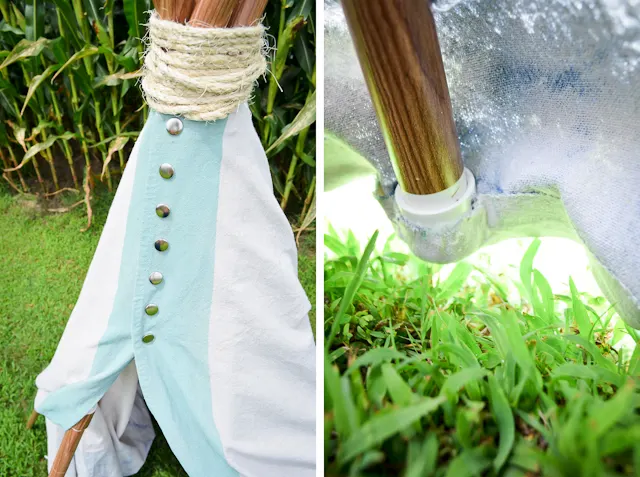
DIY No-Sew Teepee

At this point, you want to spread the legs out evenly to make the edges taut. This may require some jostling and pulling the legs to get a nice tight fit.
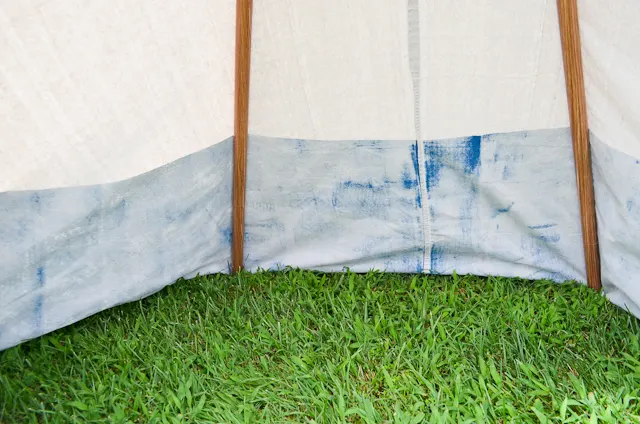
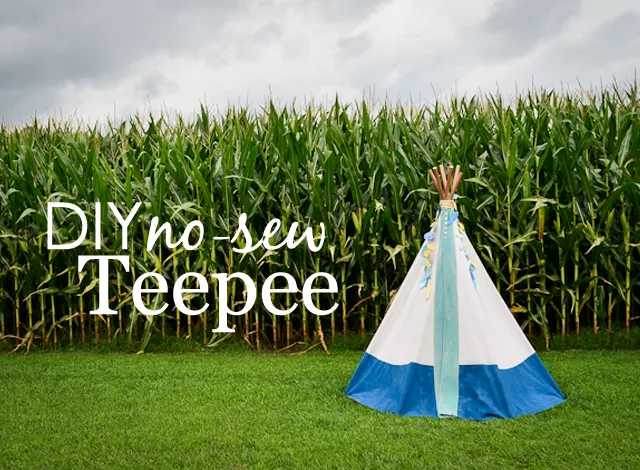
DIY No-Sew Teepee

DIY No-SewTeepee

Once set up, the teepee stands 6′ tall and 5′ wide. Adding a cute paper feather garland, a blanket and some pillows makes this teepee the place to be!
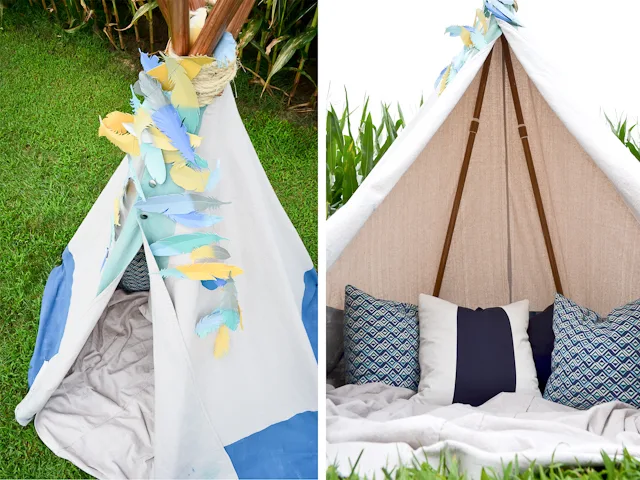
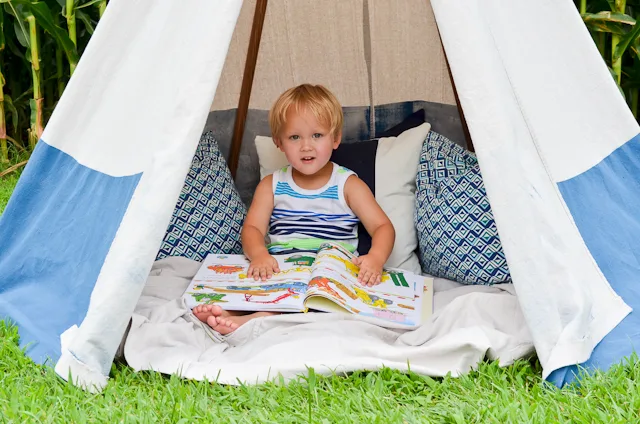
DIY No-Sew Teepee

DIY No-Sew Teepee

When summer sun gives way to falling leaves, bring the teepee inside for winter fun. Or pack it up and easily store it away for next year. Whether it lives on the lawn, in the playroom or filling the corner of your nursery, this DIY no-sew teepee is sure to spark that special kind of imaginative play that childhood is known for.
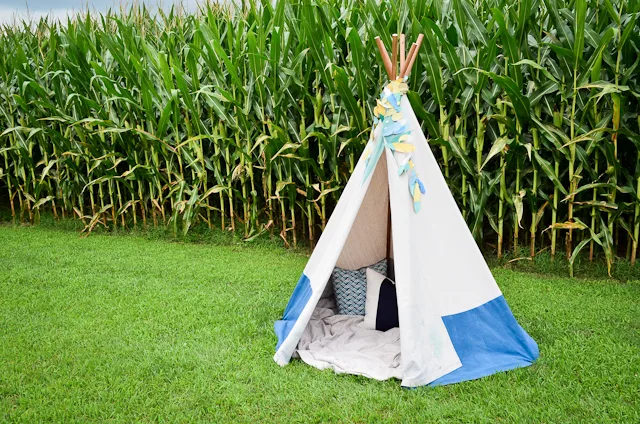

DIY No-Sew Teepee

DIY No-Sew Teepee

SaveSaveSaveSave

Leave a comment

Your email address will not be published. Required fields are marked *

  1. avatar Lisq says:

    Is there a way to adjust the material sizes to make a more narrow and shorter version?

  2. avatar Beth says:

    Thank you for all your thoughtful tips!

  3. avatar Michelle says:

    A few notes on this! I LOVE the way it turned out and how much my daughter loves it. In 2022 it’s more than a $60 project though. Here’s a breakdown of costs with some other notes on adjustments I made. Just hoping this helps someone!
    $27 canvas drop cloth from Home Depot
    $29 6 connectors and 4 10’ PVC pipes that I cut into 3 40” pieces. When you connect 2 together, it still makes an 80” pole but it collapses to be smaller and you don’t have any extra PVC. And I cut it there at the store. They have PVC cutters and measuring tape right there for you to use. And if you’ve never used them before, don’t be intimidated cause they’re so easy to use!
    I didn’t use the end caps and just insert the poles directly into the pockets, but those would have been an extra $5. The reason I chose not to use them is because PVC is very hard to disconnect and even connect sometimes so I didn’t want the extra headache and I wanted to make it as easy as possible to assemble and disassemble.
    $11 wood grain contact paper from Amazon. The 15.7” x 118” roll I bought was exactly enough and I didn’t have any extra.
    $8 rope. I used jute instead of sisal, but I think the cost was about the same
    $11 snaps. Had to get a pack with the tools to install them. I did the 7 snaps at the top plus 4 more spaced out to the bottom so that the teepee can be closed completely.
    I sewed the hem because I wanted to make sure it holds up to everything, especially the pockets where the poles would be going. I’ve never used hem tape before and I don’t know if it holds up when you wash. The hem tape would have been an added $5.
    I already had paint, but it took nearly a quart of watered down paint to paint around the same amount as in the tutorial and I didn’t even get to do a second coat like I wanted. I used a combo of furniture paint and acrylic paint. If you need to buy paint, that’s an added cost that will vary based on amount of the canvas you want to paint and type of paint you use.

    Total cost for me was about $86, but would be $100+ without the adjustments I made.

  4. […] This boy play tent is specifically for your baby boy, who wants to have a fort and want to be the king of it. Let them grow their imaginations and live their fantasies there. The DIY no-sew teepee shape is more easy to give to the tent. Dive in to find out the making of this tent here. projectnursery […]

  5. […] PROJECT NURSERY’S TUTORIAL […]

  6. […] Do you find sewing boring? The must get here free DIY childrens teepee instructions to build a teepee without using a sewing machine. This teepee will work great for outdoor and head over to 10′ PVC pipes having 3/4” diameter to install frame of this teepee. Further, you need, sisal rope, duct tape, wood -grain contact paper and canvas drop cloth for making a tepee project. projectnursery […]

  7. avatar Beth says:

    So glad it was a help to you. Happy birthday to your little boy!

  8. avatar Joanna says:

    I’ve been looking for a post like this for so long! My son’s first birthday is coming and we wanted to build him a teepee as a present! Thank you so much!! <3 Although I have to come up with smaller dimensions, this post is a godsent <3

  9. […] play area. The delicate lace teepee is another wonderful choice for the girls’ room while no-sew outdoor teepee can make your picnics to the park even more […]

  10. avatar Solz says:

    Thank you very much for sharing your DIY teepee tent instruction. Hubby was keen to put it up, hence why the pipes showing are yet to be covered by the self adhesive wood grain print.

  11. […] one if you have time. There are lots of tutorials online that can give you an idea of how to make a DIY no-sew teepee tent in your […]

  12. […] Bron https://projectnursery.com/2014/08/diy-no-sew-teepee/ […]

  13. […] they can have their own Me time for reading and even napping. Get the tutorial for a no-sew teepee here and […]

  14. […] your toddler a welcoming space that is all their own with this inexpensive DIY toddler teepee design. Easy to build, yet rugged enough for indoor or outdoor use. Plus it’s sturdy design makes it […]

  15. […] love her!!! So Meg was making the flower crown and I was tackling the teepe. I found a DIY no-sew teepee tutorial Tuesday evening, bought the supplies Wednesday night, started Thursday evening after our event […]

  16. avatar Kelsi U says:

    We only had one issue and we aren’t sure why! But we have about 3 feet of pipe hangout the top when we put ours up. We can’t figure out why this has happened?

  17. […] started and then I could go to bed. I was making a teepee for Kade’s shoot. {Here is the DIY teepee I followed from Project Nursery} The night previously {Wednesday} I had picked up the supplies and […]

  18. […] This smart teepee can be made for right around $60. Tutorial at ProjectNursery […]

  19. avatar Enia says:

    I saw the photo of your teepee on Pinterest and I fell in love :) I don’t have any kids but fortunately many of my friends have their little ones and once in a while I’m trying to make something special or at least useful for them. I am mostly interested in sewing and yesterday wrote my very first post (level of blogging: complete beginner) just to start sharing my passion with others. I’m also a big fan of DIY projects.Thanks for this detailed instruction, it’s summer time so I’m sure I’ll make it for one of my friend’s children.

  20. avatar molly says:

    Hi, this looks awesome!! I would like to make this for my sons room. However, I fear it might take up too much space. Would you be able to help me change the measurements to fit a smaller space?

  21. Hi Deb – Yes, the 12′ side is where you find the middle to measure from. Then, you keep the 69″ measurement consistent throughout the semi circle. In other words, you keep the measuring tape centered on the 12′ side and create a semi-circle that measures 69″ from that center in all directions. Does that help?

  22. avatar Deb says:

    does the 69 inches remain constant thru the whole semi-circle

  23. avatar Deb says:

    Trying to make the no-sew teepee From the pics it looks like the semi-circle is measured on the 9 foot end but your directions say to measure on the 12 foot end. can you help me? If measures on the 9 ft end what would be the distance from the center to the edge of the semi circle.
    Thanks

  24. […] own backyard. Give your kids a safe hideout by making a tent or a teepee. You can purchase one, or make it yourself. To make an awesome teepee, you will need various supplies, including PVC pipes and fabric, but in […]

  25. […] Photos from projectnursery.com […]

  26. […] like every year, this idea circulates.  So, like any great idea, we consulted Pinterest and found this tutorial from Project Nursery.   We followed her measurements and also created ours to be collapsable, but while hers is no-sew, […]

  27. Carley – I found my drop cloth at Home Depot.

  28. avatar Carley says:

    Where did you get your drop cloth?

  29. avatar Carley says:

    Where did you find your drop cloth?

  30. avatar Beth says:

    Thanks for the tip, Lynn!

  31. avatar lynn says:

    If you have a Harbor Freight near you can get a 9′ x 12′ canvas drop cloth for $16.99. Then use a 20% coupon. Saves a little bit

  32. Stephanie – So glad you found us! I’m sure your grandsons are going to LOVE it!

  33. avatar Stephanie says:

    I am looking to make a teepee for my Grandsons (3 & 5) for Christmas, and I came upon yours! Thank you for taking all the guesswork out of it for me. I really appreciate that timesaver! This is absolutely adorable!

  34. […] Garden Arbor via Remodelaholic //  Outdoor Teepee via Project […]

  35. […] Nesiuvamas, bet reikia spaudžių ir kitų dalykų… […]

  36. avatar Beth says:

    So cute, Ofelia! Thanks for sharing!

  37. avatar Ofelia says:

    Photo linked below. Rather than using contact paper, I spray painted the poles with a dark copper brown.

  38. avatar Ofelia says:

    My measurements/cuts were a bit off, but still turned out great. Thank you!

  39. Rebecca – I’m not sure of the exact amount I used, but a small roll will probably work. The circumference of each pipe is only a couple inches, so a little goes a long way.

  40. Hi Kristina – You can definitely try using regular fabric, if you can find some large enough. Or I suppose, you could always sew a couple yards together to get the correct dimensions. Good luck!

  41. avatar Kristina says:

    I’m going to attempt this for my daughters first pocahontas tribal birthday party. Wish me luck. Can I use regular fabric? With a cute print

  42. avatar Rebecca says:

    Any idea how much wood contact paper you used of that roll? I found a smaller roll but I wasn’t sure it’d be enough.

  43. […] image via projectnursery […]

  44. […]  Project Nursery crafted this adorable DIY teepee with no-sew instructions for easy assemble. Summer is the perfect time to grab a good book and […]

  45. […] DIY No Sew Teepee – What kid wouldn’t love to sit outside and read or play in this fun DIY tent! And it […]

  46. avatar Beth says:

    No problem at all! :)

  47. avatar Rebecca says:

    Thank you Beth. Boy, I guess my brain went blank on this one!!!

  48. avatar Beth says:

    If you right click on the screen where the instructions are you should get the option to “print page.” Good luck with your project!

  49. avatar Rebecca says:

    This teepee looks awesome and looks like my husband and I could do this together this weekend for our grandson that will be visiting us next weekend.

    I’m not sure how to save this so we can refer to the directions and be able to print the list of supplies needed so we can get everything we need without forgetting something. Is there a way to save this or email it to myself please?

  50. avatar Kevin says:

    You can see it better in this picture.
    http://imgur.com/Htx702s

  51. avatar Kevin says:

    Well the tarp is normally a greyish cream color and my wife wanted white so i soaked the whole tarp outside in a plastic bin overnight with water and a half gallon of bleach. Then we washed it in the front loader with bleach and detergent, then again with detergent and oxyclean. It isn’t WHITEWHITE but it is pretty close.
    imgur
    Its a little hard to see in the picture but down along the door we painted just plain white with some leftover exterior house paint. My tarp didn’t have the finished end on the 12′ side so this gives it a little structure and different texture in the light. The greenish color is Hearts of Palm by Sherwin Williams. It is on the Coastal Cool palette that we used in our whole interior (Another leftover). It was the fancy cabinet paint they sell since we used this color on a pantry door also. But i’m sure their cheaper Superpaint would work just as well.

  52. avatar Jill says:

    What color paints did you use? Thanks

  53. avatar Kevin says:

    Finished ours today, bleached the tarp and washed (shrinkage, had to adjust plan vs new circumference). White paint on doors, green around the bottom. I used wood 1×2 and ripped/routed the top 1/2 into a circle. Bottoms were cut and sanded to fit snugly into PVC caps. We like the look of wood rather than pvc even with the contact paper. Snaps were a breeze. Circle cushion and pillows/twinkle lights next. Kid is happy. Win.

    [img]http://i.imgur.com/zJTlit3.jpg[/img]

  54. avatar Arlene says:

    Sorry, in my earlier comment I should have mentioned the measurements were made with the 15 ft edge on the top. And I just used straight poles, no couplings.

  55. avatar Arlene says:

    Many thanks for your detailed precise instructions!! I made this and it turned out beautiful. My 4 yr old daughter is thrilled. :) I attempted to make a larger one that stands 84 in tall and 72 in wide so the adult sized kids could camp out too and it came out great. Here is what I used: 12 ft x 15 ft canvas drop cloth washed and dried and ironed to get more length, 3/4 inch pvc pipes cut to 100 inches; increased the measurement from 69 inches to 88 inches from the center of the canvas to the top curve; change the spacing between the caps from 17 in to roughly 21.5 in, and from 34 in to 42 in. To make it easier to position the pipes before putting on the canvas, I drilled holes using a 5/16 in drill bit about 15 in down from the top and threaded the rope through and loosely tied them into a circle. Then I put 1 pipe out at a time in order and at a slant giving the rope slack as needed. Threw the canvas on, buttoned it up, got inside to space the pipes and put them in the caps. My hubby was pretty impressed! I cannot thank you enough. We’re looking forward to spending time in them this summer. :)

  56. Lisa – Sorry to hear this. Did you see the suggestion about using a large rubber band around the poles? You definitely don’t have to use the rope… I say try fabric strips for sure!

  57. Marissa – Thank you so much for your insight! I love the rubber band idea… hopefully it might help those who are having trouble with getting the poles to stay up. :)

  58. […] Tipi, une cabane , une maisonette ou un manoir ! (en anglais: inspirez vous des photos […]

  59. avatar Lisa says:

    My fabric shrunk so I need to use 5 poles now. Is it possible I need to have the poles cut down now? There is a lot of excess pole at the top. Thanks.

  60. avatar Liz says:

    FYI on pipe – you can get two 20′ sections cut into your (6) 80″ pieces for a bit less $. Your local plumbing supply will be cheaper than a Lowes or Home Depot

  61. avatar Marissa says:

    Thank you so much for this tutorial! I just purchased the supplies and was so glad that the PVC was so much cheaper than the wooden dowels shown in most tutorials. A landscaper I met while shopping for supplies suggested using a giant rubber band to secure the poles together. Using that suggestion I had the tent structure standing in less than a minute with absolutely no help. I will still use the rope for design appeal and additional support, but the rubber band idea was brilliant! I just lined up all the pipes next to each other and put them in the rubber band one by one. Next, I was able to stand all six poles at once and arrange them without anything falling.
    Thanks again for the idea and have a great day!

  62. avatar Lisa says:

    The rope from the hardware store is terrible. What is an alternative? Using a glue gun with fabric? Help. It doesn’t stand up and I worked so hard!

  63. avatar Nikkie says:

    Can the fabric you used get wet? I want to leave the teepee up all summer in the elements- do you think the fabric can handle rain?

  64. avatar Losa says:

    So my fabric shrunk as well. If I do the semi circle 61 inches and use 5 poles as someone suggested, if they are spaced 38 inches apart what about the 17inches on the sides for the opening? Thanks.

  65. avatar christine says:

    just asked mum, she said no :( can you send me yours? I really want a teepee!!

  66. avatar christine says:

    I’m 13, do you think my mum will let me make this?

  67. Mercedes – I suppose you could! I would just check that the wood dowel end would fit properly into the pvc cap. Or… maybe you can skip the caps entirely and just slip the dowel ends into the fabric pockets?

  68. avatar Mercedes says:

    This is so awesome! Looking for a quiet time place for my 3yr old to hang out and this would be perfect. Do you think I could substitute wood dowels for the pvc pipe? Think that may be easier for me than cutting down the pipe.

  69. avatar Juliet says:

    Hi love- My sons room cannot hold a TeePee that big, so I wanted to make one that had either 5 or 4 radius… so would I just cut it at like 52 instead of 69? Have you tried it smaller? If not its ok I will just try and see what happens haha! Thanks

  70. This is definitely a kid sized teepee. I’m a medium sized adult woman and can only sit inside. It could maybe fit 2 small kids laying down, but it’s not big enough for an adult to sleep inside.

  71. Evelyn – I’ve honestly only used it on grass and carpet. But if you can get a nice tight installation I don’t imagine it would slide much. You could always put a little double sided poster tape or something like that under the legs to prevent movement.

  72. Emily – Yay! Glad you were able to compensate for the shrinkage.

  73. Jessica – I think I used just about 1 roll. The pieces are long but it doesn’t take much to go around them so I used the lengths I cut on several poles before having to cut a new length.

  74. Sarah – Oh no! Never want my directions to bring frustration tears to anyone! Let me see if I can more clearly explain my setup procedure… Definitely have 2 people, sounds like you’re set there. One person holds all the assembled poles together about 10″ down from the top, while the other person gently spreads two adjacent poles at a time until all the poles are spread fairly equidistant. One key factor is to spread the poles “in order.” Look closely at the photos and you’ll see how each pole lays nicely along the ones beside it, creating a perfect spiral at the top – no poles are crisscrossed front to back. This allows for the smallest possible circle at the point where they all meet and are lashed together. With one person still holding with hands, the other wraps the rope tightly around that intersecting portion of the poles once and knots the rope. Then, wrap the rest of the rope around and knot the final end around a singular pole to secure. If you did this correctly, the poles should stand on their own at this point. You shouldn’t be “pulling up” the canvas. The top of the canvas should be buttoned around the poles (just below the rope) before you put the bottom of the legs in the caps. When you button the canvas, if it’s too tight, move the spread poles in a little and the rope down. If the canvas is too loose, spread the poles out further and move the rope up. Getting this part right before you attach the bottom is important. Then, drape the canvas over the spread out legs and push each leg into it’s respective cap on the bottom. If you have two people, have one person hold the roped area outside the teepee while the other crawls inside. Starting with the back two legs, the person inside pulls them out away from each other (horizontally) until the canvas between them is taught. Then, holding one of those back legs, grab the next side leg and pull taught again. Do this all the way around. You may also have to grab the two legs opposite each other (diagonally) and pull to even out. Trick is to always pull and even out two legs at a time. You may have to physically pull the pole down a little from where it’s roped together to get all the legs evenly spread out. Not sure if that helps at all or just makes it more confusing. Ugh! I wish I could just come help you out!!! Please let me know how it goes.

  75. avatar Emily says:

    It can be super frustrating! My best advice would be to try and set it up with an extra set of hands holding the poles and then quickly wrap the rope around the top to secure the poles together. Then from there you can adjust the canvas and poles to get it to be even. it isn’t perfect but ours gets good use. Good luck!

  76. I hope you can help me. My daughter and I are putting this together as a Christmas gift for her daughters. We have followed the directions exactly and we simply can’t get it to spread out and support the canvas. How do you tie the poles at the top without it slipping down when you pull up the canvas? We worked on it for hours last night and were so frustrated by the end that she was in tears. Any suggestions you can give for setting it up will be greatly appreciated.

  77. avatar Danielle says:

    Hi, I’m not used to inches and feet. I was wondering how an adult fits in this? Could you lie in it like a camping tent or is it only big enough to sit in? .
    Thanks heaps

  78. avatar Evelyn says:

    Hi, how easy is it to keep the tent in place if you’re on a hardwood floor? Does it slide or anything?

  79. avatar Jessica says:

    Hi! Can you tell me how much contact paper you used? I’m ordering some from Amazon and want to make sure I get enough without overbuying. Thanks!

  80. avatar Emily says:

    This was a fabulous tutorial! My canvas shrunk so my semi-circle was 61 inches as opposed to 69 inches and I used 5 poles instead of six. I spaced them 38 inches apart and it turned out perfect! Thanks so much for the amount of detail that led to such a happy little space for my daughter :)

  81. avatar Elizabeth Mae says:

    I want to make my teepee 6′ tall and 6′ wide. What would my measurements be fore that?

  82. […] Directions to make a simple tipi […]

  83. […] on making this DIY no-sew teepee for Leo before we get too much further into […]

  84. avatar Casey says:

    Hi! I’m looking into making two of these, how much contact paper did you use for the pipes?

  85. […] the poles for me so the kids wouldnt get any splinters, we cut the canvas per these instructions: http://projectnursery.com/2014/08/diy-no-sew-teepee/# however I didnt use the no sew approach… it took 5 mins with my sewing machine to hem the […]

  86. avatar Neusa says:

    Thank you for your reply. I really love your site I always find great ideas here And most of the things are so easy to make even for me!!
    Thanjs

  87. @Neusa – Yes, that means 9 ft by 12 ft. If my Google length translator is correct, you’ll need fabric approximately 2.7 x 3.6 metres long. All the other measurements on my diagrams are in inches, which hopefully you can convert to centimeters.

  88. avatar neusa says:

    Great teepee, I love it so much that I’m thinking of doing one for my girl but I’m not sure how much fabric I’ll need for this ( not understand if 9’x 12′ it’s in or ft – I use metres normally) can you be kind enough and tell me please how much fabric I’ll need?
    Sorry about that
    Thank you

  89. […] 1. No-Sew Feather Teepee – Project Nursery […]

  90. avatar Cara says:

    We used this tutorial for my daughters school project and LOVED the outcome. It took us a few times to get it set up correct but now that we know how its easy and works great!

    /Users/Hamilton/Desktop/11182159_10101597275099897_1035083860594485570_n.jpg

  91. […] Indian outfit. For the teepee, I followed Project Nursery’s No-Sew DIY Teepee tutorial here: http://projectnursery.com/2014/08/diy-no-sew-teepee/# However, instead of using PVC piping and wood-grain con-tact paper, we picked up 5 pieces of […]

  92. avatar Louis says:

    this is an amazing DIY teepee design. I’ve tried to follow others before but have had no luck. is there anyway you would be able to tell me what size fabric i would need for a 6 foot teepee? I’ve tried on my own to no success

  93. avatar Kayla says:

    I want to make this tee pee, but I don’t need it to be 6′ tall and 5′ wide. I’m not very good with math, so can you help me with measurements for one that is 5′ tall and 4′ wide?

    Thank you and sorry for my “dumb” question! :)

  94. […] I saw this idea awhile ago and thought it would be the perfect addition to any nursery, as it wasn’t overly decorative or baby-ish and could also be a mainstay in baby Jacob’s room as he gets older. (You know, behind the future Spiderman lamp.) It was also something I could travel with, as Jacob and his family live in Texas. Which is more than could be said for this other idea I had. […]

  95. […] Frankensteined a few tutorials – picking our favorite elements from each. These two were the main inspirations. (Take a hop over to Pinterest and do a search for teepee. The variety […]

  96. avatar Hayley says:

    We spent around $60 in materials and it took about 3 hours (including cutting all the pipes) to put together.

  97. avatar Stefani says:

    About how much did this project cost you? It sounds like it was fairly inexpensive. We are on a budget for Christmas but I’m thinking we could definitely do this.

  98. avatar Hayley says:

    Super cute, Jenn! You’re gonna have the best Thanksgiving party ever. ;) And the mini-teepee… so fun!!!

  99. […] Create a teepee in your backyard if you live in warmer climates or inside for those of us in the chillier part of the country. Here’s a great teepee tutorial. […]

  100. avatar Jenn says:

    Great tutorial! Wanted to make a teepee for a while and finally have the excuse of a Thanksgiving party to do it!

    I used the extra pieces of PVC to make a mini teepee and they look so cute together! The extra poles are about 35″ long so I used the ratio to complete the teepee cover. 30″ radius (instead of 69″) with 13″ gaps between the caps (6.5″ for the front halves). The cover even fit on the extra pieces of drop cloth canvas, so only extra investment is 6 additional caps. It ends up pretty small but could fit a dog or stuffed animal.

    I also used grommets instead of snaps but think the snaps would be much easier to put things together. Lacing it up is complicated while trying to put everything together.

    Also, I forgot to wash the fabric in the begining. Was gonna skip it altogether but thought that it would help with the giant fold creases. Unfortunately I washed it AFTER I had cut out the pieces so everything frayed and I lost an inch, making things a little tight, but I still love how it looks.

  101. […] Endless imagination is one of the greatest gifts of childhood—what better way to encourage creative play than to give your little one a magical space to call his or her very own? Forts created from blankets and pillows will never go out of style, but we’re totally crushing on the latest play tent trend we’ve spotted in our gallery—teepees! Bonus points if you get crafty and make your own! […]

  102. avatar Hayley says:

    Wow Chelsea!!! That looks phenomenal. I adore the flower additions and her name… great personal touches. Bravo!

  103. avatar Chelsea Stiffler-Myers says:

    Here is our version. I hot glued burlap flowers on the door and sides.

  104. avatar Chelsea Stiffler-Myers says:

    Thank you so much for this tutorial. My husband and I just finished ours, and there is NO WAY I could have done it without you. It turned out way better than I thought i could manage.

  105. avatar Hayley says:

    You’re welcome, @frannydee:disqus! Give it a whirl, the teepees are a lot of fun.

  106. avatar Franny Dee says:

    Thank you for this post. I love these Tee pees and this DIY doesn’t look too complicated.

  107. […] but I wasn’t about to spend $200 on one from the store. Pop over to Project Nursery for my detailed instructions on how I DIYed a version just as awesome – no sewing […]