Attention all mommies of little girls, get your glue guns ready! Here’s a quick, easy and inexpensive way to display all those cute headbands and bows. With a few easy steps and materials from your local craft store, you’ll declutter those drawers and display all of your daughter’s beautiful hair accessories.
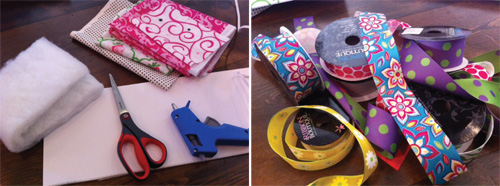
Materials: white foam board (think middle school science project) cut to size, 1-2 yards of fabric depending on how big you cut your foam board, batting, decorative ribbon and the good old glue gun!
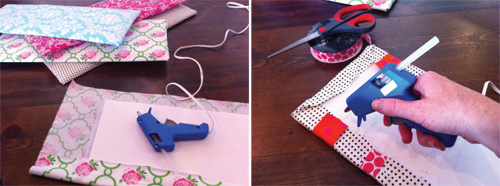
Assembly: Once you cut the board to your desired size, use it as a guide to cut the batting. The batting should be the same size as the board, but the fabric needs to be larger so you have room to wrap it around the sides. I recommend at least 3-4 inches to give you enough wiggle room. Lay the fabric down flat (right side down), then the batting, then the board, and glue away! I like to do the long sides first and then fold up the top and bottom (similar to wrapping a gift). If it looks messy, you can cover the back with your extra fabric.
Ribbons for Clips: If you are making a board for bows or clips, you’ll want to attach ribbon so that the clips have something to grab onto. I like to space mine out every 4″ so I have enough room for larger bows later on. Headband boards don’t need the ribbon since the headband will just wrap around the board itself!
Display: There are so many ways to display these boards. You can hang them on the wall in your daughter’s bathroom or on the back of a door. They make great gifts. A sweet friend of mine made a small headband board (6×8″) for my daughter and gifted it with a few darling headbands on it.

Here’s an example of how many cute hair clips you can fit onto one board. A girl can never have too many hair accessories!

Diy Room Decor & Organization – Easy And Inexpensive Ideas | DIY Project at Home
Friday 17th of July 2020
[…] View Image More Like This […]
DIY Hairclip board | Geet's Corner
Sunday 14th of October 2012
[...] First i took a piece of thermocol that i had leftover from a gadget. I covered it with colored paper and then wrapped some ribbons in rows. Then made a loop to hang the board and in the end i covered it at the back with a piece of paper. The detailed instructions can be found here in this link. [...]
Sabrina
Tuesday 4th of September 2012
With 2 daughters who wear tons of bows and ribbons, we're always looking for the right size and color matches in a massive clutter. This is such smart project-- it will make us feel more organized and it's pretty to look at.
Jasmine C.
Monday 3rd of September 2012
This would make a lovely gift for a little girly girl. Of course, you have to toss in a few bows and headbands, too, while you're at it ;)
Diane Mathias
Sunday 2nd of September 2012
Cool, So it's just this simple? My daughter's hair accessories are just taking so much storage space, and this is a perfect project.