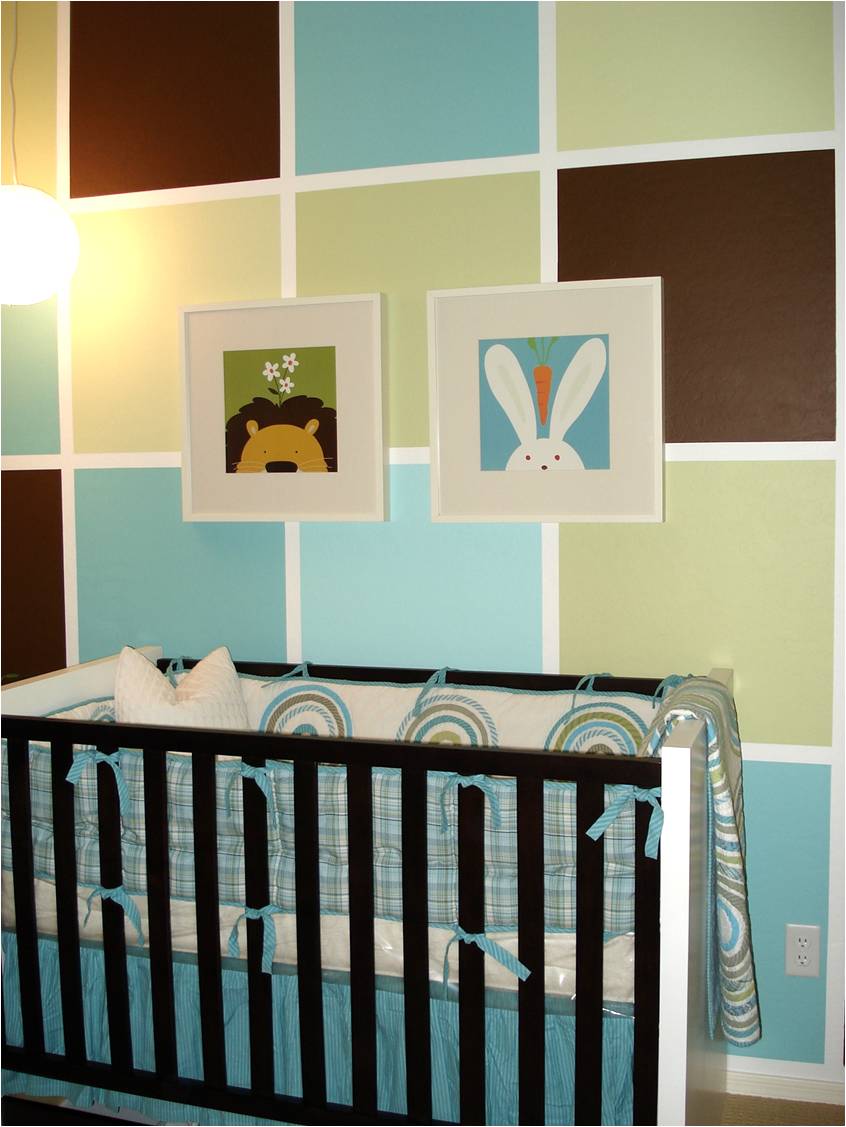
My history with Project Nursery all started here…My first lil’ dude’s room! Gosh, how time flies!! I designed this room THREE years ago and managed to paint it while I was 7 months preggers…Wowser! This color scheme and wall detail are still quite popular so per a few requests I decided to post a quick little ditty on the process and how to create the very same look (or similar) for you nursery.


Supplies:
Blue painters tape (1.75″ or 2″), a pencil, tape measure, an extra long level with ruler, a calculator, paint and all of the supplies you will need to paint and most importantly…patience!!
How To:
1. Measure the width of your wall (across)
2. Measure the height of your wall (up & down)
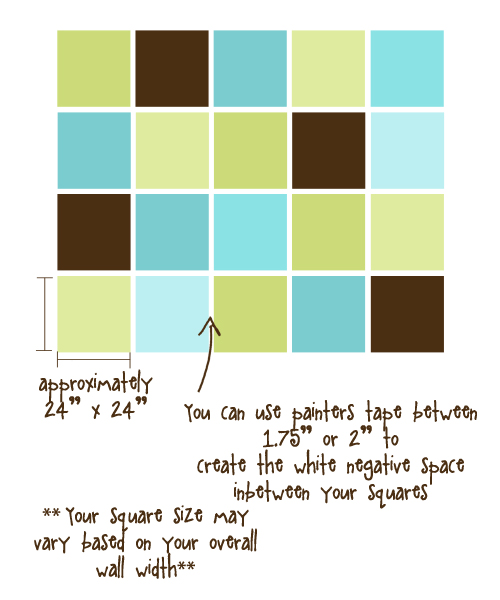
3. Ok…here is the tricky part…divide the distance into 5 equal parts, make sure to allow for the white border around the squares. I used 1.75″ blue painters tape but 2″ would work as well
4. Sketch out your dimensions and measure at least two times – make sure to check your math
5. Once you have confirmed you measurements, start penciling your pattern on your wall
6. Now that you pattern is measured out, plan what colors you will use and where…I used a random pattern and labeled it by number. Although it was random, I still planned what colors would show where. Keep in mind the bed will cover up some of it so make sure you like what is showing around the bed.
***If you have textured walls, it is near impossible for the paint not to bleed under the tape unless you “seal” the edge. This technique can be done with paint but here is also a product that does the same thing. Click HERE for instructions on how to ensure flawless tape lines. (I haven’t tried this product yet but I will now!!)
7. If you wall is already white then all you have to do is tape up your grid and start painting!!
8. Once you have painted a minimum of 2 coats you can remove the tape and start any touchups. I usually remove my tape when the paint is almost dry…when peeling the tape off peel away from the section you painted. Test a small area to determine whether or not your paint needs to be fully dry to remove the tape.
9. Sit back and admire you hard work…Great Job!

Fast forward today and this detail works great with my son’s transitioning toddler room, no more crib and I have added a pop of orange. Happy painting!
My
Saturday 14th of July 2012
What color did you paint for the other walls? I was thinking of doing the chevron wall but I like this more.
Jill
Saturday 7th of January 2012
My son and his wife are having a boy in March. As I write this my husband and son are painting the nursery like this!! Where did you get the pictures you have on the wall?? I absolutely love this nursery and was thrilled when he showed me the picture. Thanks for sharing....great job!!!!
zara
Saturday 16th of July 2011
Love it! the finish product looks great. just one questio, what color are rest of the walls?
Christine
Tuesday 16th of November 2010
Very impressive...neat!
Aimee
Saturday 23rd of October 2010
I LOVED your feature wall and featured it here. So clever!