


Description
When we found out we were pregnant with our THIRD child, we were surprised, but, even more surprised to find out she was a girl! We have two boys, and I've never really been into pinks and frills, so my original idea was to go with oranges and hot pinks. I wasn't planning to put much effort into her room because I knew we didn't have the budget or the space for it.
But, our baby was born 14 weeks early in December (she was due in April) and she weighed less than 1.5 lbs. It was a tough time for all of us. And, when I met her two days after she was born, I knew she was our princess. And, all I kept thinking my little princess had to fight to come home, and when she did, I wanted to have to have something beautiful (and girly) ready for her. And, despite our very small budget and small space, I was determined to give her the room she deserved.
Design Inspiration
My inspiration first and foremost was my little girl. I felt like I didn't know her as well when I was pregnant with her, so I chose the colors based on my own preferences. But, when I met this tiny little fighter...this dainty little girl...I knew the room had to reflect that. I knew that it was going to be a long time since we would get to bring her home so I spent a lot of time planning and working on her room when I wasn't at the hospital visiting her. It definitely made me feel just a little less helpless.
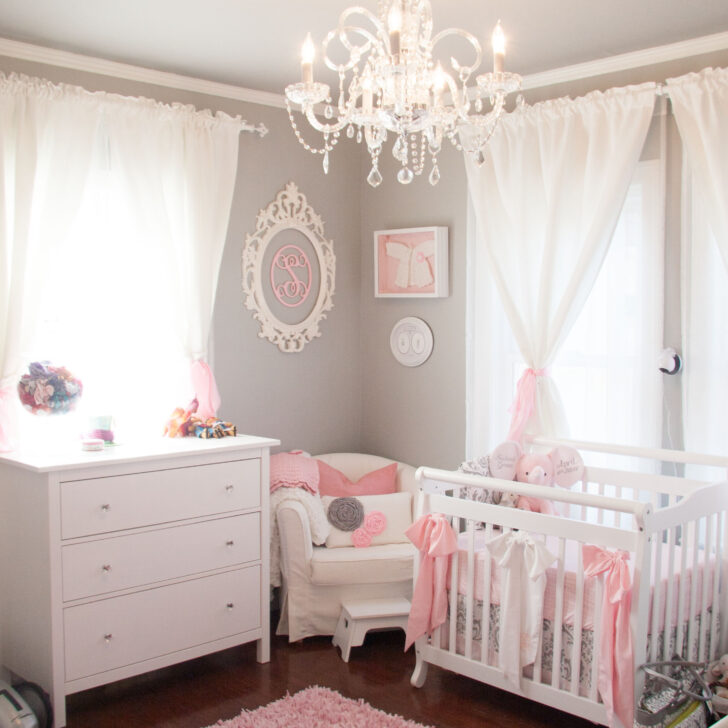
There's a room on Project Nursery that I just fell in love with when I decided to switch gears to "girly" (Ava's pink and gray nursery). I knew I wanted the colors to be pink and gray so when I did a search, Ava's awesome nursery came up. I admired the clean lines and soft colors and I wanted to come close to that. So, my ideas started there and then I added a little more "frill" to the room where I saw fit.
Decorating Style
I like things clean and simple. I'm not huge on murals or heavy patterns. I like to change things up once in awhile, so I usually like to keep decorations simple and wall colors more neutral.
Project Details
Almost all the furnishings were purchased using gift cards we saved from Christmas and when Bean was born.
The dresser and wardrobe are from Ikea. Because of our small home, we needed them both because her brothers needed to keep their clothes in her closet (sadly...and it drives me crazy because they have to stomp in through her room every day to get something). We changed the knobs on the Ikea Hemnes Dresser and Wardrobe with glass crystal ones we found on Amazon.
The changing table is also Ikea.
The crib is a mini-crib by DaVinci we also got from Amazon. This was a difficult decision for me. We had such a small space, but, we really needed the wardrobe. I went back and forth on the idea of a mini-crib (and researched and researched!) and finally decided to get it. When she gets older, the crib can convert to a twin and not a full sized bed (since we definitely don't have any room for that!). ALSO, since she was a preemie, we figured, she will probably be able to fit in it longer. I actually really love it and she sleeps well in it.
DIY: The chair I use for breastfeeding is from Ikea. The pillow came with it, so I decorated it by sewing rosettes on them. The step stool I got from Target. I used it to aid in breastfeeding and then she can use it as a step-stool when she's older (hopefully it stays white!)
Paint: Behr's Classic Silver.
Chandelier: One thing was certain when I decided my sweet girl needed a special room and that was that I needed to have a chandelier. Also keeping budget it mind, we got ours at Overstock.com and couldn't be happier with it.
The crib bows were made by my friend at Curly Q Design. I knew I wanted crib bows (that can be easily removed) since we weren't going to be using bumpers. I wasn't happy with the ones I saw online, so, I sent Michelle (From Curly Q Designs) some material I found at Joann's and she figured out how to make them for me. They're sewed securely and can be removed easily. And, she monogrammed it. I love the way it makes the crib look.
The pink elephant is also from Curly Q Designs. It has Sabinè's name and Homecoming Date (note-NOT birthdate) because after 100 days of NICU time, it was really the sweetest day of our lives.
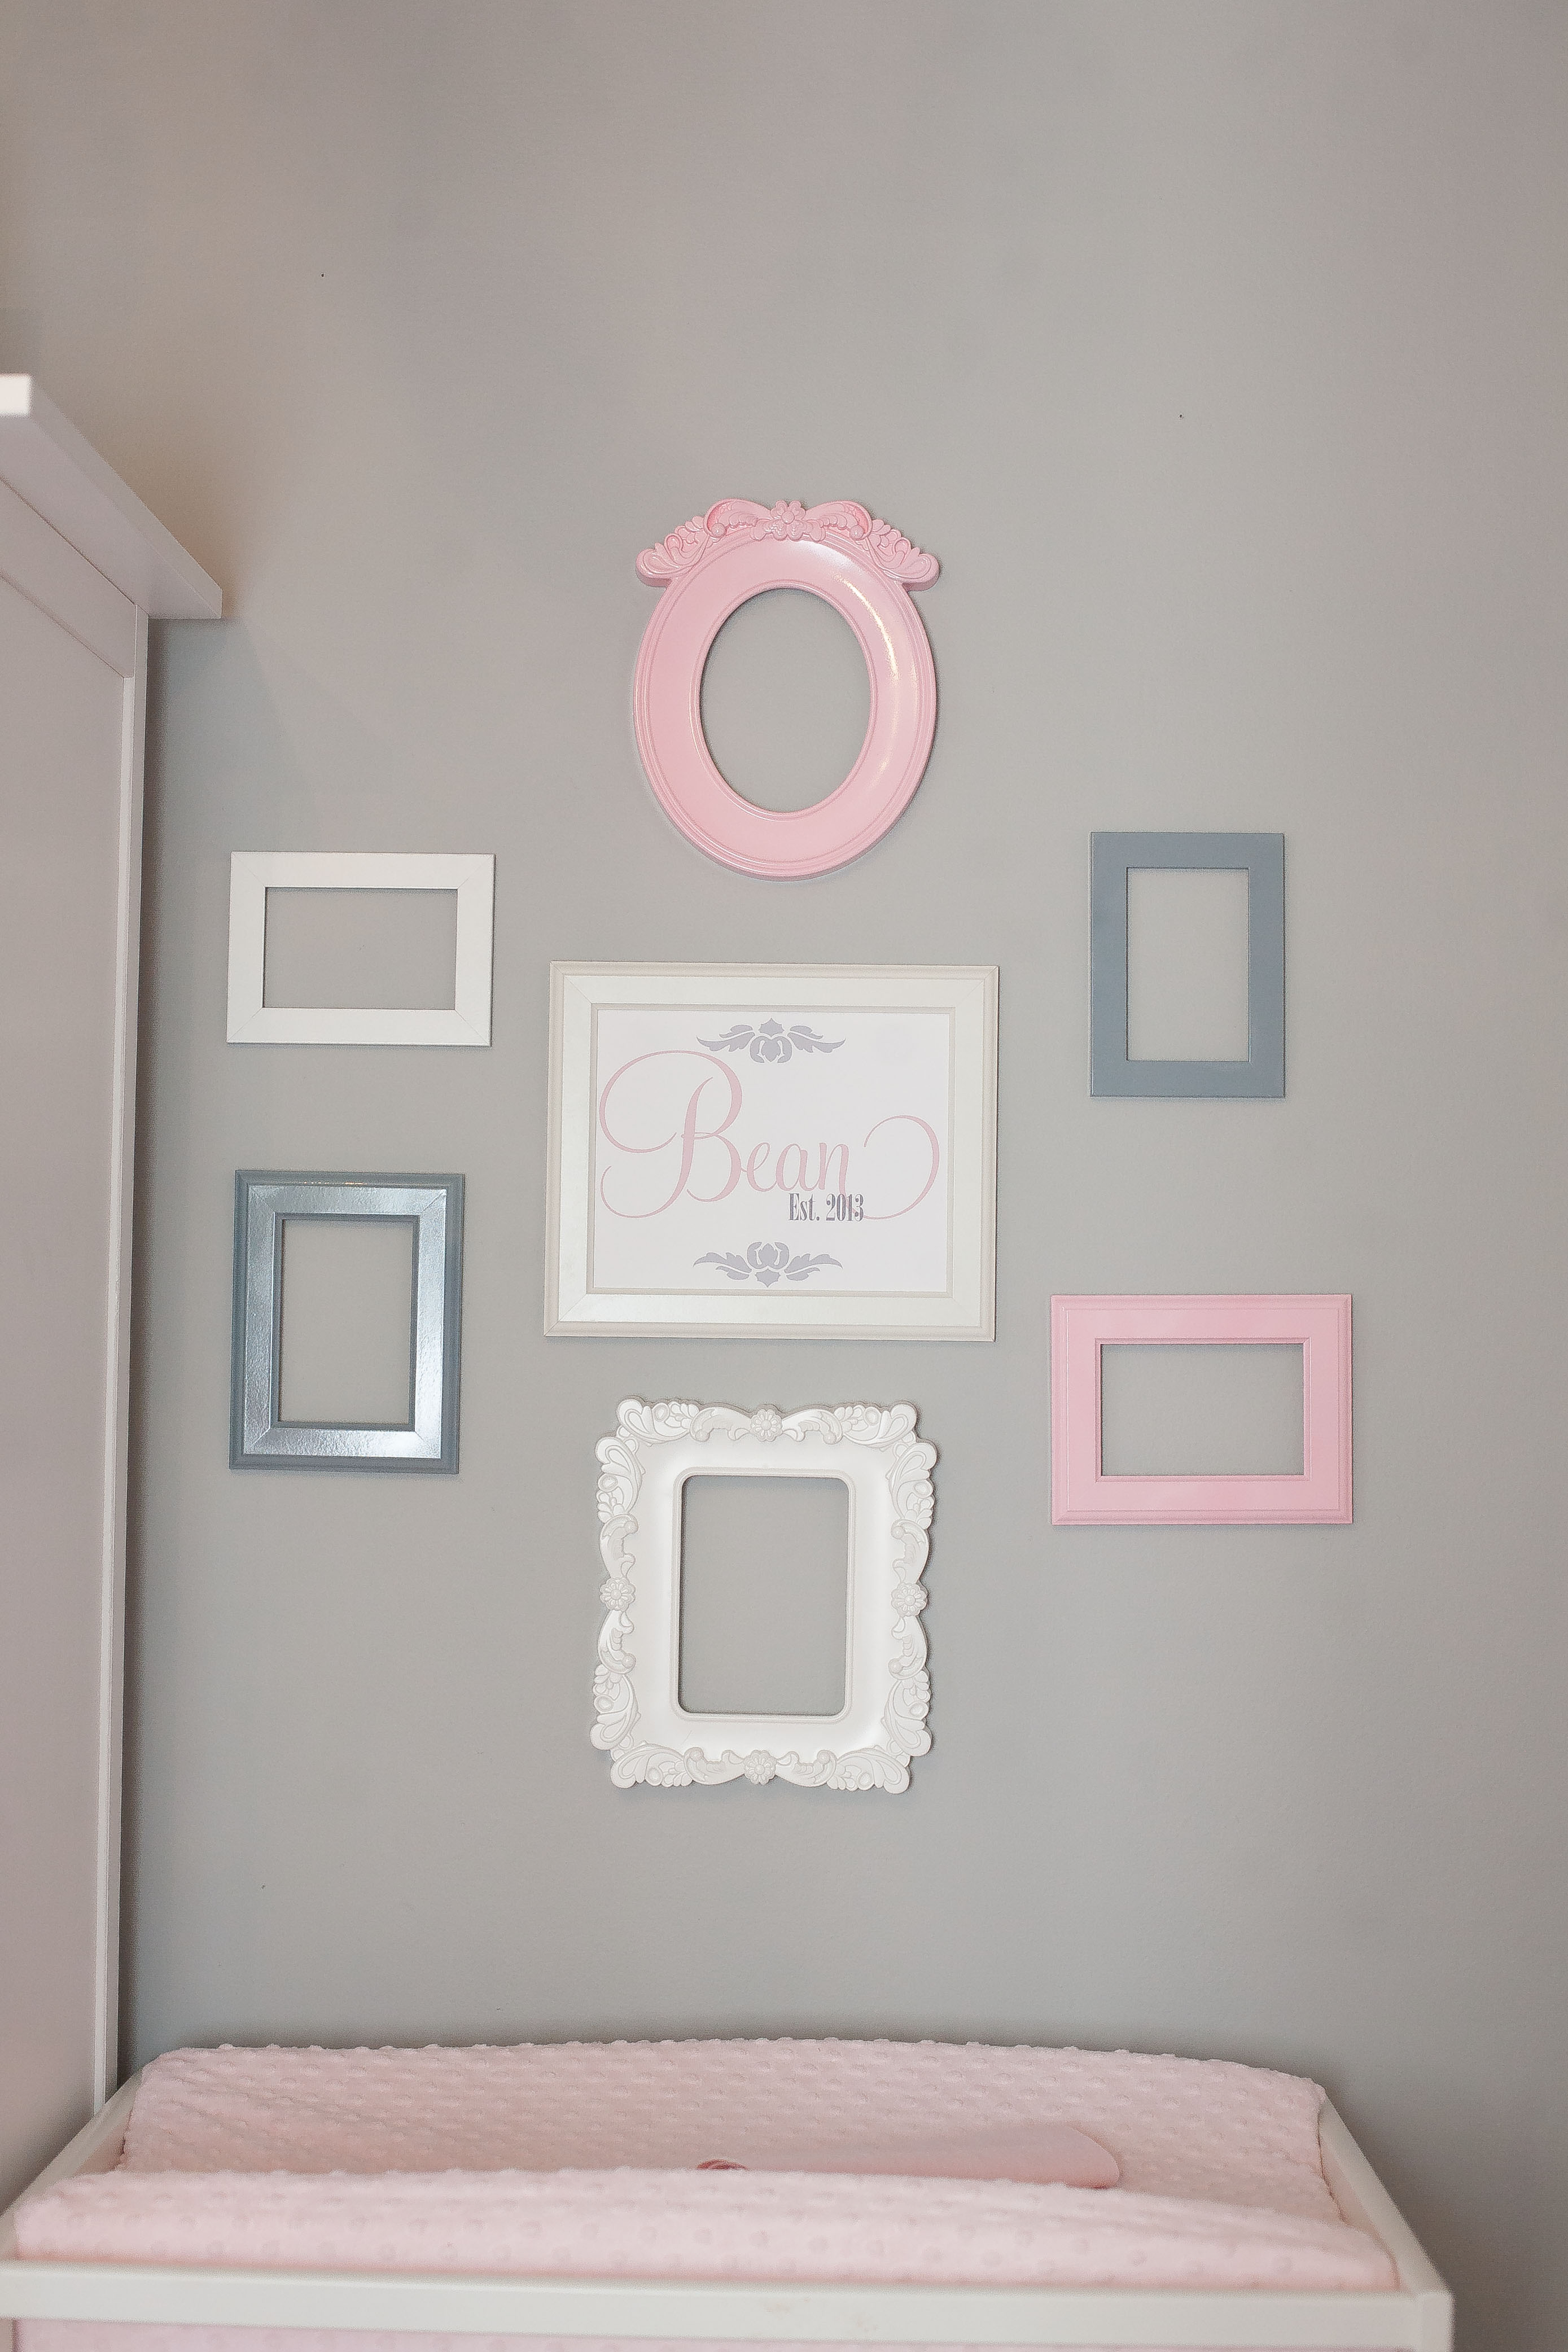
DIY: Most of the picture frames are also from Ikea OR they are old frames we had in our garage. I painted some pink and gray. The big "S" was a wooden initial I bought from Etsy. I just painted it and mounted it inside the empty frame.
The curtains took three different stores and three different returns to find the one I liked and it ended up being IKEA again. They're textured like embroidery and I love them.
DIY: In the shadowbox, there's a little sweater that someone crocheted for our little girl while she was in the NICU. The woman who made it doesn't even know us or our family and we were surprised to get it. We received several gestures like this when our little girl was born and when people heard our story. It was overwhelming and touching. I wanted to frame the sweater as a constant reminder of how much love and prayers Bean received when she was born. There were so many people that were rooting for her and we will always be appreciative. The shadowbox I also found in our garage and I re-painted it from silver to white, and covered up the white background with pink fabric.
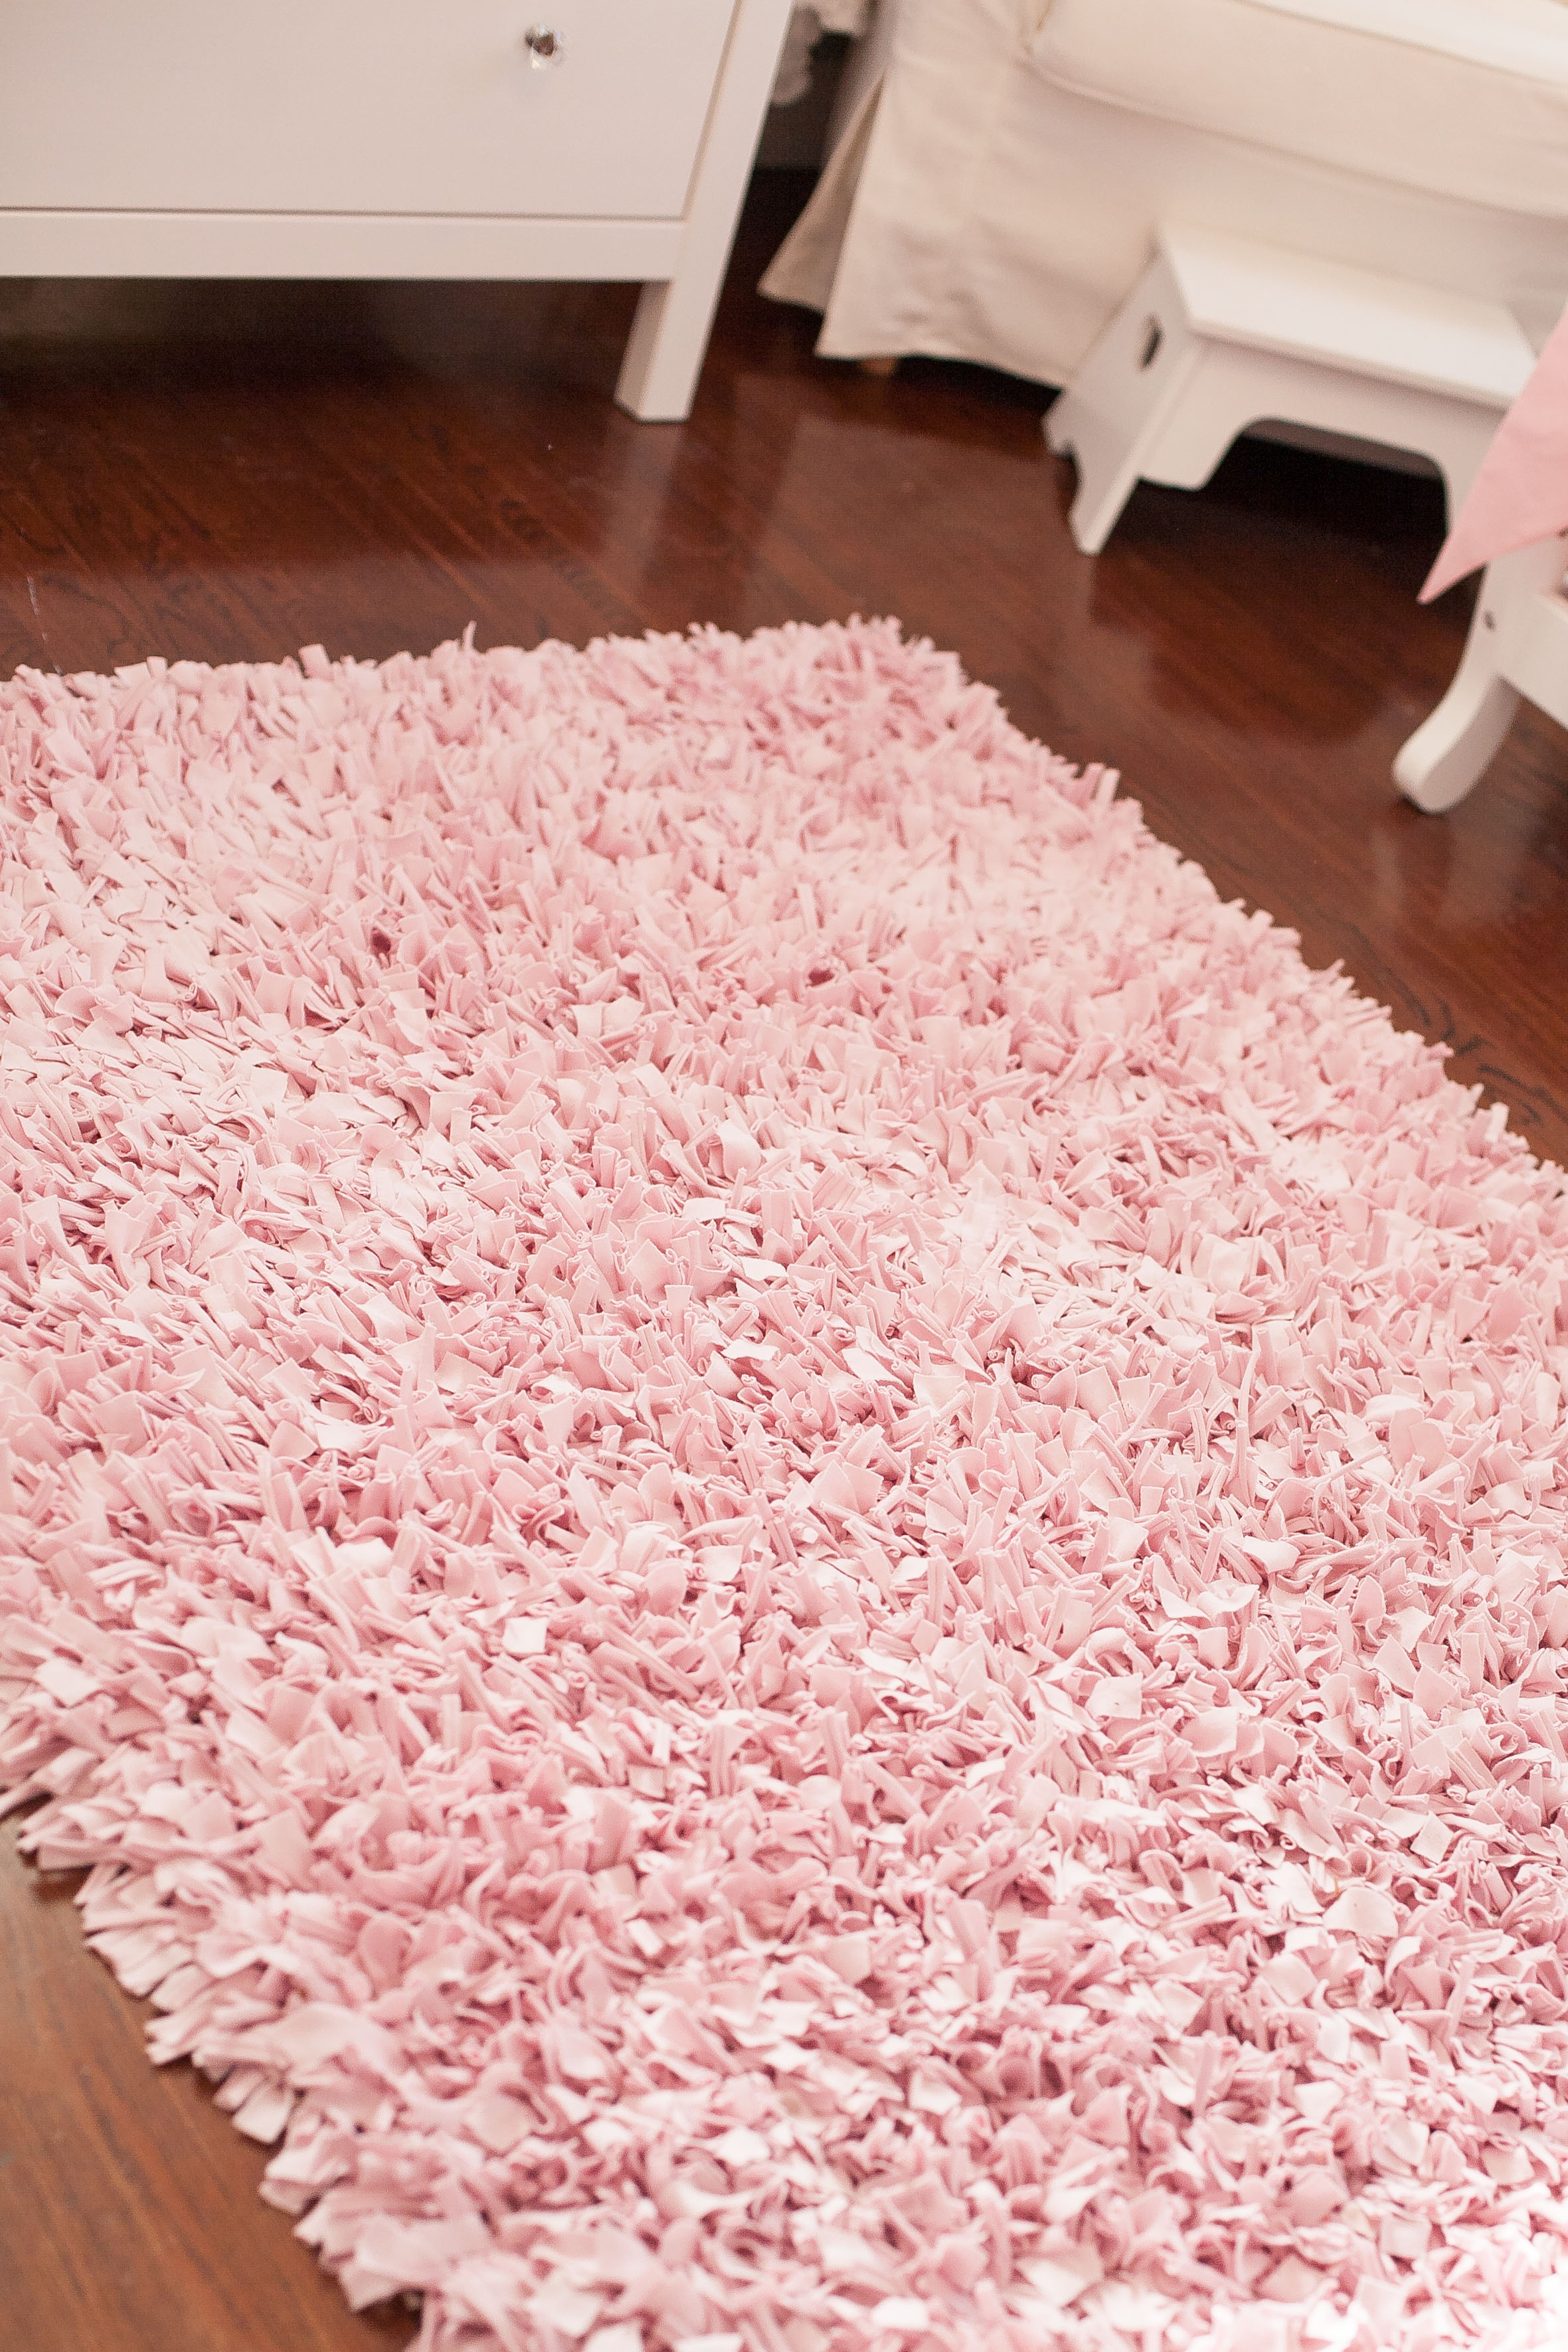
DIY: I also MADE the shag rug. All the shag rugs I wanted in that large size were too expensive so I made one using this tutorial from My Love of Style (only I used a crochet hook). It took me three weeks and all mostly while pumping milk for my baby in the NICU (Hands-free pump bras are awesome!)
DIY: The empty-frame collage (again from Ikea) has one frame filled in the middle that says "Bean, est. 2013". Print was created by me: cb Shilkret Designs
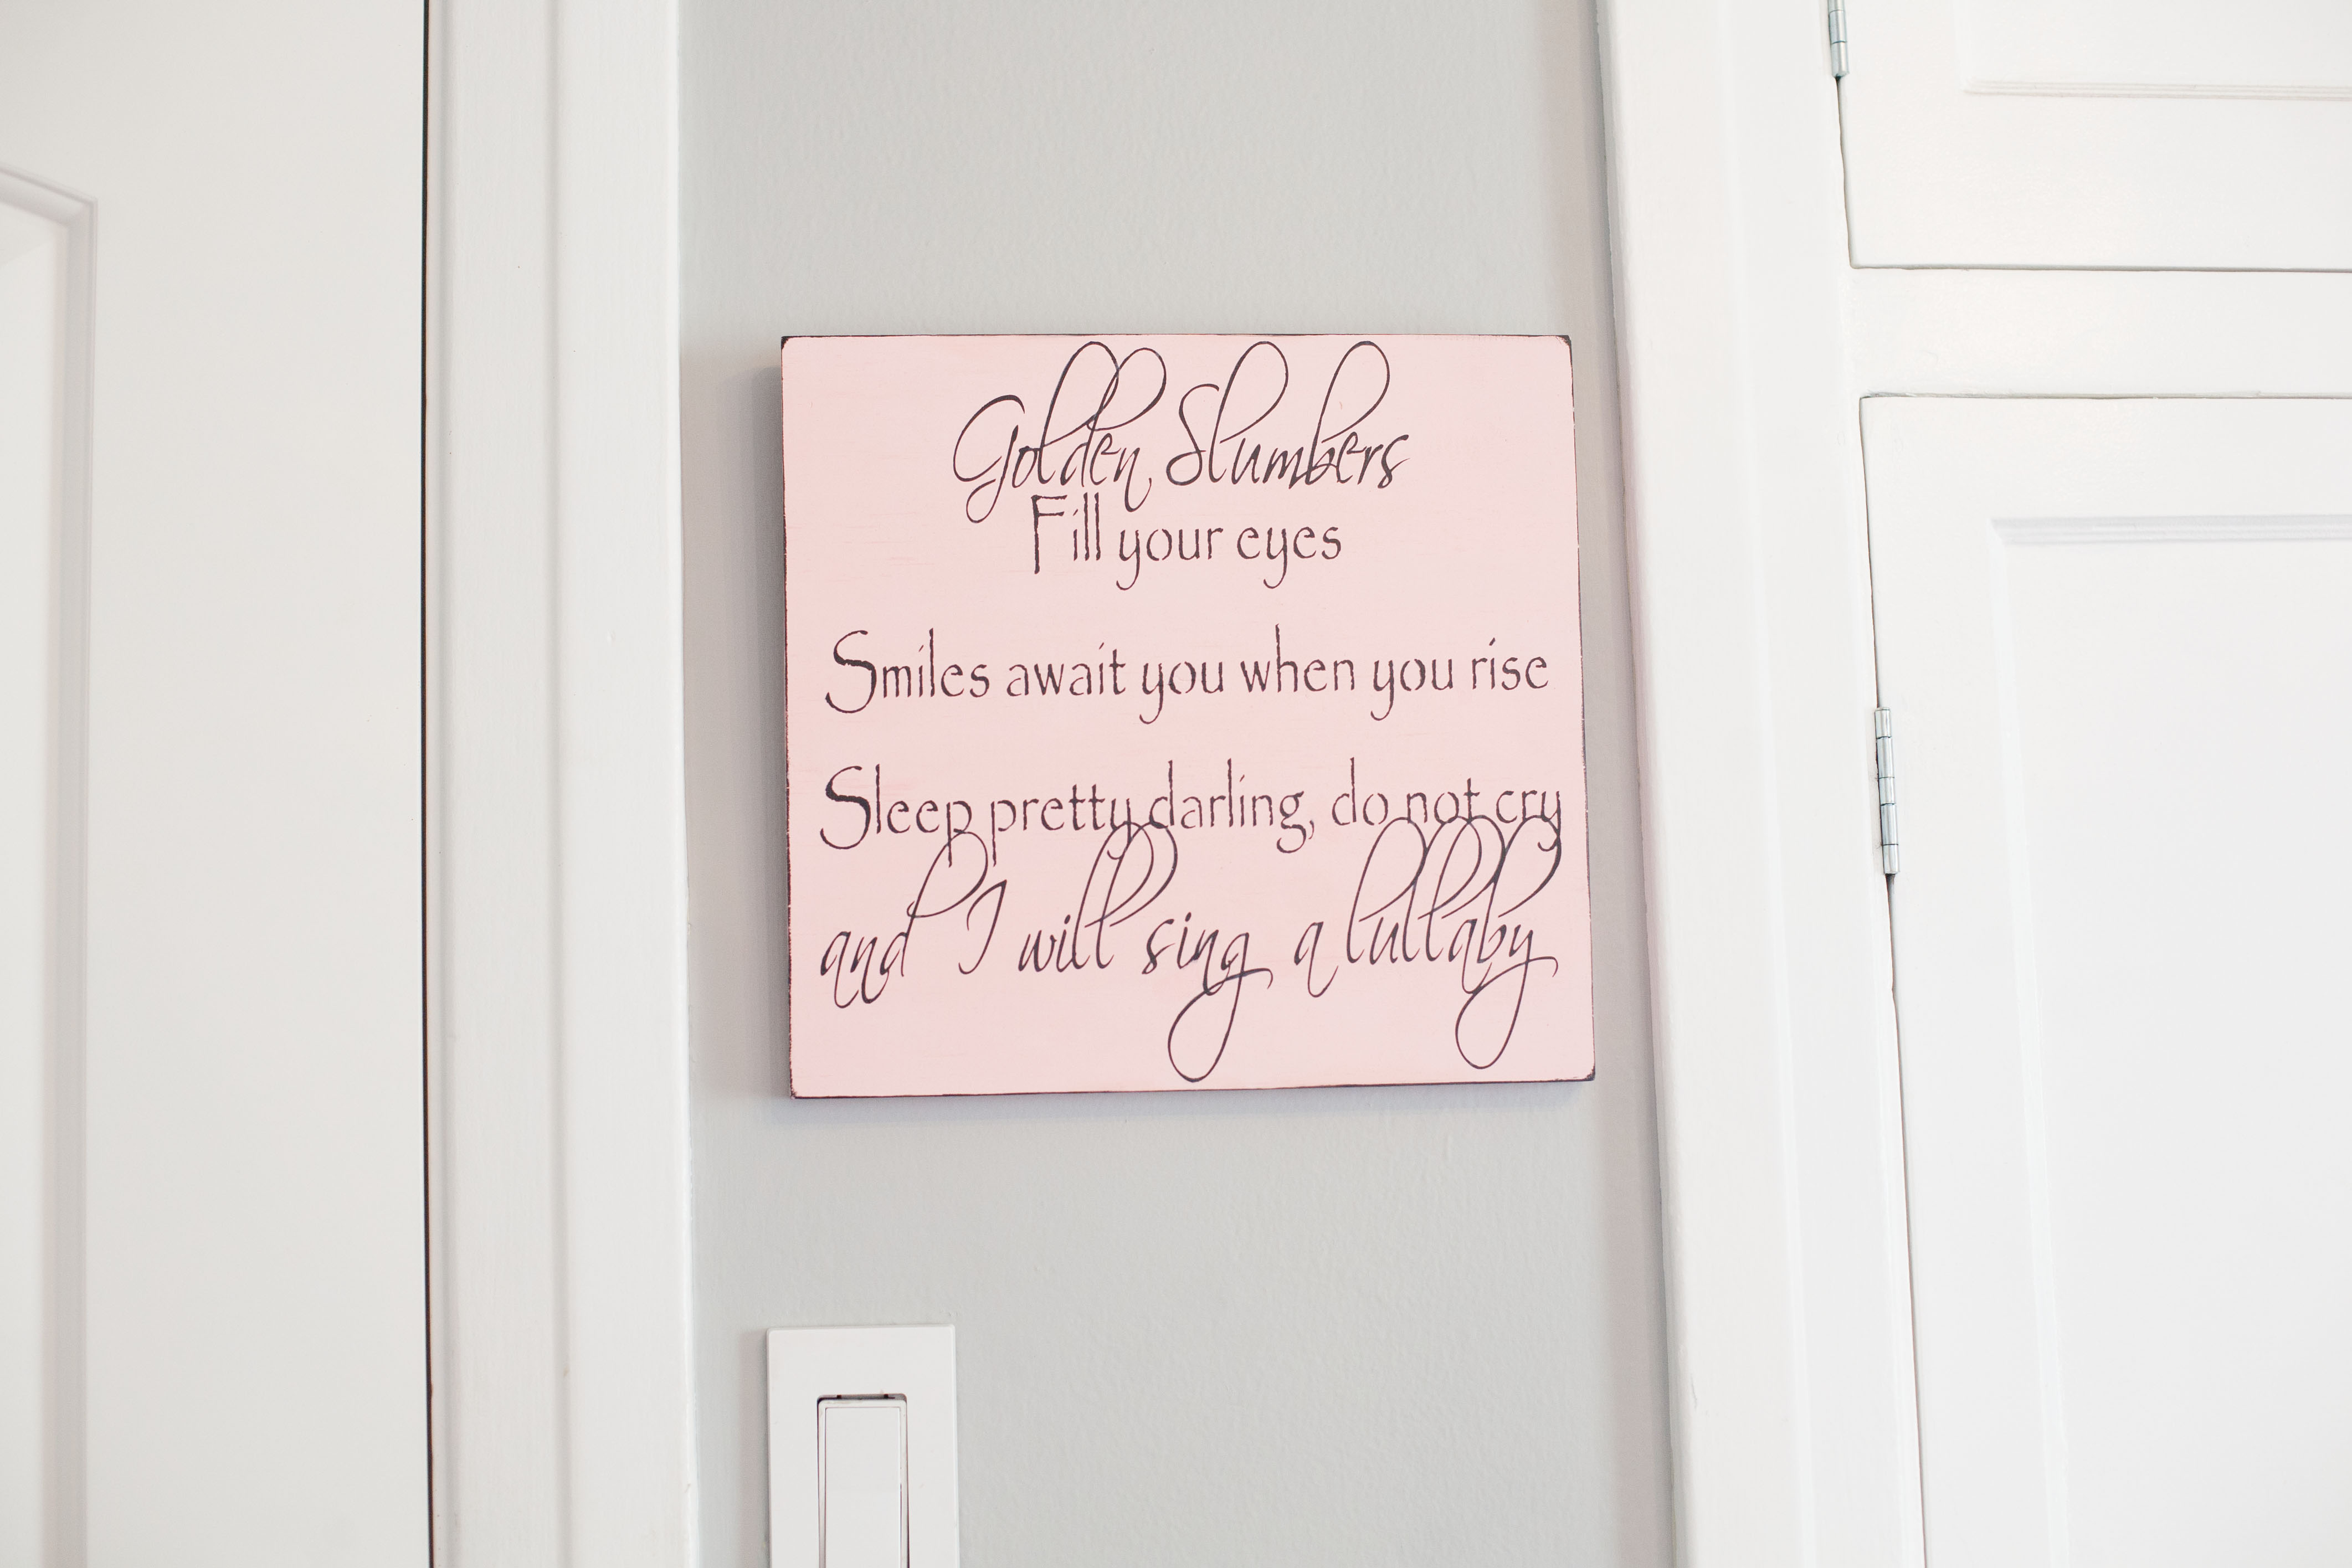
Near the doorway is a pink sign given to us by friends that has Beatles lyrics on it. Bean was born to an operating room filled with Beatles music (after my awesome OB asked what music I would like to hear during surgery) so, this is a tribute to moment she was born.
Bedding: Finally, the bedding is from Carousel Designs. They were the only ones who had the cutest mini-crib designs!
Favorite Items
It's really tough to choose one since there are a few "meaningful" things in there for me. But, if I had to choose one, I think it would be the sweater in the shadowbox. It just means a lot to all of us and it looks incredibly sweet in the room.
Advice
My advice is that there really are ways to put together your dream room even on a small budget. Don't underestimate Ikea :) Our furniture is solid wood and sturdy (and pretty, in my opinion.) It might take a lot of searching and a lot of DIY, but, in the end it's worth it! Finally, choose things that really mean something to you. I was not able to show them all here, but there are so many little things in this room that make me smile. It makes me really enjoy sitting in this room and taking it in. I hope my little girl will enjoy it as much as I do when she's older.
15 Princess Nursery Ideas रॉयल्टी के लिए उपयुक्त - Baby Fans
Sunday 7th of November 2021
[…] Photo: Project Nursery […]
Dubai to Abu Dhabi transfer
Tuesday 13th of April 2021
I really love this tinny house and want to design it for my lovely kid in this coming her birth day.
Danielle
Tuesday 24th of November 2020
How tall is your ceiling? And what’s the height of the chandelier?
We also have a little room and I want to be sure to get one that suits the space. We have 9’ ceiling. Yours looks fab!
Thanks Danielle
Jennifer
Friday 13th of November 2020
Could you please send me a link for either the exact curtains or something very similar please! I love the style you have done but cannot find anything similar !! Thank you xx
35 Designing and decorating a baby room to a place that tells a story ⋆ BrassLook
Thursday 20th of August 2020
[…] DIY Shag Rag Rug. More details at projectnursery.com […]