

Brooks Navy & Gray Animal Nursery
Our animal themed nursery is all about the critters. We wanted to create a fun space where our little boy could learn all about animals! Also sneaking in the Dallas Cowboys’ colors, navy, gray and white! ENJOY!
Our animal themed nursery is all about the critters. We wanted to create a fun space where our little boy could learn all about animals! Also sneaking in the Dallas Cowboys’ colors, navy, gray and white! ENJOY!

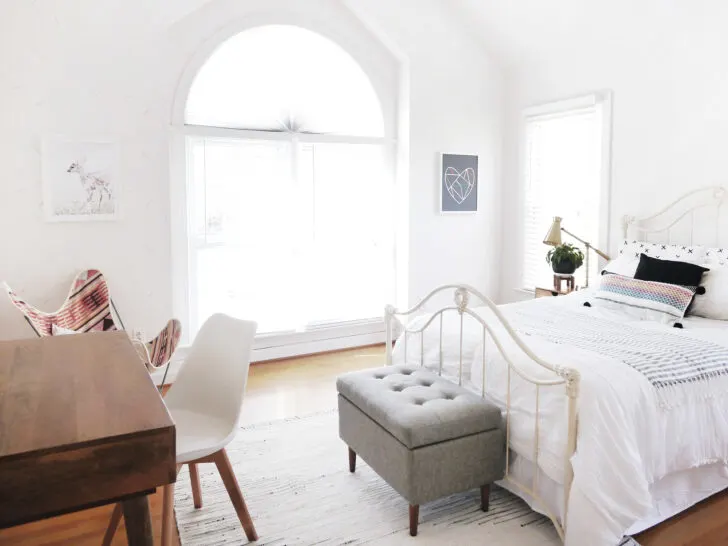
We said goodbye to the pink walls. We said goodbye to the tiny dressing table. And we said goodbye to all things that were making this space a little dysfunctional. Oh, how I wish I had a “before photo” so I could share it here. So, what do you say, are you ready to tour this bohemian inspired room?
We started designing this beautiful bedroom for #clientniece last Summer. Note to self, don’t start working on a new design project the same day the kids finish school. It’s just not a good idea. Taking on a new design project while handling the shop, the kids, and all the mimosas; calls for a bit of stalling. Do you know what I mean? But we got it done. And to make this project even more fun and unique, we did a lot of DIY projects while designing this room as well. Like the DIY bed cover tassel, the fun wall hooks, and the super cute shelving system.
My niece is turning thirteen next week. So the overall goal was to design a space that looked more like her now, while still keeping the overall aesthetic of the house. I wanted to design a room for her that felt fresh and welcoming. Using lots of white details, wood tones, a colorful, but not too colorful gallery wall, and bohemian-inspireded items, we feel like we definitely got the job done. And the best compliment comes from my niece’s friends, who now want Julia’s aunt to design their rooms too.


My little girl recently turned two and we threw her a Dinosaurs and Donuts party! She absolutely loves dinosaurs, and I absolutely love doughnuts, so it was a perfect combination. And it wasn’t even that hard to throw a dinosaur party with a feminine vibe.
Baby J has been obsessed with dinosaurs ever since we took her into the Dinosaur museum when we did my maternity photos in the Badlands last year (click here to see them!). So I had to find a way to give her a girly dinosaur party, complete with her own special girly dinosaur dress–which she hasn’t stopped wearing, btw!
We kept the food and decor really simple since at two years old she doesn’t have the most exotic taste and I am was a busy Mom of two under two. The best part was the Giant Donut Cake! The decorations were super simple. Pink, white and turquoise streamers were the backdrop along with balloons and glitter pom poms. The table cloth was fabulously tropical and we gave the little dinosaur toys tutus.
It was a really simple yet super cute party and it only helped to increase her love of dinosaurs, my nerdy little brilliant girl! You can come to my blog post for all the recipes and more here!
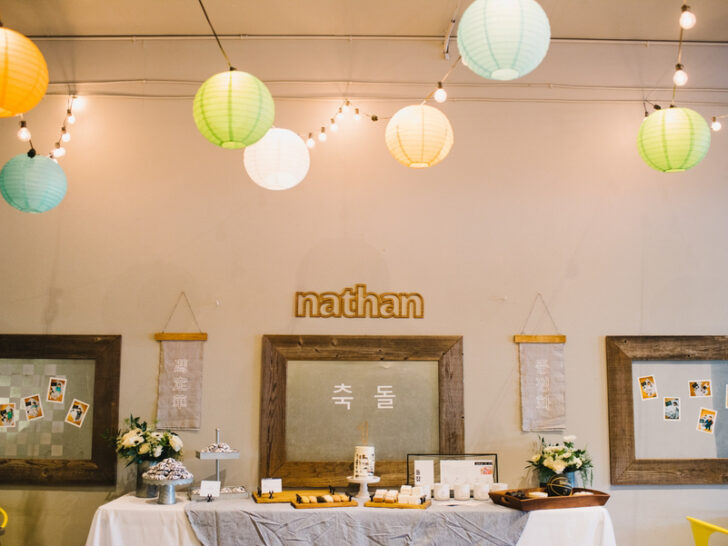

I chose this awesome local play space called the Rec Room in Berkeley, CA that has a lot of the modern industrial elements that I loved – string lights, reclaimed wooden bars and tables, and these bright yellow metal chairs. I really wanted to make this a party that didn’t scream “KIDS’ PARTY” and keep it really clean with a lot of personal, handmade touches.
Theme-wise it was black and white (my favorite color palette) and even though I mostly do wedding designs/calligraphy/hand lettering, I kept it super modern with bold typography, starting with the invitations – the enclosure and bow were made to resemble a ‘hanbok’. I also used outlines for a lot of the typographic elements to play off of the idea that his life is his to fill as he sees fit. I’m sure you know the Korean tradition of picking an item that represents his future, and after a mega-meltdown, he chose a gavel! A lot of the signage wording was written tongue-in-cheek to fit our personalities and infuse some humor.
Black/white and gray chambray was used to soften the overall look – used as a welcome banner as well as name banners behind the cake table. Rather than wasting time and energy on traditional Korean bean towers (dolgoim) I used vinyl letters on the chambray, hung on handmade wooden hangers.
Food! We had it catered by a local Korean BBQ place and had a DIY bibimbap bar, which was a huge hit. Desserts were the most amazing ube cookies and an alternating chocolate/vanilla smash cake made by a friend I’d met at a wedding I coordinated. We also had our favorite ube ice cream from Cookiebar Creamery catered in individual cups.
And my favorite touch was the custom portraits of each family/couple who attended, sketched by my kid sister – who took the time out of her busy college schedule to sketch almost 50 people! These were laid out at the entrance on handmade walnut photo stands. She also did a portrait of my son which I made into coloring pages for a fun activity guests could enjoy. As another fun gift for the kiddos, I handmade bowties and hair clips using the same chambray fabric.
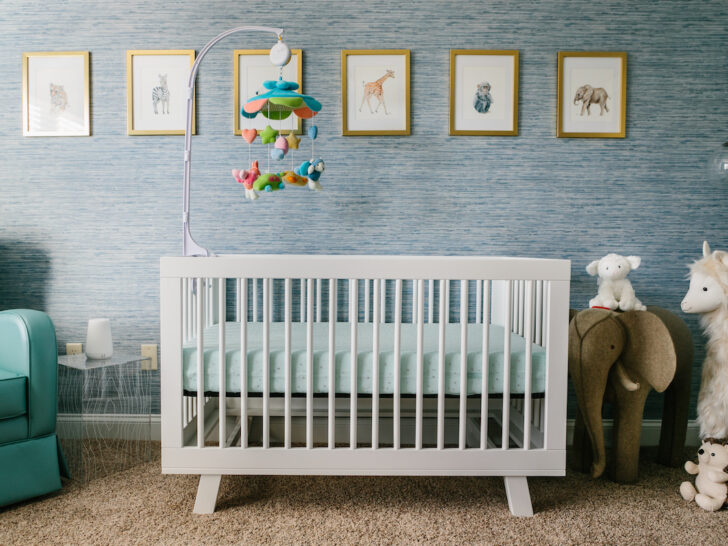

I wanted something bright and colorful for my baby boy’s nursery. I have been obsessed with the color blue for a while so this was the primary color in the space. I It all started with the wallpaper and grew from there. I originally wanted acrylic and gold touches, then moved into a more colorful palette. There are no rules with our color choices here: there’s blue, there’s grey, there’s gold and basically every other color possible here.
This nursery was a labor of love for a child who we prayed fervently for for four years. I am so happy with how it turned out and hope he’ll be happy here for years to come.
Photography by Syed Yaqeen
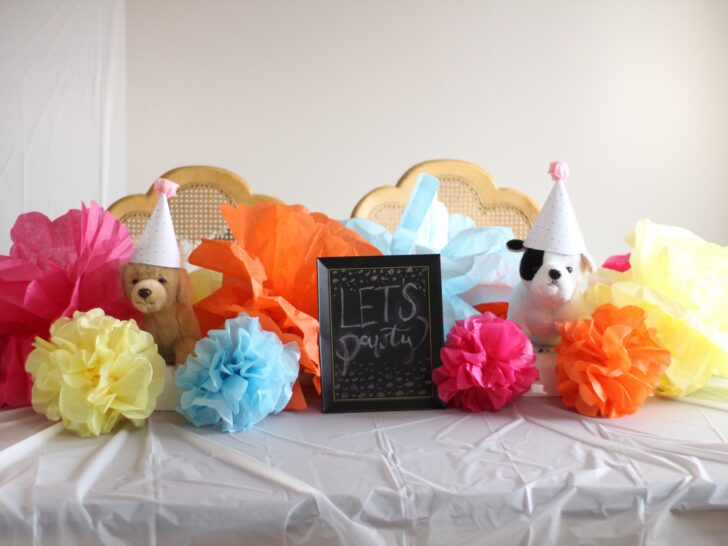

When my almost-three-year-old requested a “puppy party”, I got right to work! Lots of bright, fun colors and summery vibes made this pawesome winter birthday party one for the books. Almost everything here came from Hobby Lobby or was DIYed, so it’s all completely affordable and perfect for any toddler! Easily make this party ready for a boy by changing the themes colors.


Found out I was pregnant in the mist of planning an opening for a store! ::insert all types of anxiety here:: Feeling like I was growing two babies simultaneously, the nursery went kind of hand in hand with the store and opting out from not knowing the gender of course added even more excitement to the project. With everyone puzzled around me on my desicion, no one ever hesitated from asking the obvious… “so how do you do the nursery? Yellow, Grey!?” My answer would always be “NOPE actually color, lots and lots of color! I’ve never wanted anything that screamed GIRL or BOY so this worked to my advantage from people gifting too much pink or blue.
I first recycled the dresser we had in our room because I knew I wanted to work with different color woods and white giving it a touch of midcentury. The trunk was also something we weren’t using and decided to make it an accent piece of the room as well as good blanket storage (not to mention a gem I found at Homegoods years ago so I couldn’t give it up) Little by little started adding things with pop color. I also knew I wanted to get the artist in me to play draw something on the wall so thats when I chose to do some palm fronds. Later found that there was an empty space I could not figure out how to fill until my husband gave me the wonderful idea to put a quote in the room. Light bulb immediately lit up and I said “huh I know exactly the spot for it”. Quickly turned to our favorite band [Coldplay] and in minutes found the perfect quote! (Details on how I painted that below) I guess what it all comes down to is that I really never started with a set plan. Just months and I mean months of searching and finding things I liked here and there. Pretty much improvised my whole way through. Everything somehow came together into what now looks like a bohemian stumbled upon a tropical paradise.
Aside from the great light the room gets during the day, my favorite part is when both edison lights are on which a little touch of the camera night light. Most relaxing nook of the house! To be honest I catch myself (very often) walking in for no reason which is why I think I may just in move there!
DIY Quote: “Everything is a DREAM away” – Coldplay “Adventure of a Lifetime”
1. First aligned scotch tape to make sure I was writing in a straight line lol.
2. Then I stared by hand sketching with pencil first
3. Carefully painted with water base paint. (Just an 8 oz sample paint) that’s actually more than enough but also the least amount I’ve found they will sell to you at Homedepot.
4. Next day I went in with magic eraser to remove the pencil marks left behind.
3D Dream metal sign: Michaels (dont forget your 40% coupon) and VOILA…. this became the centerpiece of the room!
THRIFTED mini ladder
THRIFTED red abstract canvas
THRIFTED round mirror (awesome find)
Large dream catcher: Homegoods! $24 (had a lady following me around the store see if I would put it down. NOT TODAY!
DIY Handpainted …I LOVE YOU flat canvas. Made these years ago for my husband. Now passing the love onto Baby!
DIY Palm Leafs: Also hand painted with three shades of green (sample) paint. Used dense foam brush for the strokes. Video lapse on my page @natalia.estela
DIY Lamp: wire basket from Homegoods then ran a rope pendant light cord with an edison light bulb. Wrapped green garland from Michaels around the base. Lighting is not very bright. You can choose a brighter bulb but personally I like the dimness in the room. Makes it more cozy!!
***SEE OTHER SOURCES BELOW
Follow me and my “babies” @shop_ikidikid


We wanted to create a simple but elegant nursery for our daughter. Our two big goals were to avoid pink and to create a space that would grow with her- her crib will turn into an beautiful full size bed so we wanted the design to be something she can grow with into her toddler years. We’re so happy with how it turned out using the decals, both around her name sign on the wall with the crib and framing the mirror above her dresser. Pops of gold in her name sign and the mirror pull it all together.
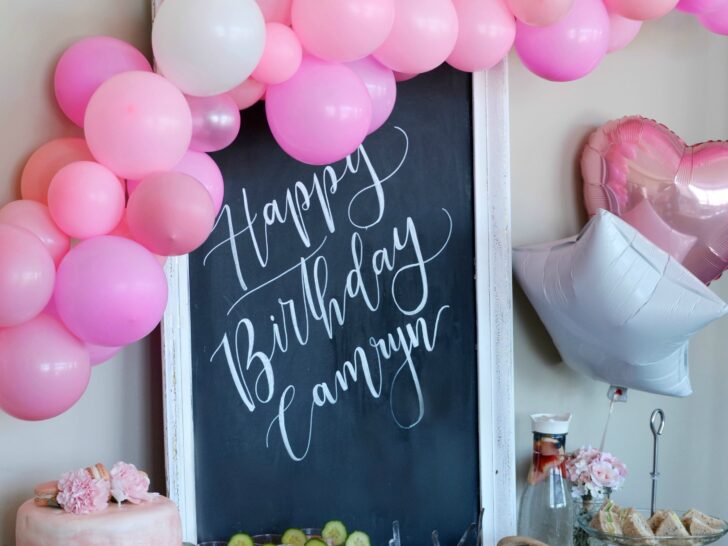

My niece is turning seven this year and I wanted to throw her a SPA inspired birthday party. The girls were able to get pampered by the mama’s and snack on sweets and cucumber sandwiches! They enjoyed face masks, mani’s and pedi’s and we finished the party off with a homemade PINK ombre cake and macaroons made by my talented grandma!


I love the clean feel of monochromatic Scandinavian style rooms, and the boy nurseries that I saw closest to this style just felt right. I tried researching other monochromatic nurseries and picked out a few key pieces such as the rocker and wall decals and tried to work around those objects and tie everything in. In order to fit the room to our budget, we bought cheaper light fixtures and crib from Ikea, and refinished our old bedroom dresser. This gave us the room to splurge on pieces that really made the room to our taste such as the Lorena Canals rug, rocker, the textured brick accent wall, and the spruce tree bookcase.


As my son made his trasition from toddler to “Big Boy,” I wanted his room to express her personality. I wanted a space that he could grow with and that was fun and bright, yet modern and classic. It includes all of the elements that he loves, its functional, and the wallpaper was the perfect catalyst for this makeover. When creating this space, I wanted it to be cute, but mostly wanted it to be somewhere that he loved!

We wanted to do a Harry Potter themed nursery from the start, but was worried it wouldn’t be girly enough. Incorporating the female characters from the story and purples/pinks helped us achieve our goal!


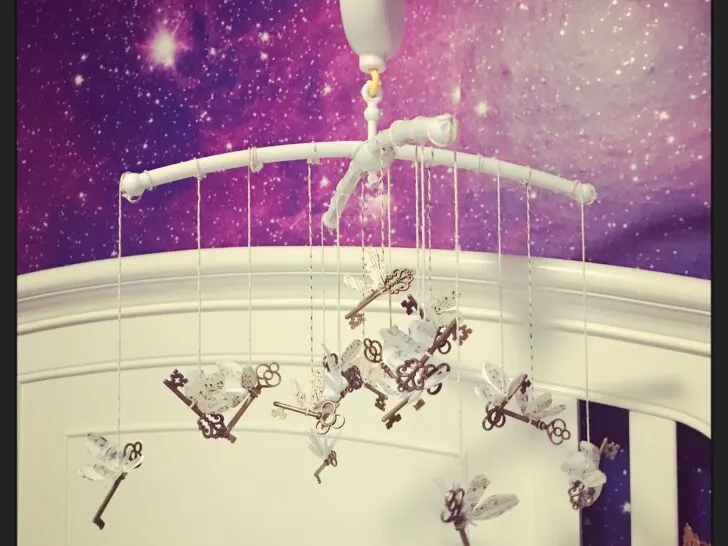
This is our first baby, and I was really, really excited to get started on the nursery! Since we opted not to find out the sex, it was a little challenging for me to make choices that were neutral without being boring. I did a lot of looking around on Pinterest and Instagram for inspiration, and found myself gravitating away from the quintessential gender-neutral grey. This was an opportunity to do some stuff that I couldn’t (or wouldn’t) necessarily get away with in an “adult” room, so I definitely wanted to take advantage of that without going too bananas. My inner-self battled between a space that was perfectly serene and simple, and one that had a lot of visual interest, textures and pattern. I normally hate anything that screams BABY LIVES HERE (the word “whimsical” makes my teeth hurt) but at the same time…a baby will live here.
The lunar cycle accent wall was my jumping-off point for the whole room. I DIY’d my own “wallpaper” to hack this removable version from Chasing Paper (which is g-o-r-g-e-o-u-s but also $$$).
I found the giraffe print on Etsy and knew it would be perfect. I purchased the downloadable file from JuniquePrints and had it printed as a poster at Walmart, so it was very cost-effective.
The dresser-turned-change-table was thrifted, and just needed a little bit of TLC by way of a nice coat of white paint. The mobile hanging above the changing pad is a DIY ( I will be posting the tutorial soon) but it was really, really easy, and I love how modern it is. I debated painting the wooden balls, but keeping it natural really helped to warm up the rest of this wall, which is heavy on the white.
Another of my favorite elements is the beautiful alphabet watercolor from belliesartboutique.
The round mirror on the wall and black blanket ladder are both DIYs as well — I will hopefully have the tutorials for both up on my blog soon. I would have loved to have left the ladder natural, but there were a lot of wood tones competing in that area so in the end I opted to paint it with Rust-Oleum matte black spray paint.
You can visit my nursery blog post here for more details.

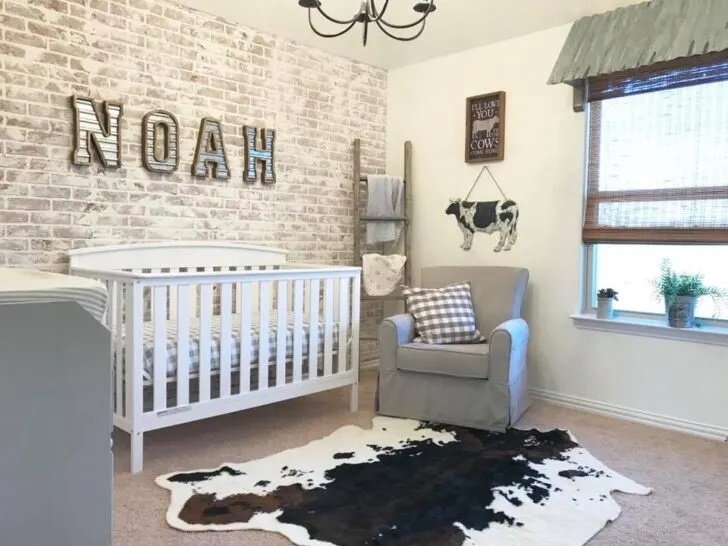
I am 32 weeks pregnant with a 17 month old…my first thought was “no way am I going to spend a ton of time preparing a nursery!” But then, walking down the aisles of Hobby Lobby, a sweet vision came to my mind! A lot of their farmhouse decor was on clearance, so I started loading up my basket with the hopes my vision would soon come together. Our work was cut out for us since we needed to convert my messy office/craft room into a nursery, but Mama was in nesting phase and was certain we could accomplish anything!
I knew I wanted an accent wall behind the crib so I started my handy work researching on Pinterest. Viola! Brick accent wall! Got the tutorial and got to work with my amazing husband’s assistance of course! I was obsessed with the final product and immediately wanted to brick the entire house!! I knew I also wanted to add some farmhouse touches to the window. So we made a tin window awning to go above the window and replaced the blinds with bamboo shades! Oh so lovely! Now for the paint color…I wanted to keep the paint neutral like the rest of our house, so I went with Benjamin Moore Simply White. Painting is my forte, the opposite of course for my husband but we got it done!
Now to add the decor! The best part! I got the changing table from my mother in law and with her blessing, painted it with rustoleum aged gray chalk paint and added handles from Hobby Lobby. Love how it turned out! I knew I wanted some storage for above the changing table but wanted it to be cute and also easy to use. We purchased the wall baskets from At Home. We used an easy tutorial on the barn shutters which perfectly completes the look I was going for. I struggled with what rug I wanted, but decided to go with the cowhide because I love cowhide and the different pattern fit in quite well to really complete the room, and bonus it was on sale at Hobby Lobby!
We absolutely love how it turned out and hope you enjoy the tour into our sweet boy’s nursery!


Evan’s first year flew by so I was inspired to do a “time flies” hot air balloon themed party to celebrate. I found hot air balloon clip art on Etsy that matched my color scheme of baby blue, mint, and navy blue and built the party around that. All of the decorations were simple DIY.


I designed my daughter’s nursery first and received so many compliments! When I became pregnant with my son, I designed this nursery and the positive feedback was overwhelming. With a lot of encouragement from friends, I decided to start designing nurseries, playrooms, and children’s rooms for friends, and now I’m starting my own company. But, no matter how many nurseries I end up designing, I am pretty sure my son’s will always be my favorite. When I started coming up with ideas for his nursery, I knew I wanted a shiplap wall. So, we installed a more rustic type shiplap, and I used lighter wood tones, gray walls, bronze hardware, and a few statement pieces to achieve the look I was going for. My advice to moms or dads designing nurseries is to choose one piece that you really love, and start building your theme from there. For me, it was the blue and white wall tapestry piece over the changing table, and the whitewashed wood wall. The overall theme is tribal, but with a coastal vibe; we live in Florida so it kind of goes with my house. I’m so excited to share Gavin’s beautiful nursery!


My client’s husband is a huge Star Wars fan and had a vision for their new baby boy. This couple had a cousin spend hours, and days, lots of love, hand painting this mural on the wall. And that rug is the perfect thing to top off this nursery!

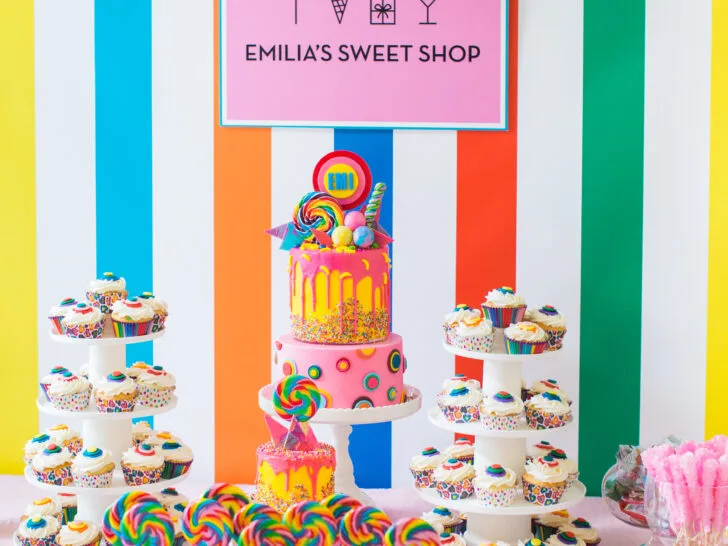
When one of my best friends, Meredith, who I hail as the Queen of Sugary Goodness, suggested a candy themed party for our daughter’s first birthday party, I listened! I did lots of online research, and I was most inspired by the Dylan’s Candy Bar branding. I came up with an invitation design (very draft, as this is not my forte!) and sent it to my very talented friend, Monica, who made my wildest dreams become a reality with my favorite invitation I’ve ever sent out! I mean, it had candy belts in it – so many of which were consumed by my husband and 3 year old prior to getting them out of the door!
I DIYed a few of the party goodies – namely the candy stand with favor bags that my mom sewed and the planter with ‘Watch Emi Grow’ lollipops. The party was a labor of love, but we had a great time and left on a sugar high! I couldn’t ask for me!
More details on my blog here!


Our sweet daughter turned one and we wanted to throw her a little party. My goal is to stay on a budget while still being glam. We set up the dessert table in our kitchen and decorated with stuff we already had. Decorations are mostly DIY. We ordered balloons and a few banners online. I made the cake myself and we did the cake smashing on the floor in our living room. Thanks to my talented husband for capturing these beautiful moments for our daughter to look back when she’s older.


We wanted to do a aquatic life theme for our son, Maddox’s, nursery. I illustrated everything and had them printed on vinyl. He loves it and points to all the animals and objects often. We use it as an opportunity to tell stories and explain who each character is.