


Description
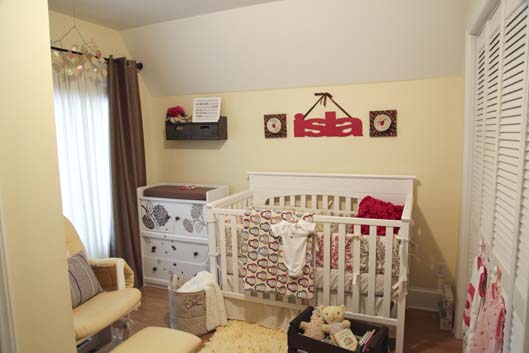
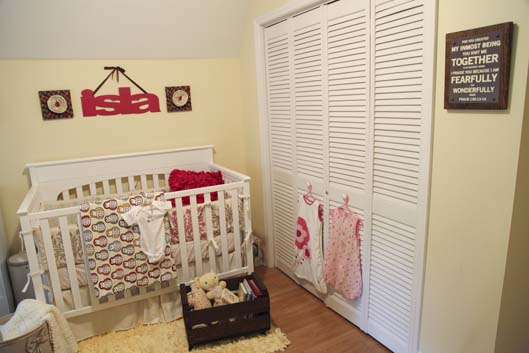
We turned our sitting room into the nursery. We knew we wanted our baby as close to us as possible and on the same floor, so we ended up redoing our sitting room to become our new nursery. We utilized every inch of the space for storage and functionality. Our base colors are cream, brown, and yellow with a pop of raspberry pink. All the wall decor was handmade by daddy to be and me. The changing table was repurporsed and I used wall decals to add more excitement to the piece. We also managed to finish the entire space for under $350, and that's including the major furniture pieces as well!
The lovely http://mcchillinphotography.com/ captured all of our pictures for us!
Design Inspiration
My inspiration for the nursery space was to keep it functional, some what gender neutral for future children and to personalize the decor as much as possible. I also used non conventional things, like wind-chimes above the curtains verses the traditional mobile.
I combed the internet for DIY projects for babies, wall decor and furniture. I decided early on that I wanted to make special keepsake items for my baby girl to be able to use in future rooms as well.
I also knew I wanted to do more sophisticated colors so I chose brown, raspberry pink with a butter cream yellow as the base wall color.
Decorating Style
My decorating style is very eclectic. I love shabby chic, rustic and even contemporary designs, but I have a soft spot for anything DIY. There is something so special and fulfilling about making something yourself.
Project Details
My favorite items in the nursery are the DIY items and most were very easy to make!
I got the personalized name sign above the crib from a deal on www.pickyourplum.com and once it arrived I decided I wanted to add a pop of color so I painted it raspberry pink.
The two flower art pieces hanging beside the name sign I made from canvas, fabric, quilt bunting and rosettes. You can view the entire project here: http://rock-a-byebradbury.blogspot.com/2012/05/diy-fabric-flower-art.html
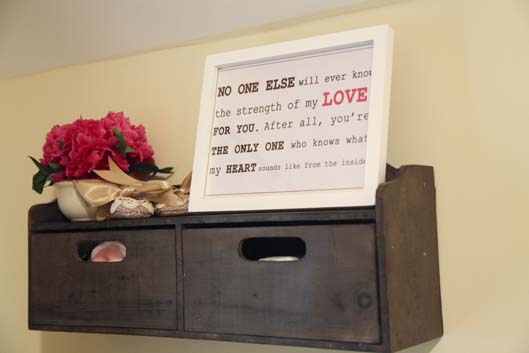
The nursery plaque was an inspirational item I saw on Shanty 2 Chic. You can view the complete tutorial here: http://www.shanty-2-chic.com/2012/02/psalm-139-art-and-free-printable.html
You can see my post here: http://rock-a-byebradbury.blogspot.com/2012/03/diy-bible-verse-art-project.html
I also made the toy box on wheels. Originally, I saw the post on Running with Scissors, http://projectsbyjess.blogspot.com/2012/02/crate-tutorial-rustic-herringbone.html
We already had an old fruit crate so the easiest thing for me to do was to take the one we have and repurpose it. I sanded, stained and attached wheels to the bottom. You can view my blog post here: http://rock-a-byebradbury.blogspot.com/2012/03/fruit-crate-makeover.html
We got the changing table on craigslist.com for only $35. I then painted it white. I found hydrangea wall decals at Joanns and applied these to the front of the table. I was originally planning on stenciling the piece, but found this to be way easier and less time consuming.
Favorite Items
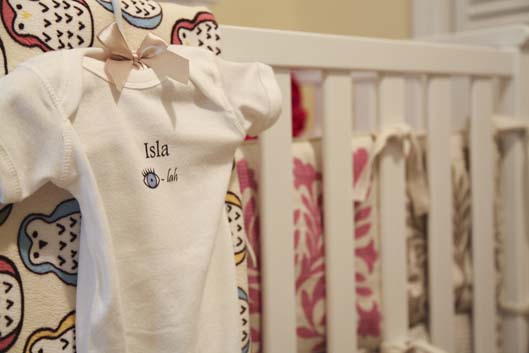
My two favorite items in the nursery are the flower wall art above the crib and the personalized onesie I made from http://www.inktastic.com/
I drew up the image on the onesie in a free program called pixlr.com and then uploaded the image in Ink Tastic's personalized program and then hit ship! Its was so easy to make and I adore it so much that I got it in several sizes.
Advice
My advice is to start with the basic pieces in the room, and after you add each piece think about the direction you want to go for several days before buying any thing else. I found that I changed my mind several times throughout the nursery design process and it helped to step back and really process what I had achieved so far and the next addition I wanted to make.
salman
Monday 4th of June 2012
Love the charming tree! It would be perfect in my little girl's room redo coming soon.kids wall decals
Sarah McMillian
Saturday 2nd of June 2012
This space is done so perfectly. Every last inch of it has a purpose while still being adorable AND easy on the pocket! Great work you two!
Karen Bradbury
Saturday 2nd of June 2012
This is the sweetest little space. Everything is so efficient and functional with a warm touch.