


Description
We turned an upstairs office room into a nursery for our son.
Design Inspiration
The jumping off point for the room's color scheme came from the ABC123 piece we found at a local antique store. After playing around a bit we decided on a robin’s egg blue for the walls. It seemed to work best with the colors in the ABC123 piece (which has been securely screwed to the wall over the crib). Since my husband and I had decided not to find out the gender of the baby, I also felt like I could work with that color and make the room bright and happy while keeping it gender neutral. The bulk of the room was finished before the baby arrived and outfitted with books and mementoes from my husband’s and my childhoods. After the baby arrived – a boy! - a few additional pieces were added for the walls along with some other items we received as gifts.
Decorating Style
I tend to lean towards modern, clean lined items, but definitely have some more traditional tastes, too. I wanted a nursery that would last into the toddler years and wasn't super babyish. We tried to choose furniture that could work for years on down the road and potentially in other rooms in our home.
Project Details
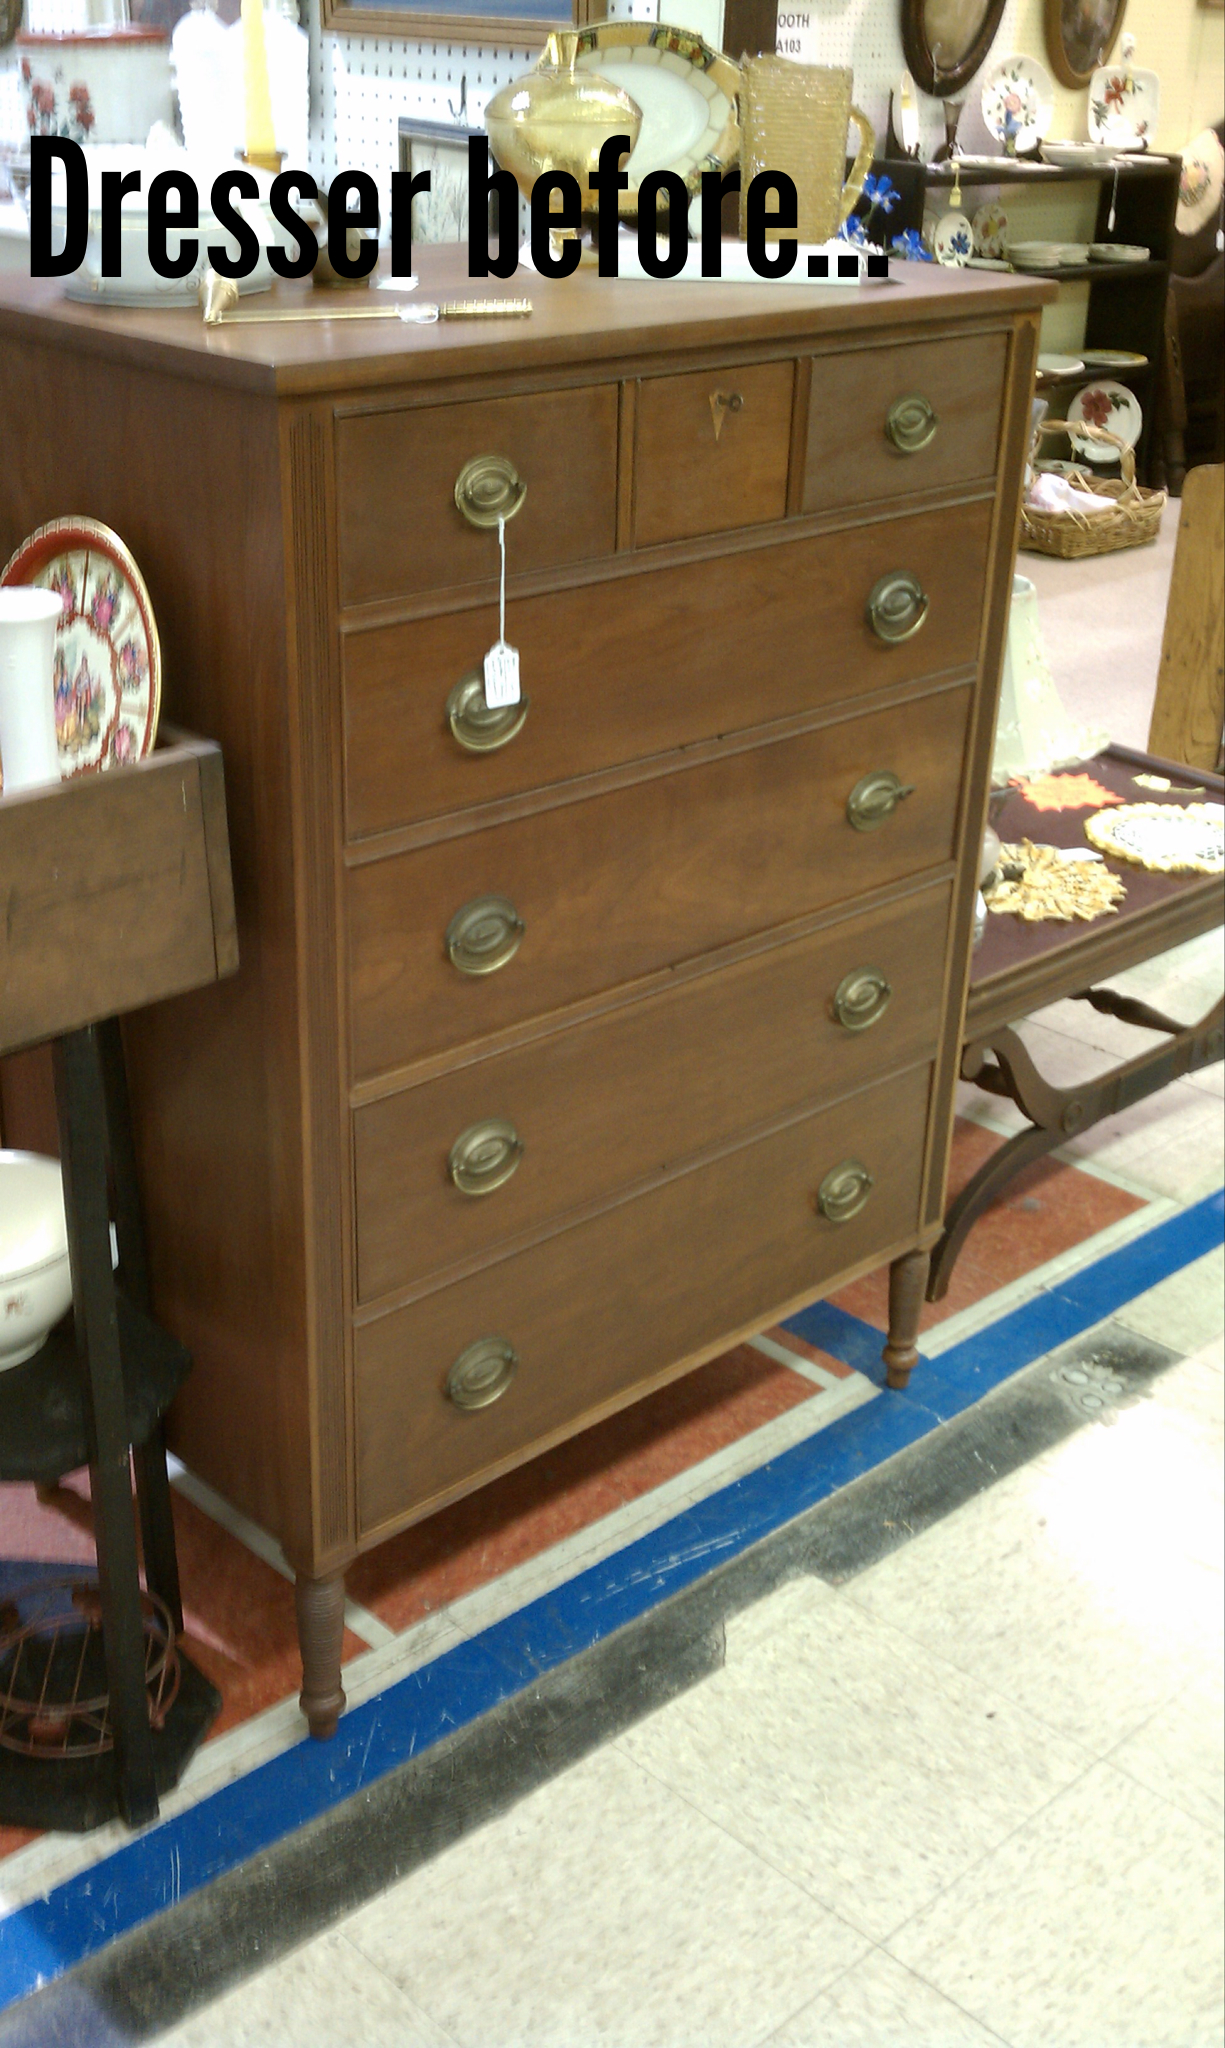
The nursery was previously an office and is both small (approx 8 ‘ x 10’) and very limited in wall space. With window, door, and radiator placement what you see in the pictures is just about the only way the furniture could get placed in the room and still allow for good, useable floor space. This sent me on a hunt for a narrow dresser and an equally small scale-changing table. The dresser was discovered at an antique store and I painted it to coordinate with the other furniture in the room. The changing table is from Ikea.
The chair is actually a platform rocking chair and it was a Craigslist find for $40! It was in sorry (and smelly…) shape when I found it, but I loved its lines and knew that refinished and reupholstered it would be great. I did the refinishing, but had a professional do the reupholstery. We opted for a solid fabric that could move to other rooms in the house when it’s no longer needed in the nursery.
We had a local carpenter build the radiator cover/bookshelf piece. The wall area remaining between the radiator and closet was an awkward space that would otherwise have been unusable. In this small room we needed to make use of every inch! The radiator cover provides much needed surface and storage space and camouflages the fact that the radiator actually is placed rather oddly on that length of wall. The front grill panel is hinged and can be opened up for access to the radiator knobs.
The room is definitely a labor of DIY love. We repainted the walls and trim and I did the curtains, little valances for the carriage windows, shades, crib skirt, lampshades (both the dresser lamp and the blue starburst lamp), and switch plate cover. The shades are just basic room darkening shades dressed up with ribbon. I made the pull out shelf on the changing table from some scrap wood we had on hand and a set of drawer slides from Home Depot. The switch plate cover is made from a card we received when the baby was and some Plexiglas I cut.
Walls: Valspar Gossamer Sky
Crib: Pottery Barn Kendall
Changing Table: Ikea Gulliver
Dresser, rocking chair, ABC123 wall piece: antique stores/Craigslist finds
Storage bins on changing table: Container Store
Fabric for lampshades, crib skirt: Hawthorne Threads
Lampshade supplies for luminary lamp: The Lamp Shop
Crib skirt inspiration from this tutorial. I modified mine somewhat from what is described, but it’s the same idea. Three separate panels that can be adjusted over time.
Window shade inspiration from HGTV.
Duck in hat picture: Elizabeth Soule Photography
Gentleman bear: Berkley Illustration
Bookworm illustration: Minted
VA state print: One Canoe Two
Daisy photo: from a photograph taken by my husband’s father
Favorite Items
I was really pleased with how the radiator cover/bookshelf turned out. I think it looks great and is super functional in the space. I'll also admit that I'm ridiculously pleased with my little pull out shelf on the changing table. It was such a simple little edit to make to the table, but it makes it so much easier to access things while changing a diaper.
Advice
Take your time collecting pieces and try to find things you really like and see the potential in. That way you can use them and enjoy them after their nursery days are over.
Andrea Lowe
Friday 29th of March 2013
You did an awesome job with that chair!
Evan
Tuesday 26th of March 2013
Great work! Love all the detail! love it! How did you make the switch plate cover and you didn't make, where did you buy it?
kwgb
Wednesday 27th of March 2013
Thanks! I did make it. It's the front of a card we received when our son was born. It's sandwiched between 2 pieces of plexiglas. I bought an 8x10 piece of lightweight plexi at Home Depot and used an x-acto to cut two pieces for the front and back of the card and the rectangular opening for the switch. I drilled holes for the 2 screws and the 4 little corner brads I used to hold the two pieces together. It wound up being no thicker than a standard switch plate cover so I put it up with the screws from the plain plate I was replacing.
Christy Roda Dalnas
Tuesday 26th of March 2013
I love the colors you chose. Super nice job.